Install mod_security for better Apache security

Recently I wrote an article to help you secure your Linux Apache Installation (see "Five ways to help secure Apache on Linux").
In that article I mentioned using Apache's mod_security, but didn't have the room for a tutorial on its installation. Well, here's the how to on installing this outstanding helper for Apache security.
What is mod_security?
The mod_security addition to Apache is a modular way to add or remove various security features to your Apache server. You can add or remove these modules by simply adding or removing (or commenting out) lines to your httpd.conf file and restarting the httpd daemon. And installing mod_rewrite is as easy as it is to install.
Getting and installing
I am going to take you through the installation of mod_security on a CentOS distribution. There will be a combination of using yum and installing from source. I will assume Apache is already installed.
There are a few ways to install this package. You can install from source, but that will require you install numerous dependencies just for the compilation alone. Since we're looking at CentOS (and this will apply to Red Hat and Fedora as well) you can use Yum for easy installation. But if you fire Yum up you will find that mod_security is not in the standard repositories.
Fortunately there is an easy way to add a repo for this installation. The command to add the repository is:
su -c 'rpm -Uvh http://dl.fedoraproject.org/pub/epel/7/x86_64/Packages/e/epel-release-7-11.noarch.rpm'
You will have to answer 'Y' to a couple of questions to finish the installation. Once you have added the repository issue the command:
yum install mod_security
to install the system. You will have to accept any dependencies needed for your system to complete the installation. Once mod_security is installed you are ready to get it up and running on your Apache server.
Note that you can also run yum install mod_security mod_security_crs to install with predefined rules.
Basic configuration
Issue the command:
grep -n security2_module httpd.conf
from within the /etc/httpd/conf/ directory. If you do not see any output that means you have to add the directive to your httpd.conf file. This is simple. At the end of your module loading section add the following line:
LoadModule security2_module modules/mod_security2.so
Now save the file and restart Apache with the command:
/etc/rc.d/init.d/httpd restart
You should not receive any errors at this point.
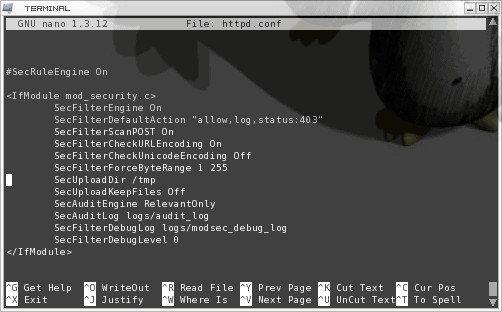
The most difficult aspect of using mod_security is the the IfModule section in the httpd.conf file. The reason this section is so complex is because there are so many possible options. The best chance you have of getting familar with this is by taking a glance at the Configuration Directives page on the mod_security web site. To give you an example of a configuration directive section take a look at the following sample in Figure 1.

As you can see this section seems fairly complex. But this is mostly a basic sample of what mod_security can do. In this sample we do the following:
- SecFilterEngine On: Start the engine
- SecFilterDefaultAction: Set the default action for the module. Notice in the sample code i have the default action set to "allow". For higher security you will want to set this to "deny".
- SecFilterScanPOST: Tell mod_security to scan Payloads as well as Get requests.
- SecFilterCheckURLEncoding: Check for valid hex values in requests.
- SecFilterCheckUnicoding: Set this to off if your web site does not use unicoding.
- SecFilterForceByteRange: Set allowable ascii values in GET request and in FORM data posts.
- SecUploadDir: Set the upload directory.
- SecUploadKeepFiles: This must be set to On for the above to be used. For security's sake you want to set it to Off so upload files are not saved.
- SecAuditEngine: Enables the logging facility. This value is set to either RelevantOnly or DynamicOrRelevant.
- SecAuditLog: The location of the log file.
- SecFilterDebugLog: Set the debug log file.
- SecFilterDebugLevel: Set the debug level.
That is the minimum directives I would employ for your mod_security configuration.
Once you finish this section, restart Apache again and enjoy a much more secure Apache server.
Final thoughts
Of course this just scratches the surface of mod_security. To really get the most of this powerful feature you will want to really comb through the directives section on the mod_security site.


You should update the first part about adding the repo to
su -c ‘rpm -Uvh http://download.fedora.redhat.com/pub/epel/5/i386/epel-release-5-4.noarch.rpm‘
really useful article thank you Jack
Hoi Martin great article (super easy read) again and also great link to the Modsecurity, reference manual. This is really helping me on the way. I repeat my (hopeful humble enough) request for (much) more security info articles and security links, if possible in the (ferry) near future.