Encrypting email in Claws Mail

YACMA (Yet Another Claws Mail Article). Recently you may have taken a look at my Claws Mail articles: "Claws Mail: The unsung powerhouse email client." and "Claws Mail: Must have plugins." Hopefully you have discovered how powerful Claws mail is.
Like all good email clients, Claws Mail can handle PGP encryption for your outgoing and incoming email. But like many of the advanced features of Claws Mail, PGP is added with the help of plugins. Once you load these plugins, encrypting and decrypting email is simple. Let's take a look and see how it's done.
Loading the plugins
The first thing you have to do is to load up the correct plugins. Loading plugins is simple with Claws Mail. Click on the Configuration menu and select the Plugins entry. A new window will open up where you select the plugins you need to load. There are three plugins specific to PGP that you will want to load up (you have to load them one at a time.) They are: PGP/Core, PGP/inline, and PGP/MIME. The PGP/Core plugin is a neceisity as it is the core of the Claws Mail PGP system. The other two plugins handle the PGP feature in different ways. If you want to send your encrypted messages as attachments you will use the PGP/MIME plugin. If you want to send your encrypted messages in line you will use the PGP/inline plugin. Simple.
Configuration
Once you have the plugins loaded you can go to the Configuration menu and select Preferences. If you scroll down in that window you will see GPG listed under Plugins. Click on GPG and you will the few options available for this plugin. The options available are:
- Automatically check signatures
- Use gpg-agent to manage passwords
- Store passphrase in memory
- Grab input while entering a passphrase
- Display warning on startup if GPG doesn't work
That's it. The default values should work just fine. Now, let's move on to actual use.
Encrypting and signing an email
After you compose an email you will need to encrypt and/or sign the email. If you click on the Options menu you will see the Privacy System sub-menu. Click on that to reveal all possible choices. The choices listed will depend upon what plugins you have loaded. If you load all three of the plugins you will have three entries in the Privacy System menu:
- None: Use no encryption
- PGP Inline: Encrypt your message inline.
- PGP MIME: Encrypt your message and add it as an attachment.
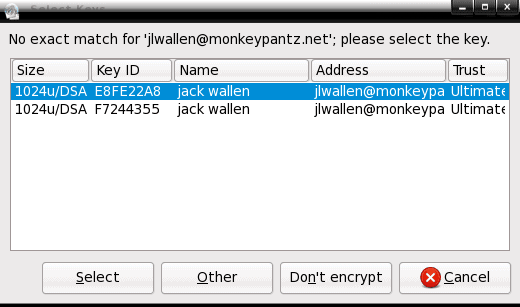
After you make your choice go back to the Privacy System sub-menu and select Sign and/or Encrypt. Once you have everything set click the Send button. The first thing you will see is an Encryption warning. You can uncheck this so it doesn't appear every time. After you click through this warning a window will appear where you can select the encryption key to use. If you only have one (and it is associated as the defalt key for the address) you may not see this window (see Figure 1). After you select the key, click Select (which will dismiss the Select Key window) and then click the Send button to send your email.
Decrypting email
This is the easy part. NOTE: In order to use this feature you have to have the keys imported that you are to use. If you have a key imported into your systems' PGP all you will have to do is enter the passphrase for the key. When you do that the incoming mail will be decrypted. Simple.
Final thoughts
I have found the Claws Mail pgp system to be the best of breed of any email client I have used. I think you will find it as easy to use and as reliable and powerful as I did. The only downfall is that there isn't a plugin for importing keys. Maybe that will come in the future.
Advertisement


These instructions left out how to import the keys I want to use. If I want to encrypt a message I can’t just encrypt it and send it, I have to use the other guys public key and I need my own key pair. I don’t know how. I’m trying to learn how to use this freeking thing and I’m stuck again after trying for hours because these instructions left out some really important steps. This really sucks. I’m so frustrated right now I could kill my computer.
Holy crap! It took me almost an hour to find this information about the plugins. It isn’t mentioned in any of the manuals or the FAQs. Great thanks goes to Jack Allen.
To import a key using Claws Mail can be done in 2 ways, depending on whether the message is mime-signed or inline-signed.
* Mime-signed
This is the easiest one. Simply select the signature part (application/pgp-signature) of the message in the mime icons list on the right of the message text. This will then raise the ‘key import’ dialogue. Click the ‘Yes’ button and the key will be searched for and retrieved from the default keyserver, as configured in ~/.gnupg/gpg.conf
* inline-signed
Create an Action (/Configuration/Actions) that has the following command, changing the keyserver to suit your tastes:
ID=`gpg --verify %p 3>&1 1>&2 2>&3 |grep "key ID"|tr -d "[:space:]"|tail -c8`;echo "==== Fetching $ID ===="; gpg --no-tty --keyserver wwwkeys.nl.pgp.net --recv-keys $IDThen, with the message selected and opened, run that Action (/Tools/Actions/…).
HTH,
Paul