Post to multiple accounts with Gwibber

Do you microblog to multiple accounts but find yourself posting the same thing to each account? If so it can be a hassle to log into each site or open up each client just to say "I'm eating my Frosted Kibble while reading the latest articles on ghacks." Wouldn't it be nice to have one client to use to post to Twitter, Jaiku, Identi.ca, Facebook, Flickr, Digg, and RSS? Well it's real and it's called Gwibber. Gwibber is a GNOME client written in Python and GTK that resides in your Panel (or on your desktop) and allows you to quickly make updates to your microblogging sites (or even your RSS feed). It's easy to install, configure, and use.
Installing Gwibber
It shouldn't matter what distribution you are using. Open up your Add/Remove Software utility (in GNOME this is found at the bottom of the Applications menu), do a search for "gwibber" (no quotes), select the results, and click apply to install. Or if you'd rather install via command line you can issue a command similar to one of these:
sudo apt-get install gwibber
or
yum install gwibber
Once Gwibber is installed you are ready to fire it up.
Adding accounts
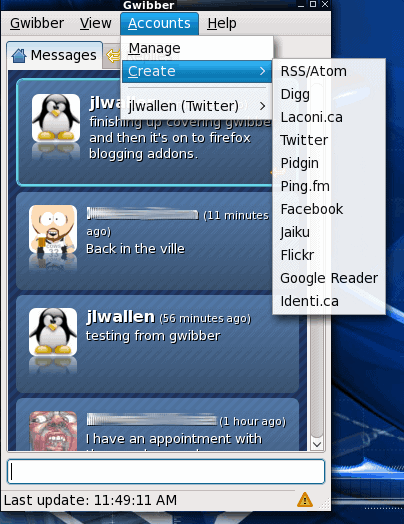
The first thing you will need to do is add an account to Gwibber. This is a fairly intuitive process. Click on the Accounts menu and select Create. When the Create submenu expands you will see all of the different types of accounts you can use with Gwibber.
Let's add a Twitter account to Gwibber (would you be "Gwibbing" instead of "Tweeting"?)Â Select Twitter from the listing which will open up a small window (see Figure 1). There is very little information you need to add:
- Username - Your Twitter user name.
- Password - Your Twitter password.
- Receive messages - Do you want Gwibber to show your incoming messages?
- Sending messages - Do you want Gwibber to be able to send messages to your account.
Once you fill in the information click OK. At first you may think nothing is happening. Give Gwibber time before you assume something is wrong because it takes a bit of time for the authentication to happen.
Most of the accounts, you will find, as as simple as this to set up. The only account that might trip you up is Facebook
Posting to Facebook

In order to post to facebook you will have to authorize Facebook to use Gwibber for posting. To do this you have to get an authorization key from Facebook. Make sure you are logged into your Facebook account before you request the key. Select Facebook from the Create submenu which will open up a similar window to the one you used to configure your Twitter account. The primary difference is there is no username/password to add. Instead you have to authorize Gwibber for your Facebook account. Click the Authorize Gwibber button which will open up a new window (see Figure 2). Click on the Request Login Code which will open up your browser to a page with a key on it. Enter that key in the text area of the Facebook Authorization window and click Apply. Now click on the Authorize Satus Changes button and you will then be taken back to Facebook where you will authorize Gwibber to post to your account. It's a sort of back and forth that might sound complicated, but it's very simple. And once you are done there is nothing more to take care of besides the posting.
Final thoughts
Gwibber is a great way to post to multiple microblogging accounts. The only drawback is you will be posting the same thing to all of your accounts.
Advertisement