Building an USB Rescue Stick for Windows XP Part 2
This is the second part of the article that explains how to build an USB Rescue Stick for Windows XP. The first dealt with all the preparations, while this one deals with the creation of the bootable USB stick and the configuration of it.
Start pebuilder.exe which is located in the BartPe folder. Select No at the beginning and put your Windows XP disc in the drive. Now browse to the drive in Source and pick the drive letter of the CD.
Click on Build afterwards and Yes to create the new directory. Bart PE processes the files on the disk now and should end the process without Warnings.
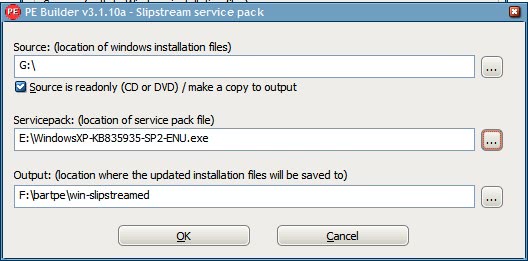
Please note that this is only working if you have Windows XP with Service Pack 2 on the disk. If you have an old CD you need to download the Service Pack 2 from Microsoft so that it can be integrated. Click on Source > Slipstream in Bart PE afterwards, check that Source is read only and add the downloaded Service Pack 2 under Service pack. Click on OK afterwards. Below is a screenshot of that process. You can add newer service packs if available as well using the method.
Move the folder srsp1 into the newly created BartPE directory (the directory where all the files from the Windows XP Cd have been copied into, not the root folder with pebuilder.exe).
Adding additional applications:
The default USB Rescue Stick includes several useful applications such as Check Disk and a File Manager. It is possible to add additional applications, called plugins, to the Rescue Stick. I would suggest to at least include a CD Burning Program and some applications that scan the computer for Trojans and Malicious software.
The plugins listing at the official website lists a lot of plugins, I would like to explain how plugins are added and leave it up to you which you add to your Rescue Stick.
If you click on the Plugins button you notice the enabled tab which either says YES or NO. No means the plugin is not installed yet. I will use the Irfanview example to explain how to add plugins that have not been enabled yet. Those require additional files most of the time.
Mark the IrfanView row and click on help. A website should pop up explaining what to do. In this case two files from the IrfanView software that can be downloaded from the IrfanView developers have to be added to the BartPE plugins directory.
A great plugin package can be downloaded from the WinBoard, it adds plugins for Firefox, 7-Zip, Acrobat Reader, several routers, Putty and Raid drivers (which I had to deactivate because they created an error during installation).
Creating the bootable USB Stick:
Open the command window again and use the following command from within the root BartPe folder to copy the files to the USB stick. (g: is the drive letter that could be different on your computer.)
pe2usb -f g:







my friend please fix this statment: “Move the folder srsp1 into the newly created BartPE directory (the directory where all the files from the Windows XP Cd have been copied into, not the root folder with pebuilder.exe).”