Compile your own Linux kernel

Back in the old days, the compiling of a Linux kernel was often a necessity. If you wanted to get a particular piece of hardware working or if you wanted to prune some of the "fat" from the kernel you had to compile a kernel specific to your machine. It was never an easy process (at least until you got the hang of it) and always took a long period of time.
So why bother with it now? When machines are large and fast enough to not have to worry about such issues as extra kernel modules or space? There are still plenty of reasons for wanting to compile your own kernel. One of those reasons is the experience. Nothing says "Linux" like compiling ones own kernel. But beyond that - gaining as much performance out of your server or eking out a bit more security are two fine examples as to why one should learn how to compile their own kernel.
In this article, I am going to show you how to do just that - compile your own Linux kernel.
A word of warning
Before you attempt this task, it's best that you read through this document in its entirety, instead of just marching through, step by step. You will also want to make sure you keep a working kernel on your system. That way, if the kernel you build doesn't work, you will have one to fall back on.
Also, my intention with this is to be as generic as possible. There might be tools or tasks that are specific to your distribution. If you find something is lacking for your particular distribution, or a particular step isn't working for your distribution, please not it in the comments so it can be resolved.
What you will need
You won't need much more than the latest kernel source (download the latest from kernel.org), you will need to make sure you have gcc installed, and you will need a lot of patience. This process can take a lot of time...so make sure you have plenty of time blocked off.
If you do not have gcc installed you can do so with a command similar to either of these (depending upon your distribution):
sudo apt-get install gcc
yum install gcc
NOTE: The latter command will require you to su to root first.
Much of the kernel building process will require root access.
The compilation process
Now it's time to do the work. I will list out the steps for compilation:
Unpack the source code into /usr/src/ with the command tar -xjvf linux-2.6.XXX.tar.bz2 -C /usr/src. Where XXX is the release number.
Move into the newly created /usr/src/2.6.XXX directory with the command mv /usr/src/linux-2.6.XXX (Where XXX is the release number).
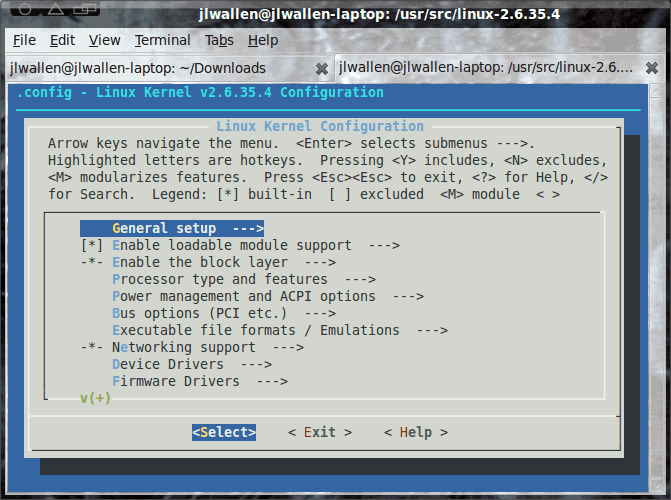
Issue the command make menuconfig.
At this ncurses based you will need to go through the entire kernel and remove (or add) the modules that you want. This can take some time, so go through this step very carefully.
Once you have finished selecting all modules exit out of that tool and issue the command make. This will compile the kernel.
After the initial make is complete issue the command make modules to compile the modules for your kernel.
Now it's time to install the kernel modules with the command make modules_install.
Now, install the kernel with the command make install.
The above last command will install the following files into /boot:
- System.map-2.6.XXX
- config-2.6.XXX
- vmlinuz-2.6.XXX
Where XXX is the release number.
Now you have to create the initrd file with the commands:
cd /boot/ Where XXX is the release number.
mkinitrd -o initrd.img-2.6.XXX 2.6.XXX
You now have to update Grup to include the new kernel. This will depend upon the distribution you are using. For this we will tackle in a separate article.
Final thoughts
You have just compiled your first Linux kernel. You may not even have a need to do this, but it's always good to have an understanding of what old school Linux users had to go through. To be honest, I haven't had to compile my own kernel for quite a while. But knowing how to do is allows you to have complete control over your Linux system.
Advertisement


Linux 2.6 Version
http://reddragon-linux.blogspot.com/2011/05/linux-custom-kernel-compilation.html
jg
Seems I forgot about the
“Move into the newly created /usr/src/2.6.XXX directory with the command mv /usr/src/linux-2.6.XXX (Where XXX is the release number).”
Really now??
It’s much safer to build the kernel while NOT root (builds have been broken before because of this). It isn’t like this requires any more work–just put the kernel in ~/src (assuming nothing is already there). Then only make modules_install, make install and mkinitrd require root privilege.
Also, make modules is only required if you want to build ONLY the modules. Simply running make will make all the modules and make module_install will install them.
If you have multiple cores, you should also do make -j# where # is two times the amount of cores on your system (e.g. make -j4 for a dual core processor). This will speed up the compilation time by quite a bit.
Overall, I have to say this was a pretty disappointing and poorly researched article, it really isn’t that hard to find good sources on compiling and installing your own kernel.
mkinitramfs* (that should be pretty much ubiquitous now), not mkinitrd, sorry for the billions of replies.