How to create email filters on Gmail

Martin Brinkmann
Jan 6, 2015
Email, Gmail
|
4

Filters are a great tool to process emails automatically on Gmail. You can create filters to apply labels to filters automatically, prevent that it ever lands in spam, or forward emails automatically.

To configure filters, you need to open the Gmail website in your browser of choice and sign in to your Google account first.

Once you have done that, you have three main options to add filters on Gmail. The first two options are available right on the frontpage while the third is listed on the settings page.

Before we explore how to create and manage filters, it may be useful to list a few use cases for them:

  1. Make sure important emails, work or family, never land in spam.
  2. Automatically archive emails that you have no use for.
  3. Forward specific emails to another account of yours or a business partner's account.
  4. Filter all large emails automatically.
  5. Delete annoying emails automatically.
  6. Label emails automatically.

Lets take a look at all of them first before going through the options you have to create filters:

1. Search

gmail search filter

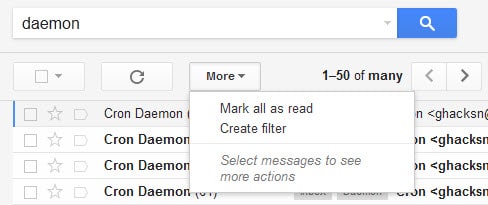
Search for something on Gmail, an email address, subject or any text. Once the results are displayed click on the more button and select Create Filter from the context menu that opens up.

2. Individual Messages

filter messages like this

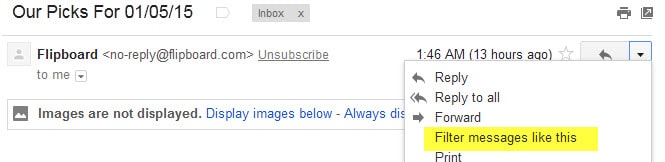
Select any message on the Gmail website so that its contents are displayed in the lower half of the interface. There you need to click on the down arrow icon next to the reply button and select filter messages like this from the context menu.

3. Filter Settings

create filter gmail

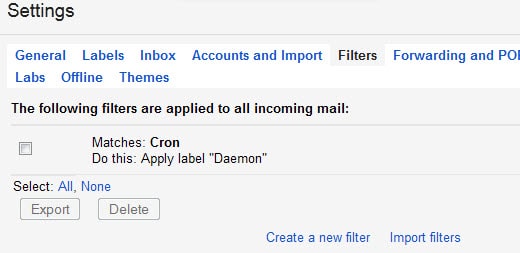
Click on the cogwheel icon in the upper right corner of the Gmail interface and select settings from the context menu. This opens the Settings page.

Click on Filters there at the top, and then on create a new filter on the page that opens up.

Step 2: Configuring the Filter

filter

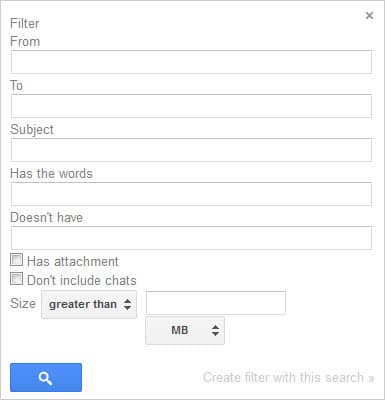
Once you have made a selection, the create filter menu opens up. This is the first page of the menu which you use to define what you want filtered.

The options are:

  1. From - Sender information. You can add email addresses here but also names.
  2. To - The recipient of the email.
  3. Subject - All or part of the subject.
  4. Has the words - This checks if the words you specify here are used in the email, for instance in its body.
  5. Doesn't have - Words that should not be in that mail.
  6. Has attachment - Needs to have attachments if selected.
  7. Don't include chats
  8. Size greater than - The size of the email needs to be greater or less than the specified size.

You can mix as many fields and options as you want for the filter. Once you have done so, step 3 follows.

Step 3: Define what you want done with matching emails

actions

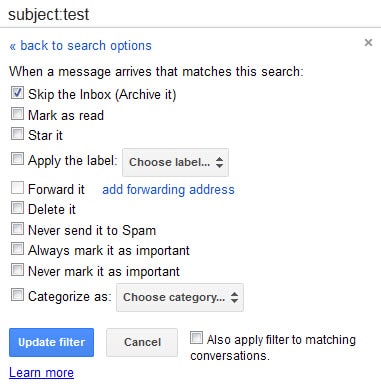
Now that you have configured which emails you want filtered automatically from that point on, you need to define the action or actions you want Gmail to run.

  1. Skip the inbox - This archives the email automatically and does not display it in the inbox at all.
  2. Mark as read.
  3. Star it.
  4. Apply a label.
  5. Forward it to another email address.
  6. Delete it.
  7. Never send it to spam to make sure it is always considered legitimate.
  8. Always mark as important.
  9. Never mark as important.
  10. Categorize it.

Click on create filter to add it to Gmail. It is immediately active once you have done that.

Manage existing filters

You can manage all existing filters in the settings. There you can edit filters that you have created previously or delete filters right away if you have no need for them anymore.

Now You: are you using filters? Have any tips you want to share?

Summary
How to create email filters on Gmail
Article Name
How to create email filters on Gmail
Description
Find out how to create filters on Gmail to process emails in a variety of ways automatically.
Author
Advertisement

Tutorials & Tips


Previous Post: «
Next Post: «

Comments

  1. JMGG said on January 19, 2012 at 8:25 am
    Reply

    You said that Outlook isn’t your main email client, so which is your main one?

    1. BalaC said on January 19, 2012 at 9:42 am
      Reply

      I think its thunderbird

    2. Martin Brinkmann said on January 19, 2012 at 10:15 am
      Reply

      It is Mozilla Thunderbird.

  2. Salaam said on September 24, 2012 at 9:52 pm
    Reply

    Awesome! This actually solved my problem… what a stupid bug.

  3. Claud said on December 19, 2012 at 2:08 am
    Reply

    If this is the same bug that I’ve encountered, there may be another fix: (1) hover over open Outlook item in Taskbar, cursor up to hover over Outlook window item, and right-click; (2) this should give you Restore / Move / Size / Minimize / Maximize — choose Move or Size; (3) use your cursor keys, going arbitrarily N/S/E/W, to try to move or size the Outlook window back into view. Basically, the app behaves as though it were open in a 0x0 window, or at a location that’s offscreen, and this will frequently work to resize and/or move the window. Don’t forget to close while resized/moved, so that Outlook remembers the size/position for next time.

    1. Lynda said on February 12, 2013 at 3:37 pm
      Reply

      THANK YOU Claude!!! I could get the main window to launch but could not get any other message window to show on the desktop. You are my hero!!!!

    2. Chad said on November 20, 2018 at 4:24 pm
      Reply

      Solved my issue! 6 years later and this is still problem…

    3. Ivan X said on January 21, 2021 at 4:50 pm
      Reply

      Fantastic. Thank you. Size did the trick.

  4. Andrew said on October 26, 2013 at 7:06 am
    Reply

    This solved my Outlook problem, too. Thank you. :)

  5. Charles said on December 7, 2013 at 7:23 pm
    Reply

    Thank you so much, this started happening to me today and was causing big problems. You are a life saver, I hope I can help you in some way some day.

  6. garth said on November 7, 2014 at 7:13 pm
    Reply

    You are a god – thank you!

  7. Faisal said on February 9, 2015 at 10:09 am
    Reply

    thanks a lot…. work like charm.. :-)

  8. Simon said on March 24, 2015 at 11:36 pm
    Reply

    Yah…thanks Claude. I’ve been having the same problem and tried all the suggestions…your solution was the answer. It had resized itself to a 0/0 box. Cheers

  9. Olu said on April 14, 2015 at 1:35 pm
    Reply

    Excellent post. This had me baffled even trying to accurately describe the problem. This fixed it for me.
    Thank you

  10. Coenig said on July 23, 2015 at 7:36 am
    Reply

    Thanks a lot for the article. Don’t know why it happenend, don’t know how it got fixed, but it was really annoying and now it works :-)

  11. Fali said on January 20, 2016 at 4:19 pm
    Reply

    Thanks a lot. I was facing this issue from past 3 week. I tried everything but no resolution. The issue was happening intermittently and mainly when I was changing the display of screen ( as i use 2 monitors). The only option i had was to do system restore. But thanks to you.

    1. MIki said on January 10, 2019 at 11:54 am
      Reply

      I’ve been tried to sole this problem for 12hours. Your comment about changing the display of screen helped me a lot!! Thanks!!

  12. Christina said on January 20, 2016 at 6:14 pm
    Reply

    Thank you…don’t know why this happened but your instructions helped me fix it. Running Windows 10 and office pro 2007

  13. Oz said on July 22, 2016 at 3:20 pm
    Reply

    Great tip! Thanks!

  14. Tracy said on September 1, 2016 at 4:48 pm
    Reply

    Worked for me, too – thank you!!!

  15. shawn said on September 9, 2016 at 10:25 am
    Reply

    It’s Worked for me, too
    thank you very much!

  16. Jari said on October 31, 2016 at 11:53 am
    Reply

    I had a similar issue with Outlook 2013 on Windows 10 and this helped me to fix it. Thank you very much!

  17. Michel H said on November 30, 2016 at 11:08 pm
    Reply

    Thank you so much. Solved!
    Considering you published this in 2012, incredible not been debugged by Microsoft.
    Thank you again. M

  18. Ziad Bitar said on January 9, 2017 at 2:00 am
    Reply

    This problem was faced by only one user logging to TS 2008 r2 using outlook 2010.The issue was resolved.

    Thanks.

  19. Anonymous said on February 15, 2017 at 5:24 pm
    Reply

    Great tip. Thank you!!!! If it helps, I had to use the Control Key and the arrow keys at the same time to bring my window back into view. Worked like a charm.

  20. Rochelle said on March 6, 2017 at 11:59 am
    Reply

    Thank you, this worked !!!!

  21. anom1234 said on May 20, 2018 at 11:20 pm
    Reply

    Man, you are a fucking god. Thanks a lot, what an annoying bug!!

  22. JC said on October 12, 2020 at 2:14 pm
    Reply

    Awesome, this post solved the issue. Many thanks!

Leave a Reply

Check the box to consent to your data being stored in line with the guidelines set out in our privacy policy

We love comments and welcome thoughtful and civilized discussion. Rudeness and personal attacks will not be tolerated. Please stay on-topic.
Please note that your comment may not appear immediately after you post it.