Connect to your Samba server from Linux

I have written a few articles on Samba here on Ghacks. And most people know how to connect to Samba shares via Windows. Generally speaking (when all is set up correctly) it's just a matter of opening up Explorer and entering \\ADDRESS_OF_SAMBA_SERVER\SHARENAME to get to your Samba shares. But what about in Linux? How do you go about connecting to Samba shares with the same operating system that is running the Samba server?
One would think that an easy task. It actually is, once you know how it is done. Â And in this article I am going to show you two different ways of making the connection to your Samba server. You will need to have a working knowledge of how the Samba server is set up as well as a username/password configured on the Samba server. There are also a few steps to take on the desktop for one certain method of connection.
The two methods I will describe are: Using GNOME's Connect To Server dialog and the command line. The latter will be used to show you how to set up auto mounting for Samba.
The graphical method
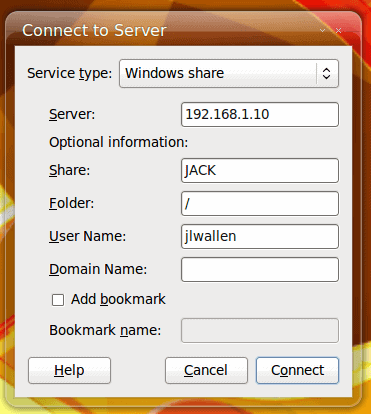
If you take a look at the GNOME Places menu you will see an entry labeled "Connect to server...". This is what you want to use in order to connect to your Samba server. When you click on that a new window will open. From the Service type drop-down select "Windows share" (see Figure 1).
When you select that entry some of the configuration options will change. As you can see (in Figure 1), I have entered the necessary options to connect to a Samba server on my internal network. You will want to replace the information so it reflects your needs. The only tricky bit of information might be the Folder entry. If you are connecting to the root directory on the share you will not need to enter anything there. Say, for instance, you share is /media/samba/user. If you want to connect to that directory leave the Folder entry blank. Say, however, you want to connect directly to a sub-folder within that share - you can enter that folder here. This, of course, isn't needed because you can always traverse the sub-directories with simple navigation. You can also choose to add a bookmark instantly, from in this window.
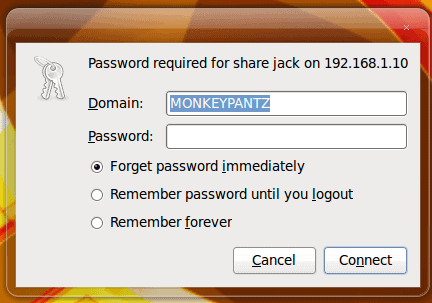
Once you have all of the information entered click Connect and you will be greeted with a new window that requires you to enter a password. Also, if you do not supply a Domain name in the previous window, you will be required to enter it here.
You can also set this up to remember your password either until you logout or until, well, forever. Once you have entered the password/domain click the Connect button and a new Nautilus window will open inside of your Samba Share.
Using the command line
Now we're going to use the command line to accomplish a similar goal. The biggest difference is that we are going to actually mount the Samba share into another directory, very much the same way we would mount a second hard drive.
There are a few pieces to put together before we actually take care of the mounting. First let's create a directory that the Samba share will be mounted to. So from the terminal window issue the following command:
sudo mkdir /media/samba
Now let's make sure our users can read/write to this directory with the command:
sudo chmod -R u+rw /media/samba
Okay now let's make sure we can see the Samba shares from the command line. We'll do that with the smbclient command like so:
smbclient -L //SAMBA_SERVER_ADDRESS
Where SAMBA_SERVER_ADDRESS is the actual IP address of the Samba server.

You will be prompted for your username and password. If you get an error it could be that the usernames don't match on each end. If that's the case you could add the -U switch to the command like so:
smbclient --user=jlwallen -L  //SAMBA_SERVER_ADDRESS
You should see output similar to that shown in Figure 3.
Now it's time to try to mount the Samba share to the /media/samba directory. To do this issue the command:
sudo mount -t cifs //SAMBA_SERVER_ADDRESS/SHARE -o username=USERNAME /media/samba/
Where:
- SAMBA_SERVER_ADDRESS is the IP address of the Samba server.
- SHARE is the share name.
- USERNAME is the username to connect with.
If that works you can now make this an automated mount by adding the following line to your /etc/fstab file:
//SAMBA_SERVER_ADDRESS/SHARE   /media/samba   cifs  credentials=/etc/samba/user.cred 0 0
Where SAMBA_SERVER_ADDRESS is the IP address of the Samba server and SHARE is the share name.
Notice the user.cred file. This is one last thing we need to create. With your text editor create this file and place into it:
username=USER
password=PASSWORD
Where USER is the username to log in with and PASSWORD is the password to use for authentication. The final step is the give this new file the proper permissions with the command:
sudo chmod 600 /etc/samba/user.cred
You can ensure this works by issuing the command mount -a which should mount your Samba share.
Final thoughts
You should now have an auto-mounting Samba share - or the ability to easily connect your GNOME desktop to a Samba share. Samba is a very powerful tool that not only can share files with Windows machines, but with Linux machines as well.
Advertisement


time travelling never felt so good. thank yooooouuuuuu
Thanks a lot.
Doesn’t work for me.
Samba is on Linux server and windows users connect just fine. Connecting from Linux machine is also easy via file browser like this smb://login@server/share/ But i also want to connect via terminal. How do i do it?
For some reason it mounts the share(even though cifs is used) but doesn’t grant me access to a folder.
sudo mount -t cifs //SAMBA_SERVER_ADDRESS/SHARE -o username=USERNAME /media/samba/
Also i can screw up permissions in there by assigining my own on already mounted folder =) but still can’t access the files =(
Thank you so much Jack!
I am a new Linux user, and could not connect to my router’s sbm share.
your article help me solve this issue.
Best Regards,
YZ Hao
Jack,
I want to thank you for your great article. This article did for me what Synology Disk Stations Customer Service, could not do. Thanks a lot, and please keep the great work going.
Best Regards,
GSaltar
Great tutorial, been wondering how to do this for an AGE.
Great write up. Thanks for explaining this.
Whatever im a hot chick who needs a hot girlfriend
its 2021 now.. and no one has replied to u in 12 yrs.. hmmmm