How To Encrypt Files, Folders With EFS
The Encrypting File System (EFS) has been part of all professional versions of Windows since Windows 2000. The feature provides file level encryption for data stored on NTFS systems, and is directly linked to a specific user account on an operating system. Only the user who encrypted the files and folders will be able to access them after they have been encrypted. The encrypted data is protected from outside access as well, as it cannot be accessed by booting into another operating system or analysis of the hard drive.
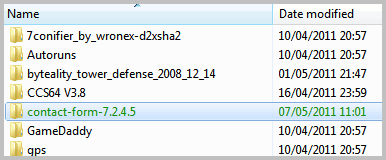
For the user in question, the files and folders appear as any other files on the system, with the exception that they are are highlighted in green.
Here are some examples of where it may make sense to use EFS encryption:
- Protecting your Dropbox configuration files
- Protecting your KeePass database, or another database
- Protecting files that you do not want anyone else to open, ever
EFS Support
The following versions and editions of Windows support EFS:
- Windows 2000, XP Professional
- Windows Server (all)
- Windows Vista Business, Enterprise, Ultimate
- Windows 7 Professional, Enterprise, Ultimate
Encrypting Data With EFS
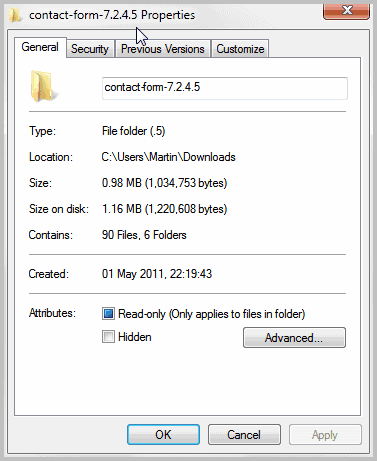
You can encrypt data in Windows Explorer. Select one or multiple files and folders in Windows Explorer, right-click the selection afterwards and select Properties from the context menu.

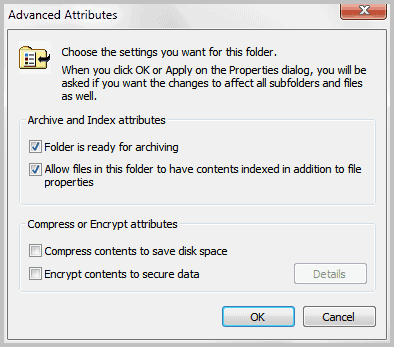
Click on Advanced and locate Encrypt contents to secure data on the new window. If you have selected at least one folder, you will be asked if you only want to encrypt the root files of that folder, or files in sub-folders as well.
The files and folder in question are then displayed in green in Windows Explorer. Congratulations, you have just encrypted your first files or folders with EFS.
You can work with the files and folders normally as long as you are logged into the right user account. Please note that even system administrators cannot access the encrypted files.
Decrypting Data With The Encrypting File System
The time may come where you may want to decrypt the data, for instance before moving the files to a new computer system. This is done by repeating the exact same process.
Select the files and folders, right-click on them afterwards and select Properties. Click on the Advanced button and remove the checkmark from Encrypt contents to secure data.
EFS Backup
The encryption is directly linked to the account and password, which means that any change to the password or account has the effect that the files cannot be decrypted anymore. This can be problematic, considering that you may forget your account password, which would then make all encrypted files inaccessible.
Backup is the solution in this case. Microsoft Windows generates a certificate after you have used EFS for the first time. You can backup the certificate to restore file access even if the account or operating system changes.
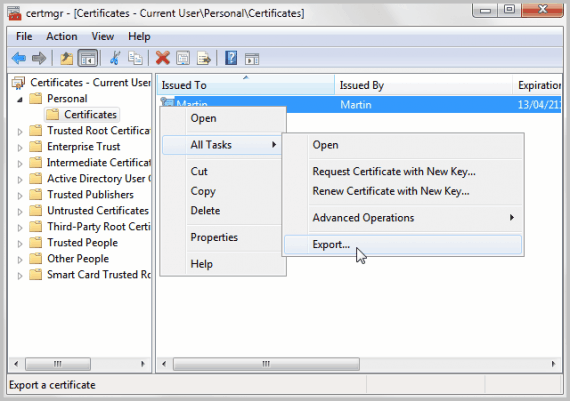
Use Windows-r to bring up the run command box. Type certmgr.msc in the box and hit enter. This opens the Windows Certificate Manager. Go to Personal > Certificates under Current User. You should see a certificate for your user account.
Right-click that entry and select All Tasks -> Exports from the context menu.
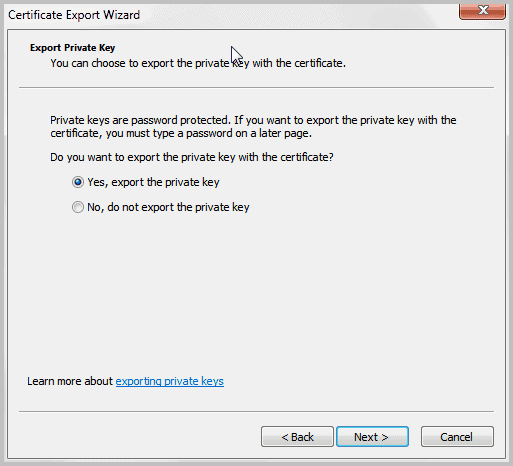
This launches the Certificate Export Wizard. Click Next on the start screen, and switch to Yes, export the private key on the next screen.
Do not change the default settings on the Export File Format screen, just select Next.
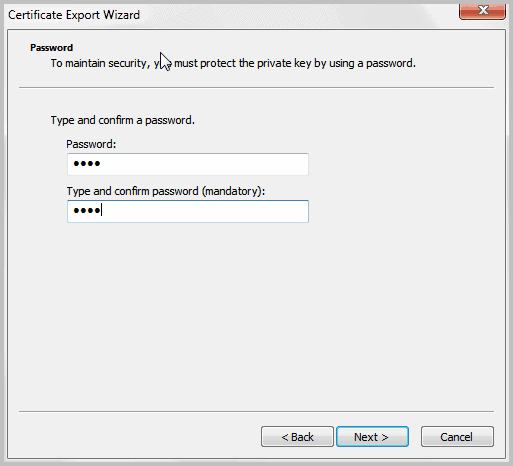
You are now asked to enter a password which will be used to protect the private key from third party access. Someone with access to the key and the right password could import the certificate on another system to gain access to the encrypted files on your system.
You need to select a location and file name for the private key in the last step. You are free to choose any filename and location you want, for instance on a True Crypt or Bitlocker volume or container.
Imports of certificates do not take that long fortunately. Just double-click the file that you have created. This will prompt for the password that you have selected during creation. If the password is correct, the certificate will be imported, after which it becomes active and the encrypted files and folders readable.
This is for instance handy if you want to access your encrypted files on multiple computer systems.
Words of Caution
It is important to backup the certificate, as this is your only option to re-gain access to the encrypted files should you forget your password, re-install Windows or accidentally delete the user account used to encrypt the files. It is essential to select a secure backup certificate password, to protect the certificate from unauthorized users.
I for one suggest to store the backup of the certificate on encrypted storage space for additional security.
Advertisement





Nice tutorial though I prefer using this small, powerfull & free CE 4 encryption software. http://jabroo.blogspot.de/2012/07/free-encryption-software-ce4.html
Strange, it doesn’t work, I don’t know why.
I encrypt a text file (win xp32 pro), the way it was presented above, and then I sent this file on another machine (win xp64 pro). I can open the file on this machine without any certificate.
Did I miss something??
I got XP Professional, which didn’t want to boot back then so I had to reinstall it, because the attempt to repair failed. (There was no backup, too). Some files were encrypted with EFS. I thought I would have lost them, since I could not access them, although they were still there. I was able to recover/decrypt the files, without any tool, just with Windows (XP) itself and without a key. (Well I guess the key was still existing but unavailable for me)
If one is interested I could post how I did this. (I hope I remember it correctly) ( I can’t test since I upgraded my system, but it’s not a professional as it makes no sense to spend money for features you’ll never use.)
Does one know if it’s still possible to recover/decrypt the files without the key?
MS: Features of EFS
http://technet.microsoft.com/en-us/library/cc962100.aspx
“Besides the user who encrypts a file, only designated recovery agent personnel can decrypt it.”
Regarding “words of caution”, I learned that hard way after losing access to my imp data. From that day I never used this method to encrypt anything. And after that instance, I suggested this method in your “Dropbox Insecure” article.
And also thanks for that valuable certificate tip.
Hoi Martin, Nice article but before i begin with encrypting i really want to know how to change back to main former settings, with other words how can i decrypt?
Paulus it is in the article. You repeat the steps that you used to encrypt the files.
When you log in as yourself you can uncheck “Enrypt”, then Windows does not encrypt the file anymore.