VidCutter review: easy video cutting

VidCutter is a cross-platform software program for Windows, Mac and Linux devices that comes with tools to cut video and audio files.
The program is not a full blown video editor but focuses on cutting media files exclusively. While that makes it less attractive to users who require other video editing tools as well, it is ideal for users who want to cut a video or audio file quickly and without having to read through hundred pages of documentation before they can even get started.
The program is available for all supported operating systems. Binary versions are provided for Windows and Mac systems; Linux users get instructions on how to install the application on Linux devices and if the Linux version supports flatpacks, such a version is available as well.
VidCutter

VidCutter requires ffmpeg, at least on Windows where I ran it. You can grab ffmpeg builds here, and need to copy the binary files to the VidCutter directory so that they get picked up.
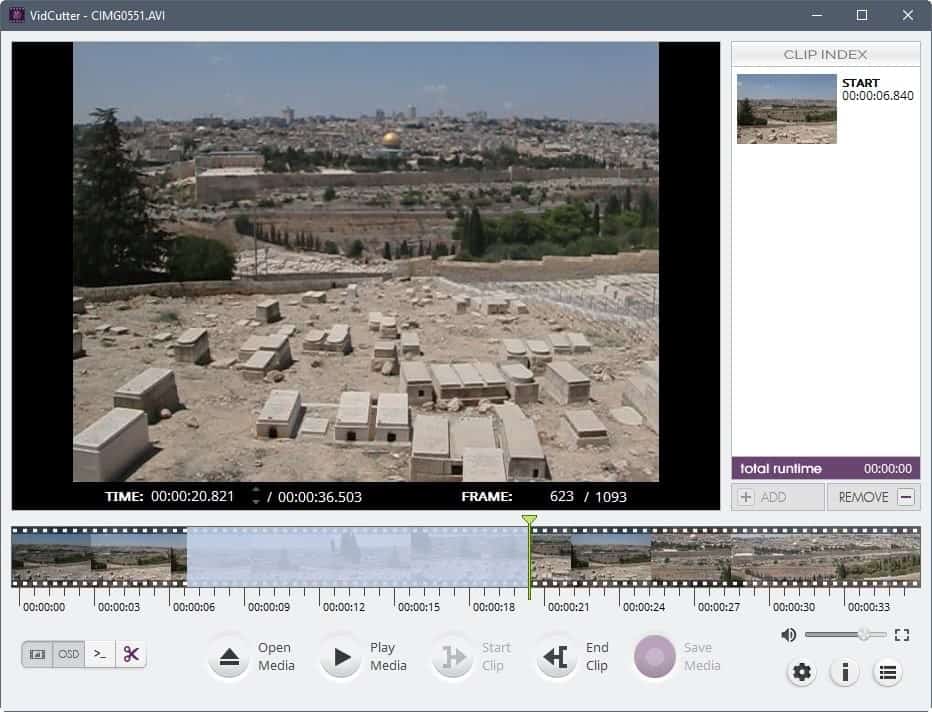
The interface of VidCutter is divided into three main panes. There is the video preview pane, the clip index listing which highlights start and end times, and the bottom toolbar.
You can load most media formats thanks to ffmpeg support and play these video or audio files directly in the interface; useful for previewing video and audio, and making sure that you have cut the video correctly.
VidCutter shows a row of thumbnails underneath the two upper panes which you use for the cutting and for jumping to positions in the video. You can hide the thumbnails if you prefer that with a click on the toggle thumbnails button in the main interface.
To cut a video, you'd simply select start and end positions for the cut jobs. What's interesting here is that you can extract multiple clips this way from a single media file. Simply select multiple start and end positions.
Click on "save media" to save the cut parts of the media file as a single file to the local system. Videos are saved in the same format as the original video, there is no option to convert the clipped parts of a video to another media format.
You may enable the SmartCut feature in the preferences to enable frame-accurate mode. If you don't VidCutter cuts at the nearest keyframe before and after the start and end markers. This is faster, but less precise.
Tip: Check out these video editing programs as well:
- Cut videos with Lossless Cut
- Cute Video Audio Merger: combine video and audio on Windows
- How To Crop Videos With Free Software
Closing Words and verdict
VitCutter is a straightforward, simply to use, video cutter for Windows, Mac and Linux devices. It is an ideal program for users who want to cut videos quickly without having to use a full blown video editor for that purpose.
It takes a couple of minutes to cut a video using the program. Just load it, select start and end time for the cutting, play the video from those positions to make sure the cutting position is accurate, and save the new creation to your system.
VidCutter lacks advanced options: there is no option to cut multiple parts at once or to save progress to continue the operation at a later point in time.
Still, if all you require is some basic video cutting, VidCutter is certainly a program that you can do for the job.


i have tried many times. where does the video get saved to? when one clicks on save video, the app ends, but it does not ask where to save to or what fie type, and i can find the cut video nowhere
Like Johnny, but on Linux Minut, vidcutter will save for 60% and then stop.
I’ve tried not to start at the very beginning, but the result is the same. Impossible to finish.
I tried to merge two clips, doesnt work, keeps telling me ‘added to index’ but the index remains empty, and you just have the first clip. don’t waste your time, does’nt work
Not useful. Wanted to extract a section in the middle of the video. Used “Start Clip” to find the beginning. Then used “End Clip” to find the end. At his point WHAT do I ido to save this section?
I tried “Save Medi” and entered a filename. The file was created BUT contain the first portion of the video BEFOREmy “Sart Clip” point.
Also cannot find a simple VID example of how to use this tool. Great idea but bad follow through.
As mentioned previously, viddcutter will save to 50% and then just hang (even for cut of 30s). In the task manager it says that vidcutter process is ‘sleeping’ even after it has been running for 35mins after a save (with a cut of 30s trying both .ts and mp4 video formats). Using Ubuntu 18.04.1. File types tried – .ts & mp4.
Very nice interface with simple easy to use controls. Hope the issue with saving files can be resolved soon! Thanks
i use ubuntu 16.04 lts and vidcutter 6.0 will not save the edit file.
vidcutter will save for 50% and ten the program will hang, so i must terminate the program.
vidcutter 5 is good but i cannot downloaded because i get only 6.0 vidcutter.
have you tried downloading from these addresses?
– https://sourceforge.net/projects/vidcutter/files/
– https://github.com/ozmartian/vidcutter/releases
Pete, this is very nice program but I wanted to ask about the SmartCut feature.
As a test, I did a regular cut of a 3 minute section of a tv episode – it was processed instantly. A similar SmartCut was still processing when I aborted after approximately 5 minutes of waiting. Was I just too impatient? IOW, what time lapse should one expect for SmartCuts?
Mike S.
Update to my own comment: have done a bunch more cuts with that same video and they all process with SmartCut quickly, ~30 seconds, except those that hang if I make the Start Clip at the very beginning of the program, iow at 00:00:00.000. Moving the Start Clip milliseconds in (ie arrow right once) and SmartCut works.
Tried a second video with the same result. Start Clip apparently does not like the very beginning of a video.
Interesting…
Mike S.
VidCuter author here, thx for the review :-)
Just wanted to add that the initial builds released for Windows contained a packaging bug which is why you had to install FFmpeg yourself (clever of you)… This has been corrected so you need nothing but the installer; FFmpeg, mpv, MediaInfo and Qt5 libraries are all self-contained.
All comments here regarding not finding FFmpeg should now be fixed. Please report a bug at our GitHub Issues page if problems still persist. Appreciated!
Cheers,
Pete
Update to my comment:
Ah, you are the dev, ha. So I guess I’ll head over to GitHuband and report my “no full preview” bug. I’ll tinker around some more first to see what else I can learn in my tests.. Thanks for sharing your creation with us, I think you’re off to a great start with VidCuter.
Furthermore, I said it before but I’ll say it again; the way it edits the subtitle with the video is an excellent feature! As an artist and video geek, I really appreciate the detailed work you devs do, be it for free or otherwise.
Thanks Martin, so far VidCutter looks like a handy tool, and it’s fast. Works good for saving clips from audio as well.
So far, what I like the most about it is, if you have video (mkv) with a subtitle track (srt) in it, it will clip that proper as well, saving the subtitle with the video. This is a huge time saver for me! That’s something that AVIdemux can’t do.
What I don’t like is I can’t get video to fill the preview area better, in full. I checked the settings but no go.. Oh well, it still works.
Hi @RayMann,
Head over to VidCutter settings, via settings button or right-click menu, and then select the Video category. Uncheck the “Keep aspect ratio” option and your video should now be using all space within the app’s physical dimensions. This setting only affects your previewing experience and doesn’t not have any effect on the videos you produce.
@ozmartian
Yup, I tried that, no worky. It just stretches it horizontally with the top half of the preview area always left black. I tried the other settings as well. I guess I’ll post a bug report with the dev.
Even after copying the ffmpeg files I still get
“Failed to execute script__main__”
Even “run as admin…” failed to get it to launch
@cybernard
Redownload and this should no longer be the case. First builds released for Windows contained packaging bugs that have since been corrected. And you dont need to copy FFmpeg yourself, its prepacked.
I got an error that it could not find ffmpeg and thus although it started I could not load anything. I had put the ffmpeg folder in the VidCutter directory, but I guess that wasn’t enough. I them moved the exe files from the bin folder into the VidCutter directory and then it worked.
I found the windows link
https://github.com/ozmartian/vidcutter/releases/tag/5.0.0
https://github.com/ozmartian/vidcutter/releases/download/5.0.0/VidCutter-5.0.0-setup-win64.exe
Is there a fast video joiner in Lubuntu?
Where is the download link for the windows installer? The developer’s website says that “Native installers for Windows and macOS are available on the releases page with every new version, or just click the button below.”, but there is no button and it’s impossible to decipher the releases page.
Use following link – https://github.com/ozmartian/vidcutter/releases