Schedule cron jobs with this easy to use GUI

Whenever I try to explain using cron to schedule jobs, new Linux users cringe at the thought of learning yet another command line tool. That's a shame, because cron is an incredibly handy tool to have in your toolbox. But just because you fear the command line, doesn't mean you don't get to take advantage of cron. With the help of a user-friendly GUI, you too can have cron scheduling automatic jobs for you.
With GNOME Schedule, you can create a one-time cron job, recurring cron jobs, or cron jobs from templates. Let's dig into the installation and usage of this tool.
Installation
Installing GNOME Schedule is simple, if you follow these steps, you will have this application installed in no time.
- Open up the Add/Remove Software utility (Such as Ubuntu Software Center).
- Search for "jobs" (no quotes).
- Mark the Schedule Tasks application for installation.
- Click Appy to install.
- Accept any dependencies that might be necessary for installation.
- Allow the installation to complete.
- Close the Add/Remove Software utility.
Once installed, you will find GNOME Schedule in Applications > System Tools > Scheduled Tasks.
Usage

The usage of GNOME Schedule is simple. When you open up the main window (see Figure 1). Let's walk through the steps for creating a recurring cron job.
Step 1: Click the new drop-down (downward pointing arrow associated with the New button) and select Recurrent Task.
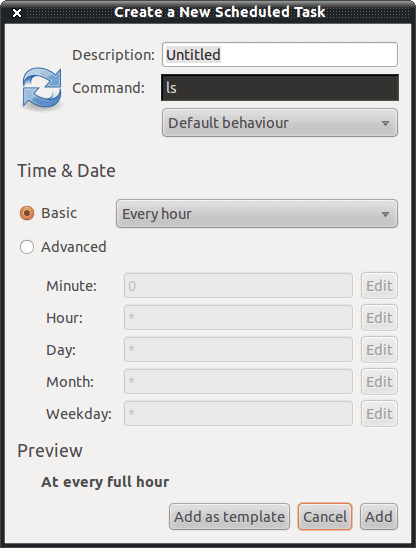
Step 2: In the resulting window (see Figure 2) fill out all of the information necessary to create the job. The information necessary will be: Description (a name for the job), Command (the command you want to run as the recurring task), Behavior (Do you want to suppress command output, is this an X Application, etc.), Basic (Is this task to run every minute, hour, day, week, or month), Advanced (schedule the job for a specific time).
After this information is complete, click the Add button and the job will be created and scheduled.
If you look at the bottom of the scheduled task window, you will notice the Add as Template button. You can add this job as a template if it is a job you can easily base other jobs on. If you create template jobs, you can then create a new job based on that template, by click the New drop-down and selecting From Template.
Now, if you want to create cron jobs that need root (or sudo) permissions, you will need to run the tool like so:
- Open a terminal window.
- Issue the command sudo gnome-schedule (if you are using a non-sudo distribution, su to the root user and issue the command gnome-schedule).
- Schedule the job as described above.
You will notice, when running in super user mode, you have an extra button - the change user button. This will allow you to schedule a cron job for any user on the system (so long as they have the ability to schedule jobs.)
Final thoughts
Gnome Schedule is a very easy way to allow new users to take advantage of the powerful cron tool, without having to learn the command line version. I recommend learning the command line for cron, but for those who don't have the time or inclination, this is a good route to take.
Advertisement


This requires and uses ‘at’ … another version of cron which is pretty dumb since cron runs on all *nix systems. :/
Is there no gui without retarded extra requirements?
so does this edit the system crontab or does it exist independently of cron?
cheers
I don’t understand why but it seems it doesn’t work for me. :((
To delete Gnome-schedule templates, manually edit / delete file located :
/home/user/.gconf/apps/gnome-schedule/templates
Crontab, i gather runs a “reduced sh shell” :
– you need to explicitly define.
– formatting and parsing scripts while working perfectly in the terminal, may need recoding to work under crontab.
Otherwise, it’s a joy to get crontab / Gnome-schedule doing all the work.