Browse your Samba shares with pyNeighborhood

A long time ago, in order to scan your Samba shares, you used a tool called LinNeighborhood. That tool was essential if you wanted your Linux box to be able to see any Windows shares (unless you were brave enough to know the command line equivalents. Well years have passed and LinNeighborhood is now pyNeighborhood. pyNeighborhood is the GTK2 version of LinNeighborhood (which was GTK1). It still serves (basically) the same purpose, but it's more reliable and easier to use.
In this article I will show you how to install and use this Samba browser on your Linux distribution.
What can pyNeighborhood do?
With this outstanding Samba scanning tool you can:
- Scan a network for Windows/Samba shares.
- Mount shares.
- Add machines.
- Remove machines.
And much more. One thing you will find that pyNeighborhood can NOT do is set up Samba for you. It is not a Samba tool other than a discovery/mount tool. With that said, let's install.
Installation
Installation is simple, but there is one piece that the installation does not catch and pyNeighborhood will not fully function without. To install everything you need open up your Add/Remove Software utility and do the following:
- Search for pyNeighborhood and mark the results for installation.
- Search for mc (Midnight Commander) and mark the results for installation.
- Click Apply to install.
That's it. If you do not install Midnight Commander the mount command will not work successfully.
Usage
Now let's use pyNeighborhood to scan a Windows share and mount the shares. I will warn you that pyNeighborhood is picky about user rights. To get around this instead of starting the application with the normal command pyNeighborhood, start the command with the help of gksudo like this:
gksudo pyNeighborhood

When you fire up pyNeighborhood the GUI will be very simple to get around. You shouldn't have to set any options or do anything other than click Action > Scan in order to see your shares (see Figure 1). When the scan completes you should see any machine listed in your network that has an available share. If this doesn't work, you might have to try adding a machine by clicking Action > Add Machine.
Once you have your machines listed you will need to mount them. To do so right click a share and select either Mount > as SMB or Mount > as CIFS. This will depend upon which you have installed.
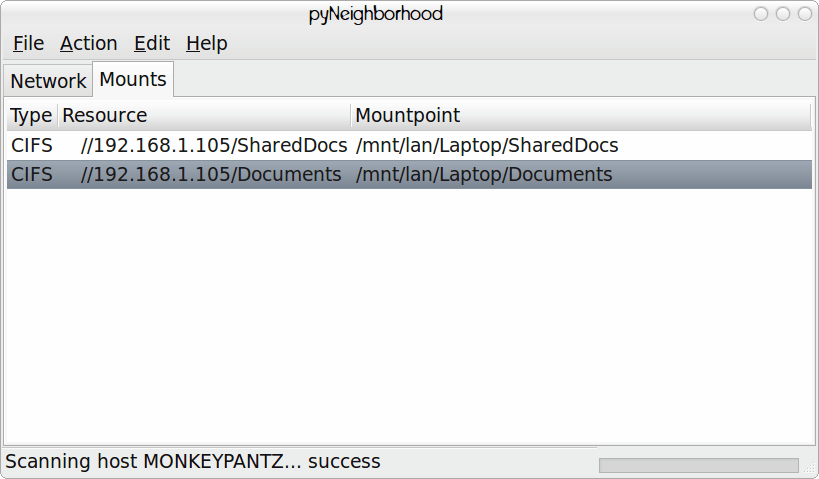
Once you have these shares mounted they will show up in your Mounts tab (see Figure 2).
If you right click one of those mounts you can select either Unmount or File Manager. The File Manager has always given me issues. In the Preferences window you should be able to change the file manager from Midnight Commander (a VERY out of date curses-based file manager) to a more modern manager like Nautlius. But when you change the file manager the changes simply won't stick and pyNeighborhood will continue on using MC. Because of this I just open up my file manager and navigate to the mount points and browse that way. By default the mount points will be /mnt/lan/. And don't worry, pyNeighborhood will create those mount points and then remove them upon umounting.
Final thoughts
If you have been looking for a good tool to browse shares in Linux, pyNeighborhood is one of the best. It has a few wrinkles that still need to be ironed out, but you won't find an easier tool to scan/mount/browse the Windows/Samba shares on your network.
Advertisement


there is a safer way to do this which basically boils down to starting without gksudo (as this opens our filemanager as root as well) – change “ande” with your user:
mkdir /home/ande/Network
chown ande:ande /home/ande/Network
**edit preferences in pyNeighborhood:**
remove mountpoints, no default password
always use msbrowse, smbclient, nmblookup, retrieve IP address
CIFS: extend the commands to include sudo i.e. “sudo mount.cifs” / “sudo umount.cifs”
(I guess the same with SMB but I don’t use this currently)
BTW: if u want to hack the root version goto /root/.pyneighbourhood and manually edit the config file entry for filemanager as Thunar or nautilus or whatever.
hope this helped somebody
Cheers
andE
> … you should be able to change the file manager from Midnight Commander (a VERY out of date curses-based file manager) …
Oh, really ‘very out of date’? Curses-based?
He-he :)
This functionality SHOULD be baked right into Gnome or Nautilus. I really don’t get the whole virutal system over simply doing a real mount where I can access the directory from any app. And I’m not going to remember what to put in fstab. I was going to write my own utility app until I found this one which has done a great job for me since finding it. Thanks to the devs.