Easily extend Nagios' functionality

My last article described how to "Quickly install Nagios on Ubunut". That article had you up and running with the powerful open source network monitoring tool, but not much more. If you really want to make Nagios useful you have to do a bit of work. Some might see this work as too time consuming and or challenging. I can understand that on a large network. Because Nagios can not do auto-discovery, it is up to the admin to configure any device to be monitored. Naturally no admin is going to want to monitor every single device on their network. That works out okay with Nagios. Now, if you are interested in monitoring every single device, on a larger network, you will either need to get clever with some scripting to search out your devices (and track down their associated addresses) or you will need to move on to a different solution.
But for those who only need to monitor a few devices, configuring Nagios to do so is actually quite simple. In this article I am going to show you a few configurations to handle and then how to add devices and checks for your installation.
Post-install configurations and plugins
Before you get busy setting up devices for Nagios to monitor, you should first install some extra plugins for the system. Open up Synaptic, search for "nagios" (no quotes), mark nagios-plugins-extra for installation, and click Apply to install. Once that is done you will already have more functionality with Nagios.
Now let's take care of a couple of configurations. The first is in the /etc/nagios3/conf.d directory. The file is called contacts_nagios2.cfg. In this file you will configure who is to receive the email alerts. The line to set this configuration is:
email   root@localhost
You will want to change that email address. That is it for this configuration file. Now in order for Nagios to be able to send out alerts via email, the machine housing Nagios has to be able to send those alerts out. You can check that by using the mail command like so:
mail email@address -s TEST
Where email@address is an actual address you can use for testing.
Once you enter that line, hit Enter and then type some random text. When you're done typing hit <Ctrl>d and then Enter. The mail should send away. If not you will have to troubleshoot your mail server (beyond the scope of this tutorial).
Add a device
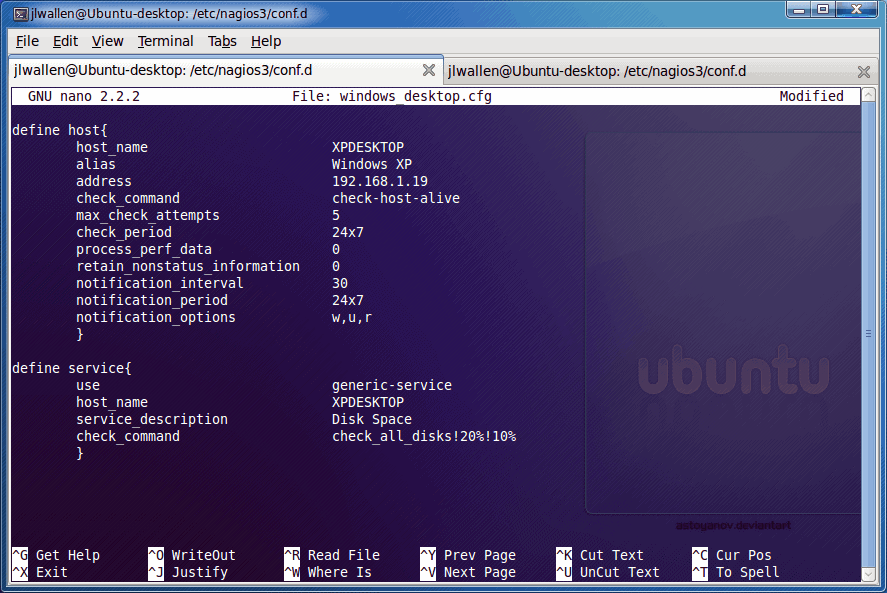
Now for the good stuff. We are going to add a device to Nagios. The device we will add is a Windows XP desktop to monitor. Within the /etc/nagios3/conf.d directory you will see a number of .cfg files. These are the files Nagios uses to dictate what is see and how it acts upon what it see. For every device you want to use, I find it best to add a .cfg file. So let's create the file /etc/nagios3/conf.d/windows_xp.cfg. The contents of this fill will look like what you see in Figure 1.
As you can see there are a few directives here. The directives are as follows:
- check_command - The command used to check the status of the device.
- max_check_attempts - How many times will Nagios retry the status check.
- check_period - How often are the checks made.
- process_perf_data - Enable the processing of performance data.
- retain_nonstatus_information - Enable the retention of non-status information across reboots.
- notification_interval - How often are notifications sent to inform the administrator this host is not okay.
- notification_period - How often are notifications sent out.
- notification_options - The options shown are w - send notifications on "warning" state, u - send notifications on "unknown" state, and "r" - send notifications when a service stops flapping (when a service changes frequently).
NOTE: Depending upon the version of Nagios you have installed the notification_options will be different. Some instances will not accept the "w" option. If you get an error, exchange "w" with "d" (for down).
As you can see there are configuration options that will be specific to your devices and networking topology (host_name and address are examples). Once you have created this file save it and restart Nagios with the command sudo /etc/init.d/nagios3 restart command. Now take a look at your Nagios page and you will see the new device you just added.
Final thoughts
Someday someone will come up with an automated way to detect devices in Nagios. Until then we are relegated to adding them using this means. Does that mean you should shy away from Nagios? Not at all. Nagios is a powerful tool ready to help network administrators keep tabs on their network devices.
Advertisement


What is “ubunut”? lol