Installing Ubuntu Server 9.04

Recently a friend requested I help him with an installation of Ubuntu Server. Since he was completely new to the process of installing Linux (and the topic is a winner anyway) I thought it would be smart to walk through the process of installing a Ubuntu Server, step by step, here on Ghacks.
Ubuntu Server is, in my experience, one of the finest servers on the Linux landscape. This server distribution can be used for just about any server needs. But one thing to be warned about - it is headless. With the Ubuntu server you can have just about any server package you can think of, but don't expect a GUI to help you along. And due to its headless nature, it is faster than a desktop-based counterpart. But what is it like to install?
Let's find out.
NOTE: This particular installation will be done in a Virtual Machine using VirtualBox. So any oddities (or small hard disk sizes) you see will be due to that.

The first step is to insert the CD of Ubuntu Server (I am using 9.04) into the machine and boot. The first screen you will see is the language screen (see Figure 1).
In the language section you just use the up and down keys to migrate through the various languages available and, when you land on the correct language, click the enter key.

The next step (see Figure 2) gives you a few different actions to take.
Here you can start the installation by selecting "Install Ubuntu Server" or you can check the disk, test the memory on your machine, bypass the installation and start from your hard drive, or use this disk as a rescue disk.
Go ahead and select "Install Ubuntu Server" and click the Enter key.

The nex screen (see Figure 3) again is asking you to choose a language. The difference between this language selection and the first language is that this language selection will be the language used on your actual server, whereas the original language screen was for the installation process. You select the language using the same technique you did for the first language.
Notice the difference in color and style on this screen? This is the typical Linux text-based installation. Get used to it, because this is the look and feel for the rest of the installation.

The next screen (see Figure 4) has you select the country where you (or your server) reside. As you can see the selections offered for your country are based on the languages you chose. This selection is actually important because it will help configure your region-based settings.
You make this selection the same way you did the language (scroll up or down with your arrow keys). To make your selection hit the enter key.

The next screen (figure 5) is the keyboard selection screen. Most likely you can just use your left arrow key, move to <Yes> and then hit the enter key. If you're not sure select <No> and you will walked through a very simple keyboard selection wizard that will ask you if certain keys are present. This will narrow down your selection. After you select <Yes> and hit enter the next window will ask for the original of your keyboard. Select the country associated with your keyboard and hit the enter key. After that you will need to further narrow down your keyboard selection by choosing the layout type. I leave the last two screens out because they should be very obvious to you.

The next few screens require no interaction on your part. It isn't until you finally get to the Hostname screen (see Figure 6) that you will have to do anything.
The hostname will be the "nickname" your machine will be known for on your network. It is a single word name. Say this machine will be your mail server. For that you can name the machine "mail".
Once you have entered your hostname click the tab button until <Continue> is slected and press Enter.

The next screen (Figure 7) requires you to enter your time zone. Make sure you select this properly because it will effect many services on your machine. If your machine is an email server it could incorrectly stamp all incoming email with the wrong time (if the wrong zone is selected).
Scroll through the listing with the up and down arrows and, once you have highlighted the selection you want, click the Enter key.
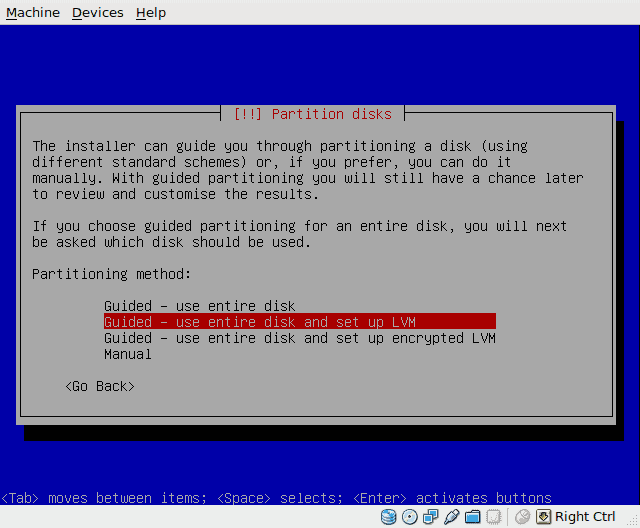
The next screen (see Figure 8) sets up the disk partitioning scheme. You have four choices. Only one of these choices is manual which should only be used by more experienced users. Of the other choices you will want to stick with one of the LVM options only if you already know how to set up LVM. LVM is the Logical Volume Management scheme which is much more flexible than a standard scheme. If you choose to use LVM you can then choose if you want your disk encrypted or not. An encrypted disk will be slightly slower than a non-encrypted disk, but it will be much more secure. The easiest partition method is to select "Guided - use entire disk". For a default Ubuntu Server, I always select this.
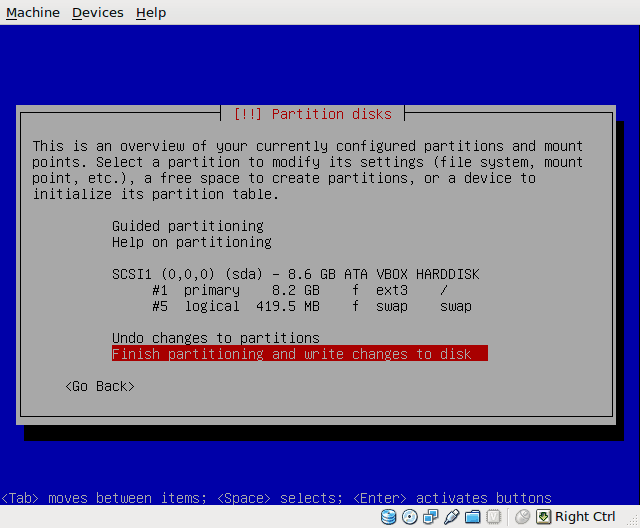
The next screen (Figure 9)Â is just a confirmation window showing you what the installer is about to do to your disk and is it okay. If what you see listed is okay, select "Finish Partitioning and write changes to disk" by using the Tab key and then hit the enter key.
After that you will have one more chance at making changes because the next screen asks for you to verify the changes. Tab to <Yes> and click enter on this screen.
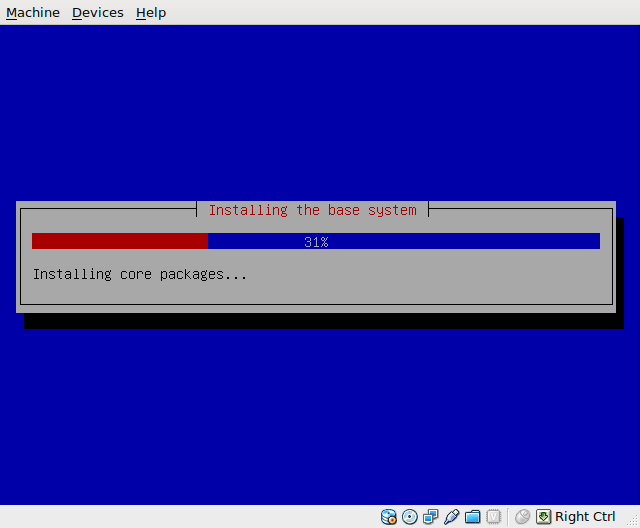
Depending upon the size of the disk you have partitioned, the partitioning process could take a while. Once the paritioning is complete the installation will start. This will take a bit of time (but far less time than you are used to for an operating system installation). Figure 10 was taken after about 30 seconds into the process and the installation of the base system was already at 31%. Don't be fooled. This is not 31% of the entire installation. This is just the base packages like the kernel. You will still have to install the packages you need for your server.
The next three screens are all dedicated to creating a user account. You will will first enter a full name for your user, then a login name for your user, followed by a password for your user. Once you are done with those you will be at the next important screen.
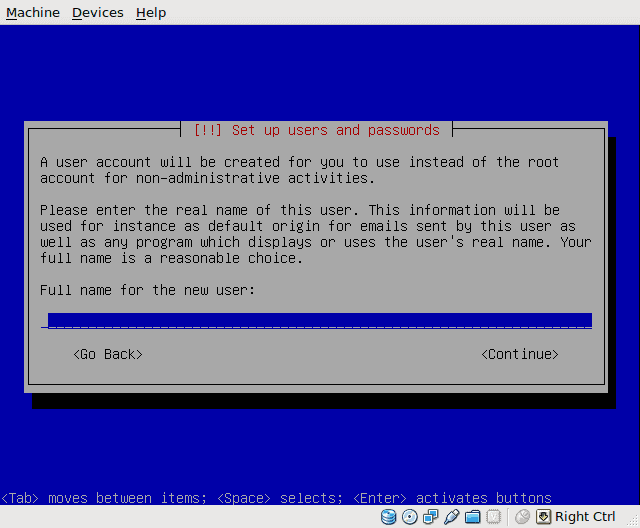
The next window (see Figure 11) asks if you want to encrypt your /home directory. If you plan on having log in users on the system it might be a good idea to encrypt the data. If, however, you don't think the /home directory will be used all that much (say this will be a public web server) this isn't that necessary.
After that screen you will be presented by a screen asking if you need to set up a proxy. If you need a proxy enter the address in the blank space, tab down to <Continue> and click Enter. If you do not need a proxy just tab down to <Continue> and click Enter.
The next screen will, depending upon how fast your network connection is, seem to hold for a bit. This screen is scanning the mirror for packages.
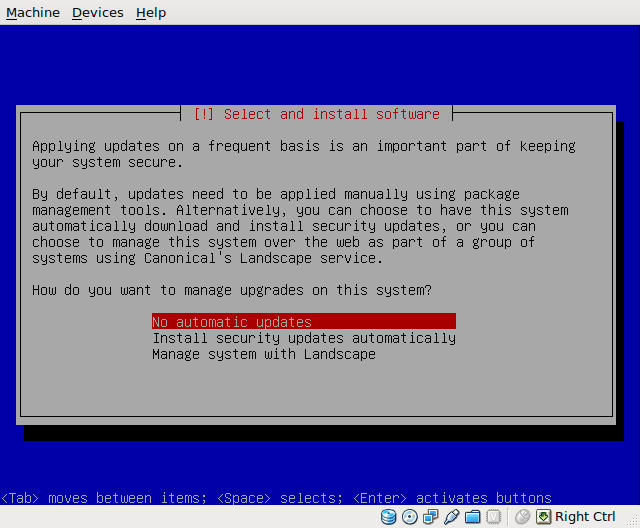
You will then proceed to the updates section. If you want to have all of the updates applied automatically you will want to selec the "Install security updates automatically". If you prefer to handle the updates on your own select "No automatica updates". You can also use Landscape which is a web-based updater. If you want the easiest method, my suggestion is to go with automatic updates.
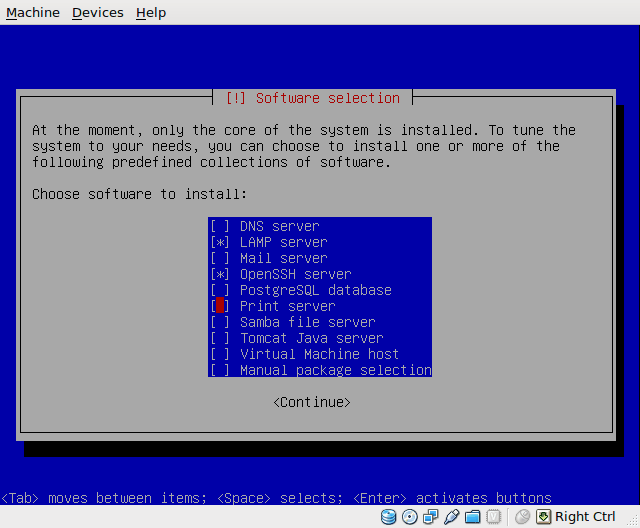
The next screen is the longest screen, because it is the package installation screen. But during this you will be given the change to select the software you want (see Figure 13). This porition is set up easily.
You can use the arrow keys to move up and down and then select a package with the space bar. From this list you can see what types of servers can be installed. If you go to Manual selection make sure you know what you need. Tab down to continue and then hit Enter when you're ready to install.
The installation process will now download the necessary packages, based on the packages you selected.
Depending upon the packages you selected you might have to handle a few configuration options. For example, if you are installing a LAMP server, you will be prompted for a MySQL password for the "root" user. If you are prompted for this, type the password and hit Enter. Most likely you will be prompted for the MySQL password three times.
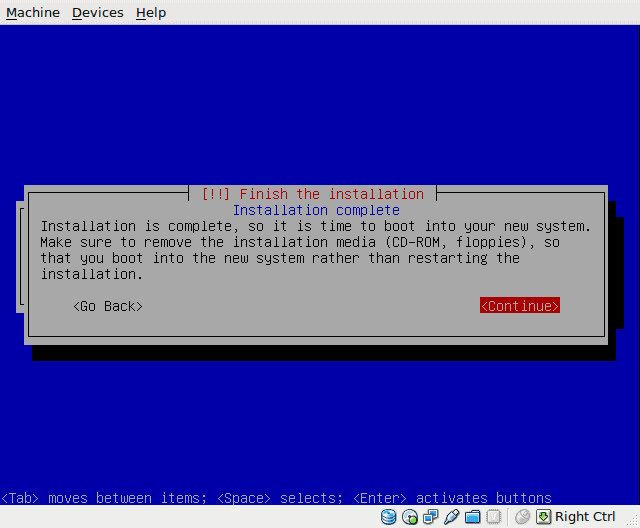
After the package installation is complete you will see the installer automatically take care of the GRUB installation/configuration as well as some clean up tasks. When you reach the final screen (Figure 14) you are complete! You can now reboot your Ubuntu Server installation and enjoy.


I want to set up Ubunti 9.04 as a mail server sharing the internet connection using squid to replace our existing Redhat 9.
Can anyone help me please?
Hi,
Thanks for your tutorial.
But I need to do some updates like:
sudo aptitude update
But it appears I need to be connected to the Net.
Please could you let men know how I can do this?
Thanks!
Shimona.
Today, after my second follow up email to the profithost abuse department, I received this response: “We apologize for the late reply. This customer was allready contacted and is scheduled for termination after the current (monthly) billing period in the case of no response.”
Hopefully, at the end of September, that site will be no more.
FYI. Looks like that copycat website is still up (or maybe they just changed hosting providers?), 2 months later.
I reviewed that site further, and found that every single article on the site is stolen content. I’m just an innnocent bystander, but I can’t stand sites like that. So, I tracked down his hosting provider, and found the abuse department (abuse@profithost.net). The abuse department is currently reviewing the case. If I don’t hear back from them within the next few days, I plan to start contacting the legal departments of some of the larger companies this guy has stolen content from (such as ZDNet).
Hi,
im just curious, what steps are you taking to remove the copy
Of this article that was made to the site that was mentioned on the previous comment?
it seems that they haven’t removed it yet? (http://telephone-issues.com/?p=73003).
Quasimodo: That’s my plan exactly. ;-) Just had to install this as a base. the next article will be about Samba.
Well, the installation of Ubuntu and its little brother the server edition is pretty much self-explainatory, even for someone doing it the first time.
It is afterwards where things get really interesting and challenging.
For people not used to a text console, like most computer users these days,
the learning curve is quite steep, but very, very rewarding if you pull it through.
Maybe you could do some followups on this article, like
installing and using ssh to remotely administer your linux root server or
compiling and installing torrentflux from scratch or
compiling and installing amuled + amuleweb from scratch.
I assure you those are quite the challenges for someone doing it the very first time.
Installing the server os seems like a walk in the park in retrospective.
:)
Yes, I assumed it was your content, because the copy even includes “here on Ghacks.” which is how I knew to look for your copy here.
It’s unfortunate. People like this steal content from all over the web, then try to earn ad revenue from it. I’ve run into this a lot with my personal blog. Imagine my shock when I saw my content on the front page of Digg, but not pointing to my site. Sad thing is, they are usually happy to take it down because they’ve usually already achieved most of the hits from the article initially hitting aggregators.
Dan: I just wrote this article this morning. It is original I can assure you. It looks like the site you pointed to has copied my work. Thank you for bringing this to my attention.
Are you aware this content was complete copied by another site? http://telephone-issues.com/?p=73003