How to set up a mobile Wi-Fi hotspot in Windows 7 or above without any software
I came across a router which had an issue with the Wi-Fi; the LAN connection was working fine but the wireless functionality appeared to be busted. My friend wanted a temporary fix, as he waited for the replacement router to arrive.
Windows 10 has an option for setting up a mobile hotspot without a software. Thinking this would be a good fix, I fired up the Settings app, navigated to the Mobile Hotspot screen and in a matter of seconds I was able to set up the connection to use the PC's Ethernet network. It's never that easy, is it? Apparently not.
The Hotspot was created, our phones could see and connect to it, but there was a notification that said "This Wi-Fi network has no internet". The computer's browser also threw up errors which said the connection failed. What happened is, the Hotspot was active, but the internet wasn't working. Disabling it fixed the issue on the system.
Time for the manual fix, command prompt to the rescue. This method works on Windows 7 and above.
How to set up a mobile Wi-Fi hotspot in Windows 7 or above without any software
1. Open a Command Prompt window with administrator rights.
2. Type the following in the window,
netsh wlan set hostednetwork mode=allow ssid=wifiname key=password
Replace wifiname with a name that you want to assign to your network. For the password, choose a strong non-pronounceable one. The password should have a minimum of 8 characters.
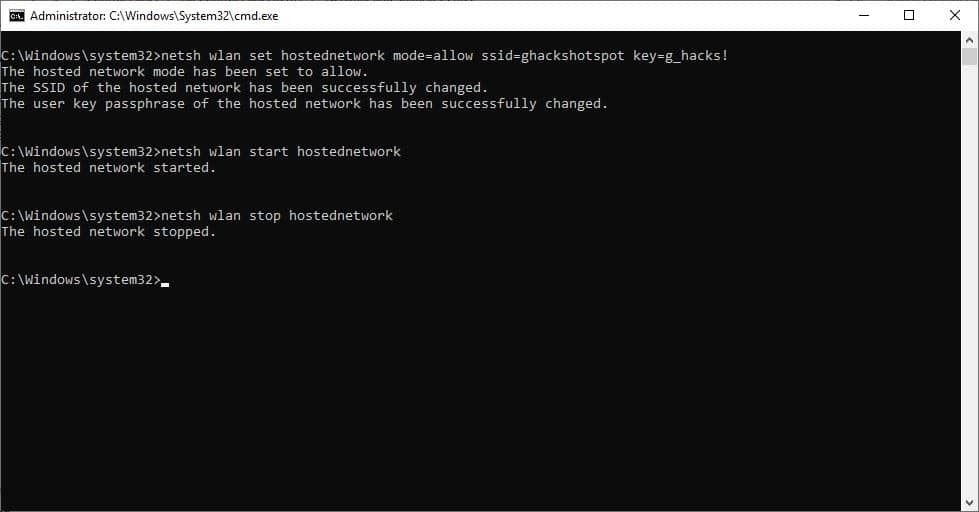
For e.g. netsh wlan set hostednetwork mode=allow ssid=ghackshotspot key=g_hacks!
3. Hit the enter key and the screen should read "The hosted network mode has been set to allow. The SSID of the hosted network has been successfully changed. The user key passphrase of the hosted network has been successfully changed."

4. Congratulations, you have created a hotspot. Now to activate it. Type
netsh wlan start hostednetwork
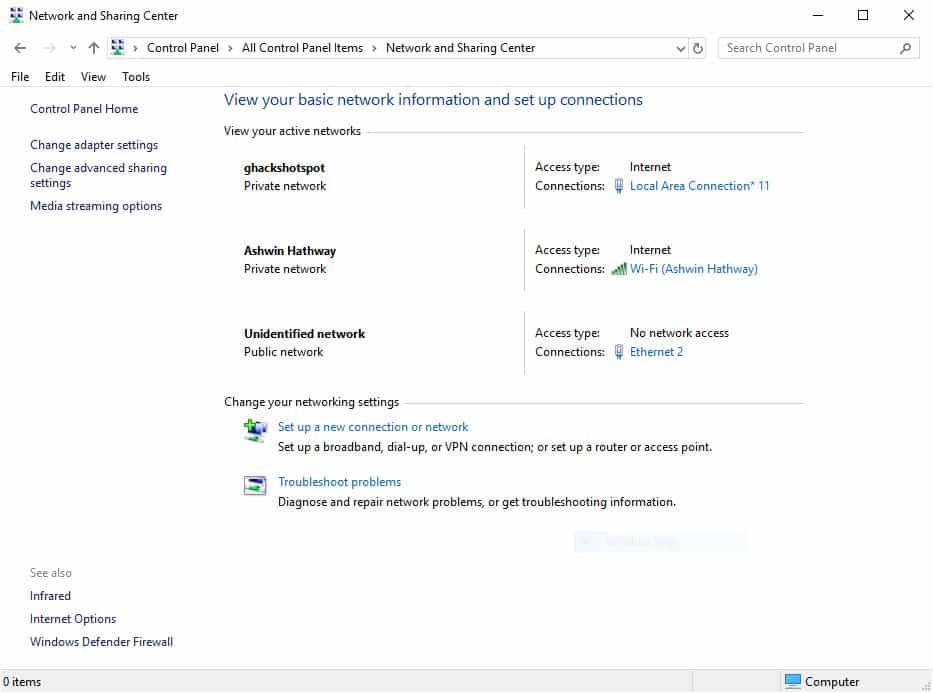
5. You will need to configure the hotspot to use your Wi-Fi. Open the Network and Sharing Center from the Control Panel. You can paste the following path in Windows Explorer.
Control Panel\All Control Panel Items\Network and Sharing Center.
6. You'll see all available network adapters, including the newly created hotspot. Choose the one that you wish to share. It's usually your Ethernet or Local Area Connection, but sometimes it may have the adapter's name instead. Click on the network's name and it should open the Network Status window. Select the properties option.
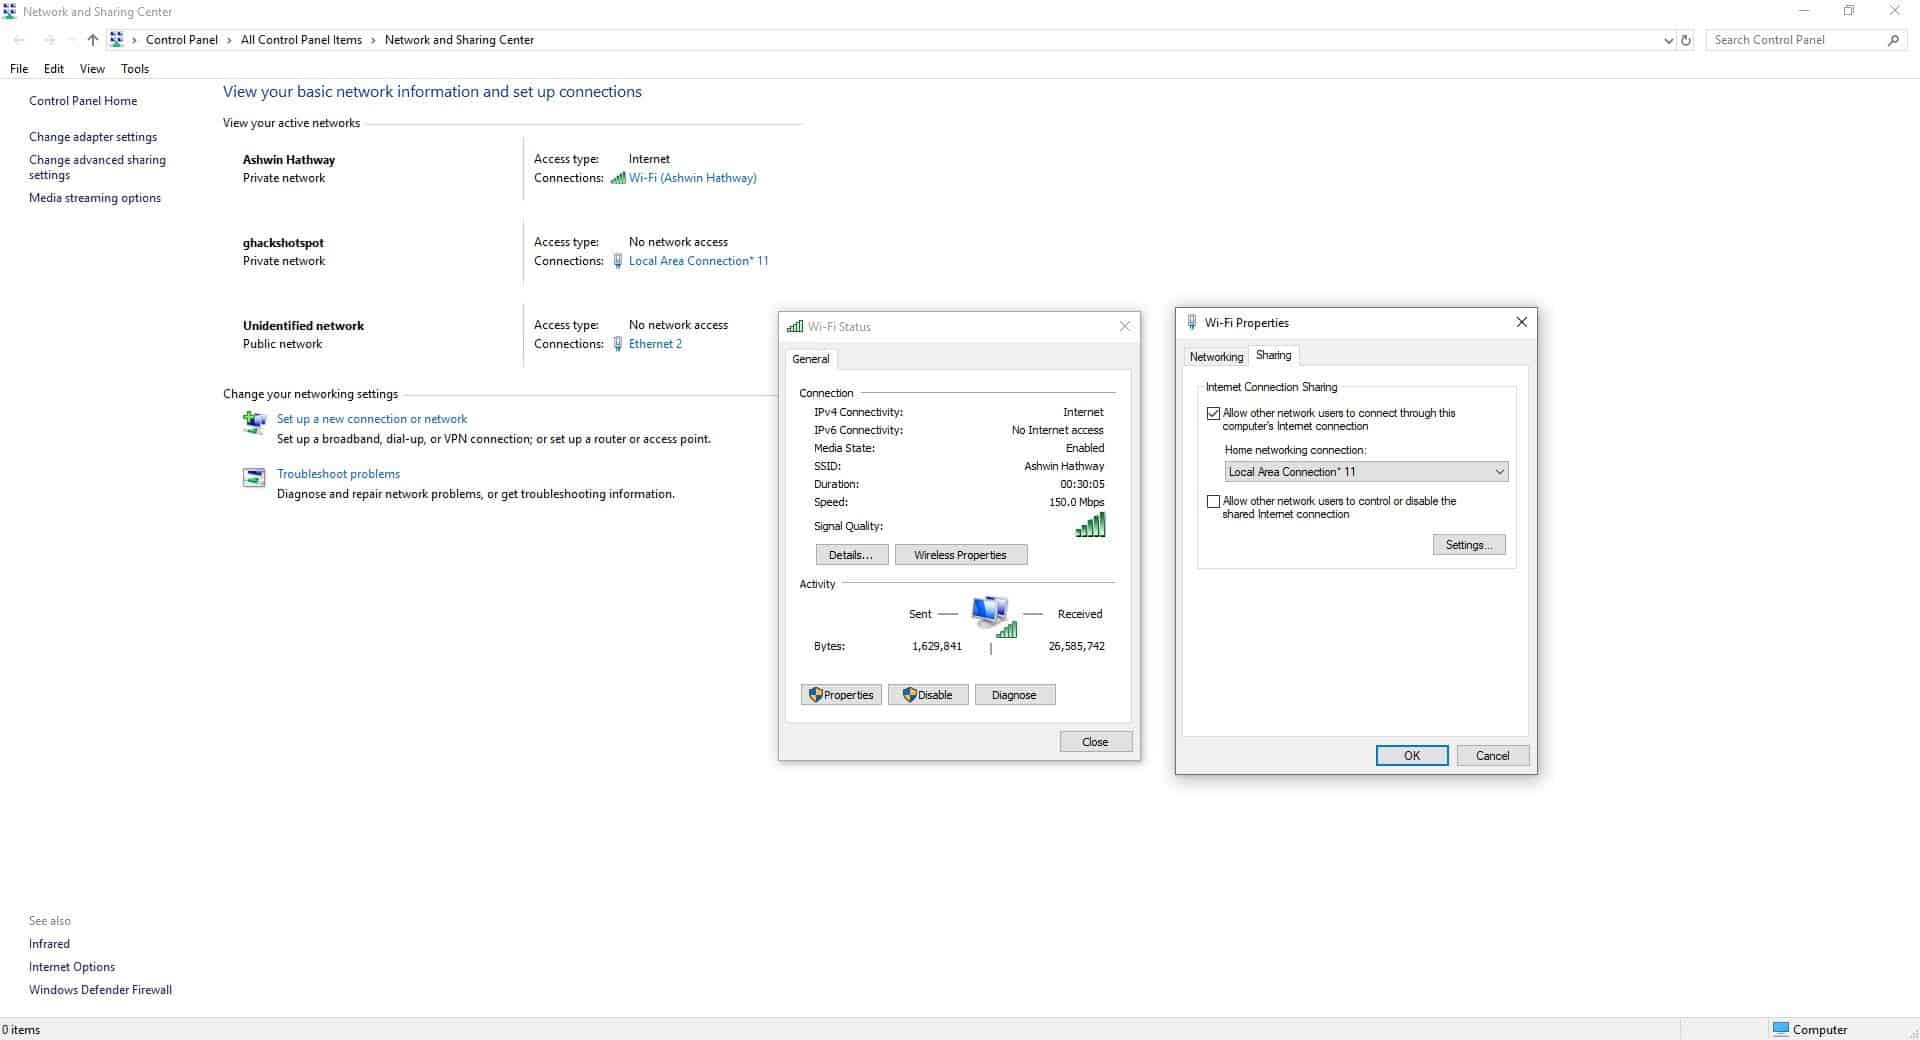
7. Click on the Sharing tab and enable Internet Connect Sharing by checking the box next to "Allow other network users to connect through this computer's internet connection". Next, click on the drop-down menu and select the hotspot network with which you should share your network. In this case, I selected Local Area Connection 11.
8. Hit the ok button, and your Hotspot is ready to be discovered. You can verify this by observing the "Access Type" of the hotspot at the Network and Sharing Center screen, it should say "Access Type: Internet".
Enable Wi-Fi on your laptop or phone and try connecting to it using the password that you chose.
Note: My laptop's Ethernet port doesn't work, so I had to use the Wi-Fi adapter in the screenshots, but the procedure is the same. I've tested it with my friend's computer.
To stop the hotspot, use the following command
netsh wlan stop hostednetwork
This Microsoft document and Dell support page were used as a reference for the article.
If you ever find yourself with just a wired network connection, but have a laptop or a desktop PC with a Wi-Fi card or USB dongle, you can use this method to create a hotspot. This can also be useful if you're using USB-tethering to access your phone's mobile network.





I tried everything I have been reading up on. My laptop receives a very good signal, but not my phone. So I tried to make my laptop a hotspot. My hotspot says Ipv4 Internet, Ipv6 Interenet. I have successfully connected the phone with the hotspot several times, it is fetching IP address, the strong signal of the hotspot shows up and seconds later a message can’t provide Internet and it disconnects. Starting hostednetwork from command line is a problem as well. The hotspot shows up in my sharing center as not connected and I am unable to connect. Additionally it seems the hostednework needs to be restarted manually after restarting the laptop.Tthis is more than frustrating as I have been fighting with this for over a month now.
Hi, I did all the steps and it worked, but when I try to connect with my mobile it didn’t work because it couldn’t obtain network address. How can i make the hostednetwork work as DHCP
thanks
The network card you want to share MUST be able to share. USE:
netsh wlan show all
Look at the output, find your (wifi) device, look for the line:
Hosted Network Supported
If the answer is No — you have to buy a wifi usb dongle that does support Hosted Network, or share another connection like your Ethernet port using a network cable.
Mine was a nice RTL 8188 but doesn’t support Hosted Network (and I think most RealTek’s don’t)
on my workstation, but on my Dell laptop with Dell Wireless 1490 Dual Band internal mini-card YES, it does hostednetwork, so I just switched my cell phone tether over to the Dell. I probably would want the Dell to go with me on vacation, etc. anyway, so I’ll just use that one.
I got the new hosted network name to appear on the “Network and Sharing Center” list of networks. I followed all steps and got the expected results until step 8. I never got “Access type: Internet” but only got “Access type: internet not available.” Still, I was able to see this network from another device and connect to it. When I did this, however, Intel My Wifi Technology disabled itself. I kept manually re-enabling it, but it would disable itself again a few seconds later. After a few rounds of this, the network disappeared entirely. I had to go back to my command prompt (with admin rights) and start over, but then I could not get the hosted network to start. I kept getting a message along the lines of “resource not available,” and the network disappeared from the “Network and Sharing Center” list.
I had been looking online for this solution and none worked. This method, first time; zero issues.
Excellent advice
After I hit start it says:
The hosted network couldn’t be started.
The group or resource is not in the correct state to perform the requested operation.
The network card you want to share MUST be able to share. USE:
netsh wlan show all
Look at the output, find your (wifi) device, look for the line:
Hosted Network Supported
If the answer is No — you have to buy a wifi usb dongle that does support Hosted Network, or share another connection like your Ethernet port using a network cable.
Mine was a nice RTL 8188 but doesn’t support Hosted Network (and I think most RealTek’s don’t)
on my workstation, but on my Dell laptop with Dell Wireless 1490 Dual Band internal mini-card YES, it does hostednetwork, so I just switched my cell phone tether over to the Dell. I probably would want the Dell to go with me on vacation, etc. anyway, so I’ll just use that one.
hi, I did all the steps and it appears on my wifi list, but it has no internet access. How to fix it? Thanks :)
I used in my mobile HTC Desire 10 Pro, but first time mobile connected in second time on connecting obtaining ip address and not connected. i still wait for connected but same condition in last 5 time try to connect…
please suggest me best solution ,,
Regards,
Rana Arshad…
I want to use my Samsung S5 hotspot on my laptop ,who has no windows,how do I create Internet connection on laptop
Step 7 – There is no drop down! The box is populated by “WiFi” (the name of my incoming wifi connection, which is not used as I use ethernet).
How do I fix this please? Windows 8.1 (Hotspot was set up and working, then suddenly stopped a couple of months ago.???)
Step 7 fix (I don’t know which part fixed it…)
1. enabled sharing on “WiFi” connection.
2. renamed the hotspot lan.
3. enabled sharing for the ethernet connection. No “home networking connection” box appeared.
2. (maybe I did this here)
4. when sharing tab was re-opened for ethernet, it was pre-populated with my renamed hotspot adapter name! Duh
In Windows 7 you can create a hotspot from Control Panel directly.
Control Panel\Network and Internet\Network and Sharing Center > Manage wireless networks > Add. You should be able to define the name, password and security type. At the end check a box which asks you if you want to allow internet access through this network.
I didn’t know Windows 7 had this function. So the version in Windows 10 isn’t something new.
“but have a laptop or a desktop PC with a Wi-Fi card or USB dongle”
How do I know if my laptop has what it needs or is something that needs to be added? I used a mobile Wifi wireless device (like a phone but not) for internet in the past with a paid service. Now I connect to a neighbor’s (a relative) Wifi but I have no control or details on the setup of it and they aren’t technically-inclined to answer questions about it.
I used this before with Connectify Hotspot. Was frustratingly unstable for me. I had to repeatedly stop and start hostednetwork to unstick it.
My Connectify Hotspot symptom was:
After not being connected for an extended period of time; a client device is no longer able to connect to Hotspot until the Connectify service is restarted.
I discovered that it was just using Windows’ hostednetwork, which was unstable for me. Eventually gave up and just got another AP and ran cabling.
Very useful, I tried so many times in the past but never succeeded!
Thanks a lot!
This is very cool. I had no idea you could do this. Thanks.