Set Windows Defender Antivirus blocking to high on Windows 10
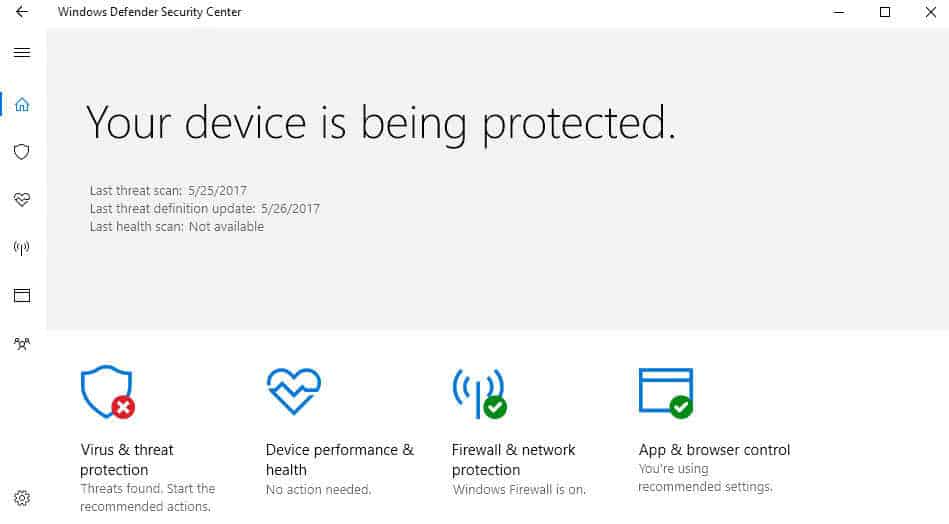
Windows Defender Antivirus is the default security solution that ships with all versions of the Windows 10 operating system.
It offers basic protection when compared to third-party solutions, but the overall protection that it offers has improved and the product does not test at the very bottom of every AV Comparatives or AV Test runs anymore.
The product supports the detection of all kinds of malware, including trojans and viruses, rootkits, spyware, and other forms that may attack Windows machines.
One new feature that Microsoft introduced in the Windows 10 Creators Update was the new Windows Defender Security Center. It is a central hub for security related settings.

Along with it came an under the hood change that is not enabled by default: the ability to increase the blocking level of Windows Defender Antivirus to high for extra protection against threats.
Note: The following procedure enables cloud-delivered protection in Windows Defender Antivirus. The feature is only available in Windows 10 version 1703 (and newer), and manageable through various interfaces including Group Policy, Registry, System Center Configuration Manager, or Microsoft Intune.
The main benefit that enabling cloud-delivered protection brings to the table is that it may detect and block new malware, even if no signatures are available yet.
The core difference to Microsoft Advanced Protection Service, the previous incarnation of cloud-protection service available for Windows 10 version 1607 and Windows 8.1, is that you can configure the cloud block timeout period, and that block at first sight is supported (also on 1607 but not on Windows 8.1).
Enable Cloud-Delivered Protection for Windows Defender Antivirus using Group Policy
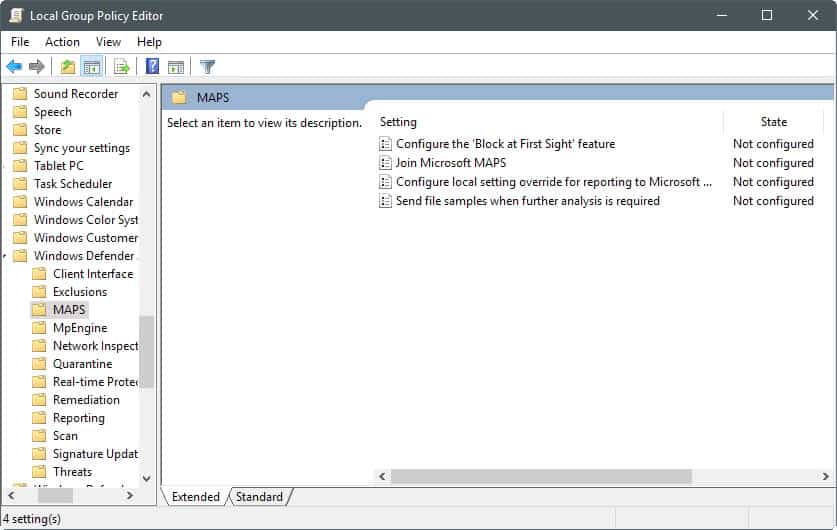
You can use the following method to enable the protective feature if you run a professional or Enterprise version of Windows 10 (Creators Update or up).
- Tap on the Windows-key, type gpedit.msc, and hit the Enter-key on the keyboard.
- Use the hierarchy on the left to navigate to the following folder: Computer Configuration > Administrative Templates > Windows Components > Windows Defender Antivirus > MAPS
- Double-click on Join Microsoft MAPS.
- Switch the status from "not configured" to "enabled.
- Select "Advanced MAPS" under "Join Microsoft MAPS" under options on the same page.
Basic membership is not really an option anymore, as Microsoft has deprecated it under Windows 10. If you select basic membership, you are automatically enrolled in the advanced membership instead.
Basic membership will send basic information to Microsoft about software that has been detected, including where the software came from, the actions that you apply or that are applied automatically, and whether the actions were successful.
Advanced membership, in addition to basic information, will send more information to Microsoft about malicious software, spyware, and potentially unwanted software, including the location of the software, file names, how the software operates, and how it has impacted your computer.
Note that both will send data to Microsoft.
The MAPS folder includes three additional policies that you may want to configure:
- Configure the "Block at First Sight" feature -- This can be used to turn the "Block at first Sight" feature on or off. If enabled, checks are performed in real time with the Microsoft Active Protection Service before content is allowed to run or accessed on the device.
- Configure local setting override for reporting to Microsoft -- Allows you to configure local overrides. Local preference setting take precedence over Group Policy if enabled.
- Send file samples when further analysis is required -- Define if and when file samples are transferred to Microsoft. You can set it to "always prompt", "send safe samples automatically", "never send" or "send all samples automatically. Note that you need to select one of the two auto-send options if you enable the "configure the block at first sight feature.
Change the cloud-protection level of Windows Defender Antivirus
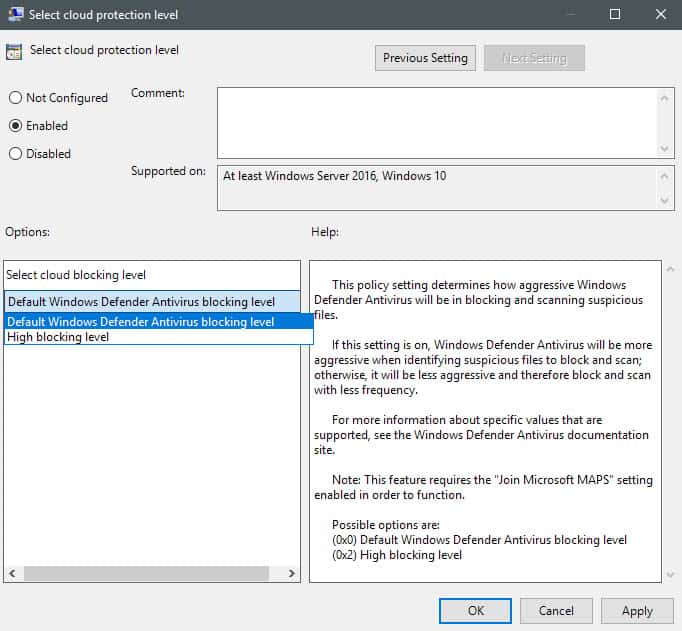
Now that you have joined MAPS on the device, you may set the higher protection level.
- Navigate to the following path in the Group Policy Editor: Computer Configuration > Administrative Templates > Windows Components > Windows Defender Antivirus > MpEngine
- Double-click on "select cloud protection level".
- Set the status of the feature to enabled, and switch from "default Windows Defender Antivirus blocking level" to "High blocking level" under options.
Microsoft has this to say about the differences between the two blocking levels:
Setting to Default Windows Defender Antivirus blocking level will provide strong detection without increasing the risk of detecting legitimate files.
Setting to High blocking level will apply a strong level of detection. While unlikely, some legitimate files may be detected (although you will have the option to unblock or dispute that detection).
Setting this on Windows 10 Home devices using the Registry
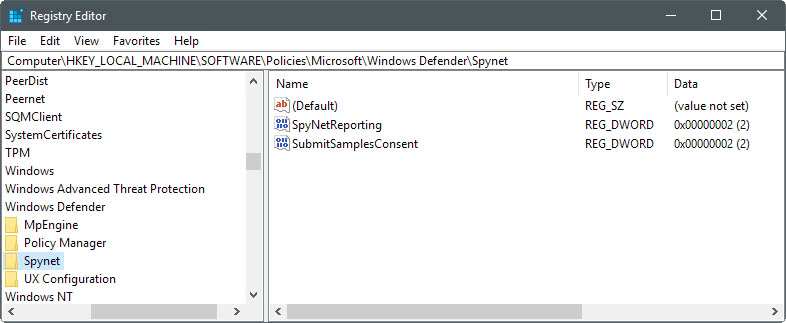
Windows 10 Home devices ship without Group Policy support. You can make the necessary changes using the Windows Registry however.
- Tap on the Windows-key, type regedit.exe, and hit the Enter-key on the keyboard.
- Confirm the UAC prompt. This opens the Windows Registry Editor.
- Use the key hierarchy on the left to open HKEY_LOCAL_MACHINE\Software\Policies\Microsoft\Windows Defender.
- Right-click on Windows Defender, and select New > Key.
- Name the key Spynet.
- Right-click on Spynet, and select New > Dword (32-bit) Value.
- Name the value SpynetReporting.
- Double-click on the new value to set its value to 2.
- Go back to the path HKEY_LOCAL_MACHINE\Software\Policies\Microsoft\Windows Defender
- Right-click on Windows Defender, and select New > Key.
- Name the key MpEngine.
- Right-click on the newly created MpEngine key, and select New > Dword (32-bit) Value.
- Name the new value MpCloudBlockLevel.
- Double-click on the value to set it to 2.
Opt out again
You can opt-out again by deleting the Registry keys, and/or by setting the policies in the Group Policy Editor to disabled or not configured.
Closing Words
Adding extra protection may sound like a nice idea, and it probably is. Some users may not want to enable this however for two core reasons. First, because it enables more data sending to Microsoft (including file samples if configured this way), and second, because it may increase the number of false positives as well. (via Deskmodder / Windows Central)
Now You: Which antivirus solution do you use on Windows?






It doesn’t always protect you: http://www.securitytracker.com/id/1038571
I use the Premium version of Malwarebytes which includes AV protection among other safeguards.
I just use Kaspersky free
What does it mean “Safe Samples”?
I use AVG Internet Security and Windows Defender on my Windows 10 CU x64 Home laptop. Defender seems to mostly defer to AVG presence, but I use it monthly or so to run a complete scan on about 2,000,000 files as I recall – nothing found. AVG found one Trojan over the last 6 weeks it has been running, and it seemed a valid catch, even though by default it only scans about 100,000 files. AVG firewall blocked a program I use that drives the USB2 port on my router, which works with my old but good USB2 printer. Its firewall was configurable to allow the router USB port however. Defender says it is monitoring real time, but I don’t know if that is actually true. Process Explorer will no doubt show me what is going on, when I get some time to check it out.
AVG internet Security new Version AVG Technologies CZ – Framework version 1.203.3.5167 (32/64-bit) and AVG Technologies CZ – Internet Security System version 17.4.3482.0 has the ability to do an optional boot scan, as does Defender in Windows 10 CU. It will be interesting to see qualified reviews of this security solution in the future, but I am impressed now.
ME TOO!! The last time I got malware was before XP Service Pack 2: the Blaster worm telling me my OS will be shut down automatically in few seconds. XPSP2 pretty much got security perfect for Windows. Yes, new vulnerabilities will be found continuously but with the XP POS Ready 2009 patch, even XP can be fully patched still. Microsoft has only been scaring people to “upgrade” each version so they remain in business. Security is a good excuse to scare people into “upgrading” perpetually. After this incident, I am just careful about what I run or install. As long as you use trusted apps, you are safe. I don’t use any anti-virus and I have disabled Defender which slows down I/O performance. My system is completely malware-free for many years. Only idiots who run random untrusted things are at risk from malware. Patch regularly but even if your OS is unpatched, it’s not the end of the world as long as you don’t run random untested programs.
Oh, and Windows Defender is a slow piece of shit that slows down your OS tremendously.
Windows Defender consumed much of my CPU and RAM so I switched to Bitdefender Free.
Currently I do not use any anti-virus software.
Thank you for helping support scammers, DDOS botnets, and identity thieves!
If you’re not protecting your PC – YOU’RE PART OF THE PROBLEM!
Yes folks seem to forget that they are no longer running a Pentium 200MMX from 1999.
It’s not the ones you see, it’s the ones you don’t see.
So do I. I have defender disabled. I know one day I might get pwned, but until then no resources are being allocated on antivirus whenever I do something. The last time I got a virus was back then in XP days telling me my OS will shut down automatically in 30 secs. Now I might had some unknown viruses, but can’t tell. I’m just careful as best as I can.
You should at least use Avira Browser Safety on Firefox or Chrome and disable autoplay from gpedit.msc so you wont get hit by virus via autorun.inf the moment you insert removable drive.