Instant message on your LAN with iptux

I recently covered a great LAN file sharing tool called Giver (see my article "Easily share files on LAN with fellow Ubuntu users using Giver"). I wanted to take that idea a little further and cover a similar tool that allows you to chat with fellow users on your LAN WITHOUT have to add them to a buddy list. Giver is such a tool. Once started it will auto-discover users and allow you to chat away. Giver is simple to install, a breeze to use, and free. A no-brainer for anyone who prefers to chat with their co-workers without having to bother to leave the confines of your desk.
Features
Although not a HUGE list, the features of iptux are really impressive.
- Auto-detect other iptux users.
- Create shared resources (send files).
- Password protect resources.
- Change your online information.
What I like most about iptux' shared resources is that you can password protect your shared resources. And you can easily add/remove files to the resource management. This way you can add files to your shared management that have a password, share them, remove them, and then add files that do not have a password. A nice feature would be to enable the ability to have both password protected and open files in the same manager. That's not there yet, but would be very handy in a company environment.
Installation
The installation is simple. Just follow these (fairly standard) steps:
- Open up your Add/Remove Software utility.
- Search for "iptux" (no quotes).
- Mark iptux for installation.
- Click Apply to install.
- Close your Add/Remove Software utility.
Usage

To start up iptux click Applications > Internet > iptux. This will fire up the main window (see Figure 1) where you will quickly see anyone who happens to be on line and also using iptux. As you can see iptux gives you the "Pals" name and ip address. An unconfigured "Pal" will only list their username. Naturally you can configure iptux to display any name you like. But first, let me show you how to send a message and set up resources.
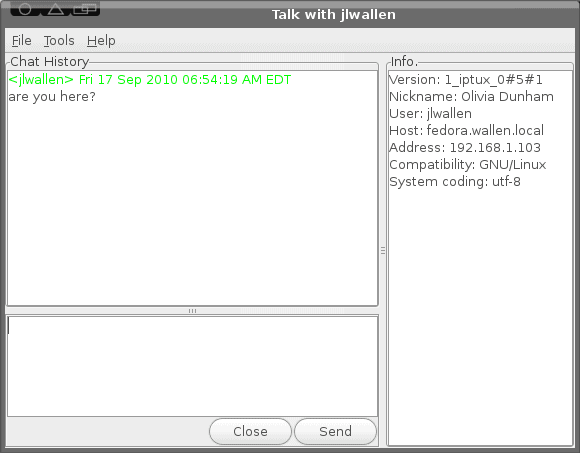
To send a message double click on the Pal you want to communicate with to open up the chat window (see Figure 2). The actual chatting is fairly straightforward. Â Type and click Send.
To create resources to share with users click Tools > Shared Managment. In this new window
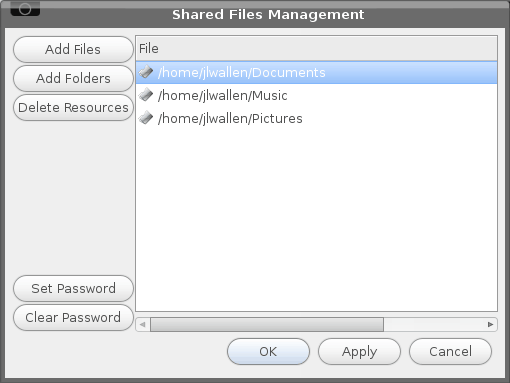
(see Figure 3) you add files and/or folder to your shared resources. If you want to password protect your shared resources, click Set Password and enter your password.
To request shared resources from a Pal simply right-click the Pal in your main window and select Request Shared Resources. NOTE: When you accept a shared directory, you download the full directory. You can not traverse the directory and choose only particular files. So choose wisely when you share a directory.
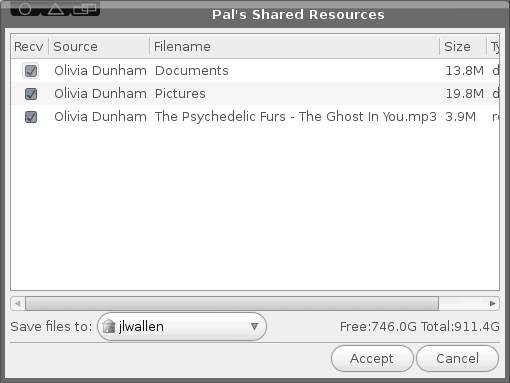
When you request shared resources that are password protected, you will be prompted for the password even before you see the listing of files and folders. Once you reach the shared resources window (see Figure 4) you can select what you want to download and where you want to download it to.
Final thoughts
The iptux application is an ideal little tool for collaborating with fellow workers. It's simple to use, allows you to create shared resources, and is very unobtrusive. Take advantage of this handy application to make your work life much easier.
Advertisement


can we save iptux history?
But… on Unity and Mint 13 the iptux window automatically shrinks to the size of the icons of the connected systems, so the ip nos won’t be visible anymore!
On my Puppy Precise an Mint 11 box there is no such flaw.
IPtux is crap. Everytime i use it I have to “Detect” all the other machines on the network by entering their IP address before they’ll show up in the list.
This is really annoying as there are 5 other machines here.
Goto: tools / preferences /network
Add/define from:192.168.1.0 To:192.168.1.254
Click on “add” and iptux wil automatically connect to available systems
This program is alright, but this article is pretty lacking. You have had a YEAR to fix the above two statements as well, both mentioning the wrong program, and the fact that there is a way to talk to windows computers on the subnet with IP Messenger (although it is humble and ugly by comparison).
what theme is that?
In the opening paragraph you replace the word iptux with Giver twice (in the third and fifth sentences.).
Seems like you were a bit quick in writing the text.
Here’s a link to the iptux website: http://freshmeat.net/projects/iptux
You might also add that iptux is based on a windows tool called ipmsg.exe (or is it the other way round?) and that iptux and ipmsg can communicate with each other on a (home) network with both operating systems.
Here’s a link to the ipmsg website: http://ipmsg.org/index.html.en
Thanks Roebie, I have added the link for Jack.