Getting The Most Out of Windows 7 – Using Jumplists

Jumplists are undoubtedly one of the most secret efficiency tools that Windows 7 possesses. As you may already know, with previous versions of Microsoft Windows, the Start Menu showed a list of recently accessed files and documents that allowed users to navigate to them with a single click. But with all its ease, this list could only link to a few certain file types, and it displayed only the last 10 files that the users had accessed recently, in a way quickly cycling items off that list.
Now a Jumplist in Windows 7’s Start Menu shows recently used files that have been used by various applications individually.
These Windows 7 Jumplists are based on the same old recent items concept, but now that concept has been applied on an application-by-application basis to provide users a fast, one-click access to the recently used files.
Now how would you know that there’s a jumplist present for the application you use most frequently? There’s a little arrow to the right of the application name in the Start Menu, which indicates that a Jump list for this application is available. Users can hover over the application name to expand the consequent Jump List and see a list of the files that they have recently accessed for that program. To open it instantly, all one needs to do is to click on the file name.
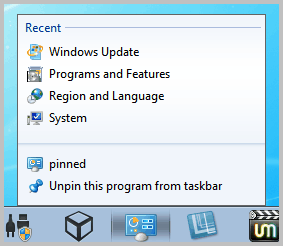
Jumplists are also available for items displayed on the taskbar. There is no arrow indicating that a Jumplist is available. To see if it is, right-click an icon on the taskbar.
The number of items that are maintained in each Jump List is 10 by default, but users can expand it to up to 60 by manipulating the Start Menu settings. Just Right-click on the Windows taskbar at the bottom of the screen and select Properties from the context menu, then move to the Start Menu tab in the Properties window that pops up and click on the Customize button.
Look at the bottom of the Start Menu customization area; and there you can alter the number of recent items to be displayed in the Jump List. This setting will be universal and will be applied to each application’s Jump List. For the time being, there is no possibility to customize the number of items on an individual application basis.
Now here’s the cherry on the top, you can pin the most frequent items you use to the Jump List, so you never have to worry about them moving off the list. For that, just click the push pin icon that appears right next to the file’s name when you hover the mouse pointer over it in the Jump List, to pin it to the Jump list permanently. Files that you have pinned appear above the dynamic list and do not cycle off, even if you don’t use it for some time. To make an item unpin from a Jump List, simply select it in the Jump list, click on its push pin icon, and choose Unpin from this list.
This functionality makes windows a much easier program to use for those that are constantly switching between files or applications, and have multiple processes open at the same time. If you have been looking for something that will help your efficiency, then this might be just the tool for you.
Thank you ferry much for your input, I will keep on looking for the app.
Yes Martin, Sorry that I was not Cristal clear to you. I schould have asked is there a way to remove with one swift move all the recently used entries, from one particular Windows taskbar program? Or maybay a program?
I do not think there is a way to do that natively, not sure if there is an app for that.
Hoi Martin, Indeed a ferry nice feature. The only question i have about the windows items jumplist is or i can clean up individual, of each item on main windows taskbar of.the last opened items?
You can remove individual entries.
Wow – really useful, and I had no idea. Thanks!