
How to Capture Screenshots on Windows 10 and 11


Capturing screenshots on your Windows 10 or 11 device is a common practice that can be useful for a variety of purposes, including documenting software bugs, creating tutorials, or sharing information with others. There are various methods to capture screenshots on your Windows device, each with its own unique set of features and functionalities.
In this article, we will explore different ways to capture screenshots on Windows, including using the built-in Snipping Tool and Game Bar, pressing the PrtSc key, and using third-party screenshot applications. By the end of this article, you will have a better understanding of how to capture high-quality screenshots quickly and efficiently.
Use the Snipping Tool
- To capture a screenshot on Windows, use the Snipping Tool application.
- Access the Snipping Tool by navigating to the Start menu and searching for it in the search bar.
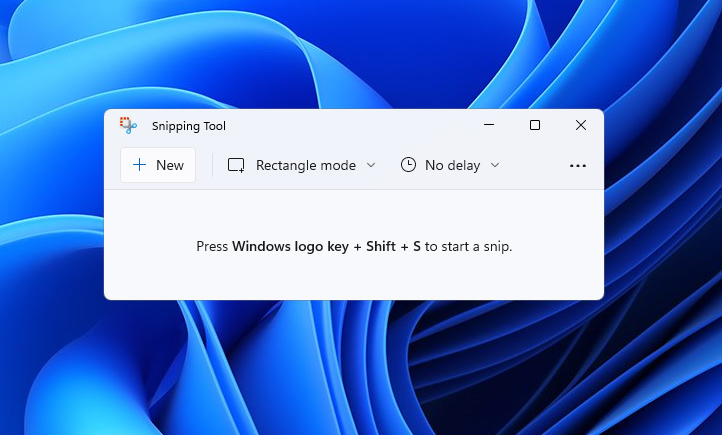
- The Snipping Tool offers a variety of screenshot methods to choose from, including Rectangle Snip, Freeform Snip, Window Snip, and Fullscreen Snip.
- These options are located at the top of the Snipping Tool overlay.
- Select the method that best fits your requirements.
- Use your cursor to select the region you want to capture.
- Once you've positioned your cursor over the desired region, release the cursor to capture your snapshot.
The Snipping Tool makes capturing high-quality screenshots a simple and efficient process.
Related: How to open registry editor on Windows 11

Use the PrtSc key
- To take a screenshot on your computer, use the PrtSc (Print Screen) key.
- The PrtSc key is typically located in the top row of your keyboard, near the function keys.
- To capture a screenshot using the PrtSc key, simply press and hold the key.
- This will capture a screenshot of your entire screen and save it to your clipboard.
- From there, you can paste the screenshot into an image editor or document of your choice.
Using the PrtSc key is a convenient and easy way to capture screenshots quickly and efficiently. By using this method, you can capture and share information and visuals with others effortlessly.
Use the Game Bar
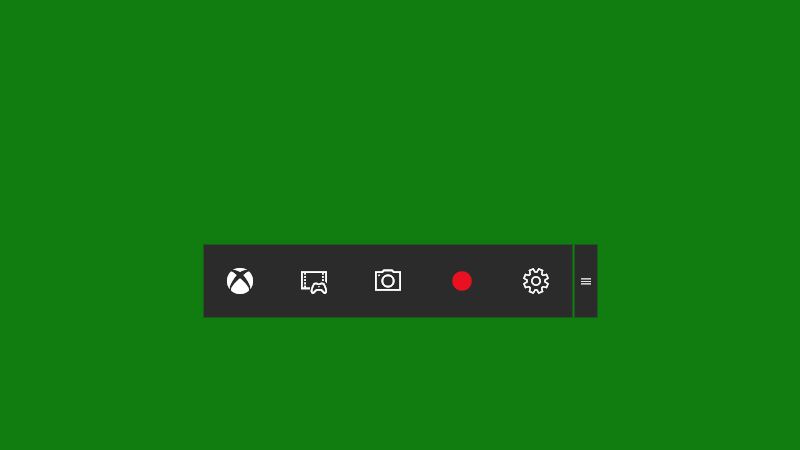
- To access the Game Bar, press the Win + G key combination on your keyboard.
- Navigate to the Capture area, located in the top-left corner of the screen.
- Use the Take screenshot option to capture a screenshot of your current screen.
- Use the Record button to capture a video of your screen or take a screenshot of a specific window.
Using the Game Bar to capture screenshots and videos is a useful and straightforward method. This method is particularly helpful for those who need to capture images or video footage for presentations, tutorials, or work-related purposes. The Game Bar's built-in features make it easy to capture high-quality visuals quickly and effortlessly.

Search the internet for a third-party solution
If you're looking for a more feature-rich screenshot application, you may want to consider searching for one on the internet. There are various screenshot apps available, each with their own unique set of features and functionalities.
To find a screenshot app that suits your needs, you can perform a simple search on the internet using your preferred search engine. You can use keywords such as "screenshot app," "screen capture software," or "screen recording tool" to find relevant results.
Once you have a list of potential screenshot apps, you can compare their features, pricing, user reviews, and ratings to determine which one is the best fit for you. Some popular options include Snagit, Greenshot, Lightshot, and ShareX, among others.
By using a dedicated screenshot app, you can have more control over your screenshots, including the ability to annotate, edit, and save them in various formats. This can be especially useful for professionals who require high-quality screenshots for their work or personal projects.
Related: Windows 11 File Explorer is getting a Recommended section
Screenshots made simple
There are various methods to capture screenshots on your Windows 10 and 11 devices, including using the built-in Snipping Tool or Game Bar, pressing the PrtSc key, or using a third-party screenshot application. Each method has its own unique set of features and functionalities, allowing you to capture high-quality visuals quickly and effortlessly. By choosing the method that best fits your needs, you can streamline your workflow and enhance your productivity when it comes to capturing and sharing information and visuals with others.
Advertisement


win-f
There are many ways to printscreen which have overlapping as well as unique function. For me an appropriate combination for 99% of my requirements is PicPick, IrfanView, and paint.net per https://www.getpaint.net/ but it takes individual effort to try alternative solutions best for you.
Good old, snipping tool, helped me to save, some dosens of ladies pics ;) Nowdays, I’m using an trully storng ‘n’ good app, that is of course the ShareX. Most features, includes region capture, video capture (from whatever area you want), media convertion, direct uploading and plenty of other usefull tools. Using it mostly to share photos on forums.
For my option, windows snipping tool is dead.
The latest update of the W11 Snipping tool is just a complete failure. It places the working icons at the bottom of the working screen and it’s very difficult to get access to them if not enabled full screen. Also the taskbar is so big that it’s almost a weird difficult obstacle to work properly. If the taskar could be placed at top of the screen this serious problem would be less improductivy. W11 is the tomb of the competence and clever people, they don’t do nothing good recently.
Any particular reason you’re using it, then?
You didn’t say anything about the method introduced in W10–while holding down the Windows key (to right and left of Space bar, either one), press the Print Screen key. The screen darkens for a second, and the image is placed in the Screenshots folder in the Pictures folder. Of course, it stays there until you delete it. Using the method that places the screenprint in Clipboard, eventually the image will disappear. Maybe there’s a set, definite time for contents to stay there and then they’re gone, I don’t know, but eventually stuff there will disappear; at least, that’s my experience.
This is a great tip. Do you know how to change the naming template so it uses date and time instead of just sequential numbering?
Dude if you’re using printscreen just open a “paint” instance and paste in there, your printscreen will be preserved until you save it, freeing up your clipboard.
Dude (basingstoke), I don’t know what a “‘paint’ instance” is, and I normally create screenprints using the Windows key method I described. My Clipboard is in fine shape. Thanks.
You wrote this:
“Using the method that places the screenprint in Clipboard, eventually the image will disappear. Maybe there’s a set, definite time for contents to stay there and then they’re gone, I don’t know, but eventually stuff there will disappear; at least, that’s my experience.”
The method that places the “screenprint” into clipboard is called the “printscreen” button, am I wrong? Well I have described a method of making things not “disappear” when using printscreen by itself, because it seems you didn’t know of it. Feel free to keep using windows key + printscreen by all means – but pasting a printscreen into paint is a really old trick, i’m not making up random stuff here.
Btw a “paint instance” is the same as a “chrome instance” or an “audacity instance”, it’s an instance of an application or program.
And just to throw two cents in, i don’t believe a printscreen result ever disappears from the clipboard, you probably just used ctrl+c at something else which overwrites the clipboard, which is a very easy to make mistake.
One thing I don’t like about windows+printscreen is that you have to navigate to the screenshots folder anyways afterwards to check the result (as I usually use printscreen to capture things that happen too quickly for snipping tool to grab, I need to make sure I timed it right). Printscreen+paint gives the benefit of showing you what you captured without navigating file explorer, and if the screenshot didn’t come out right, just close the window, no file was created, nothing ends up in recycling bin.
But if you’re 100% sure you took the printscreen of what you wanted, I guess yours is a good method.
Don’t know that navigating to the screenshots folder is any more trouble than “open[ing] a ‘paint’ instance.” And again it’s permanent without any accidental deletion, timing out, or being pushed out of the stack of 24 entries in Clipboard. My only use of Paint has been to do some type of graphics on something (like a screenshot) (like drawing a box around something) to highlight something I’m going to send to somebody as an email attachment.
Basically, I can’t believe the person who wrote this article didn’t mention the method I described.
Totally fair – no need to argue about this, i guess. As you can probably guess I am not using Microsoft’s latest and greatest, so don’t have 100% knowledge of the new methods.
One thing I’ll throw in that should have been mentioned is irfanview – the lightest photo viewer (that can handle huge multi-gigabyte pictures even better than the Win7 and Win10 photo viewers), it’s screenshot feature captures the cursor which is highly useful for writing guides and documentation.
Do any of the windows 10 screenshot methods allow capturing the cursor, out of curiosity? No built in Win7 method does.
Unfortunately, this process is not simple. Flameshot is a much better alternative.
Lies, there’s nothing anybody reasonably needs that isn’t covered by snipping tool or printscreen. As someone who takes a lot of screenshots, that is my opinion.
Some social media sites (such as discord) will even accept the “copy” from a snipping tool (straight from clipboard), meaning you dont have to save it as a local file before uploading it.