
How to block Windows 11 from encrypting drives during installation


A clean installation of Windows 10 or Windows 11 may enable Bitlocker drive encryption automatically. The main system partition and all fixed drives will be encrypted in this case after the out-of-box experience.
Bitlocker protects data on the PC against unauthorized access by encrypting partitions and drives.
Microsoft calls this specific BitLocker feature device encryption: "Device encryption is a Windows feature that provides a simple way for some devices to enable BitLocker encryption automatically".
Problem is, since the encryption process happens automatically in this case, users may not be aware of it. This can lead to issues, for instance when reinstalling the operating system without saving the Bitlocker recovery key or using a Microsoft account. Access to files is lost in the worst case.
Thankfully, there are ways to block Windows from enabling the automatic encryption of drives during clean installs.
Option 1: during installation
New PCs come with a preinstallation of Windows. This speeds up the setup process, but it also gives users less control.
Step 1: It begins on the country or region selection screen.


Step 2: Open the Registry Editor

- Use the keyboard shortcut Shift-F10 to open a command prompt window.
- Type regedit and press the Enter-key.
This opens the Registry Editor.
Step 3: Disable automatic encryption using BitLocker
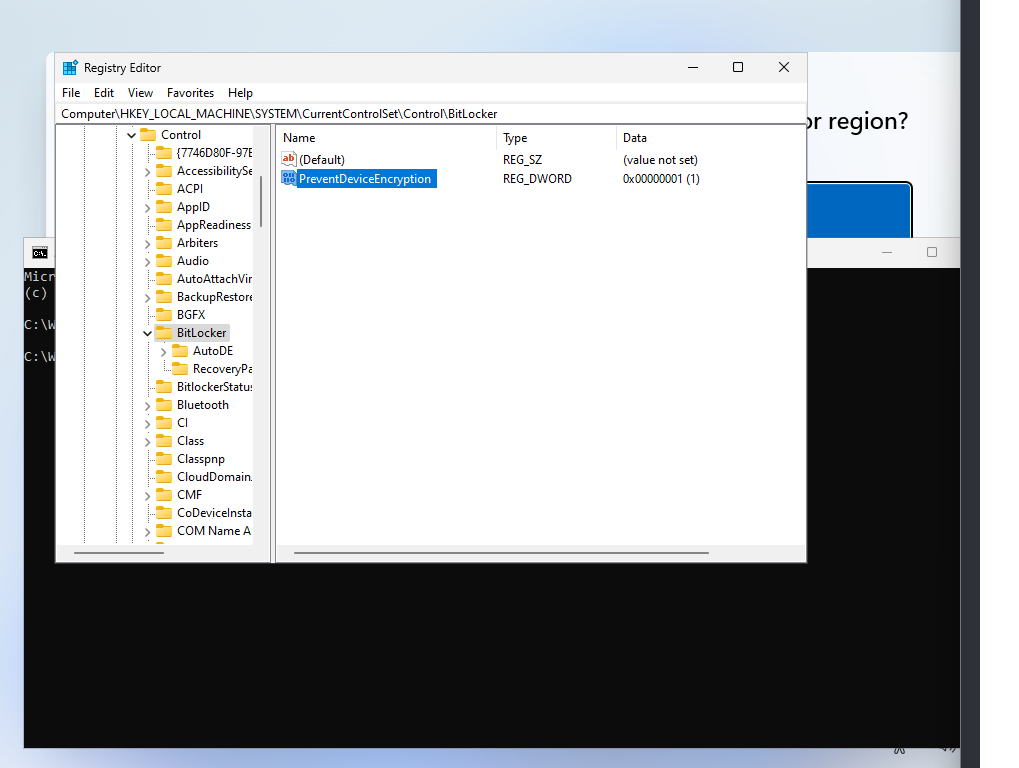

- Use the structure on the left to go to HKEY_LOCAL_MACHINE\SYSTEM\CurrentControlSet\Control\BitLocker
- Right-click on BitLocker and select New > Dword (32-bit) Value.
- Name it PreventDeviceEncryption.
- Double-click on it and change its value to 1.
- Close the Registry Editor.
- Close the Command Prompt window.
Continue with the installation.
Option 2: Manipulating an ISO image
It is also possible to modify an ISO image directly. This requires a USB device with at least 16 GB of storage. The Windows installation is copied to the USB device and the PC is booted from the USB device to install Windows.
Here is how this works:
Step 1: Download Rufus
Rufus is a free program to create bootable USB drives. You can download the latest version for Windows from the homepage.
Step 2: Run Rufus
Rufus does not need to be installed. Just double-click on the downloaded executable file to start the app. Make sure you give your okay for online update checks, if you do not have a Windows ISO image already. This allows you to download the ISO using Rufus.
Step 3a: download the ISO using Rufus
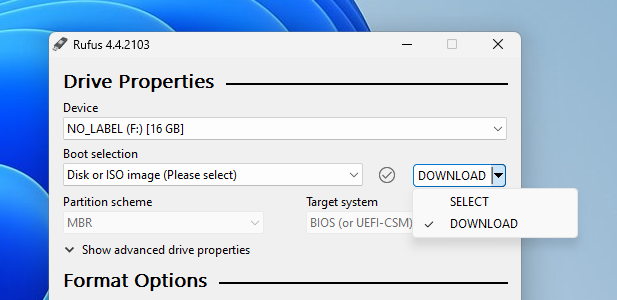

Switch from select to download in the upper half of the interface. Activate Download again to start the process.
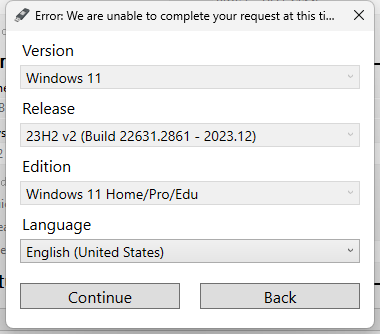

Select the version of Windows, edition, language and architecture. It may take a while for the download to complete.
Step 3b: select an ISO that is already on your device
Make sure select, and not download, is selected in the Rufus interface. Click on the select button and use the file browser that opens to select the ISO image.
Step 4: Preparing the ISO
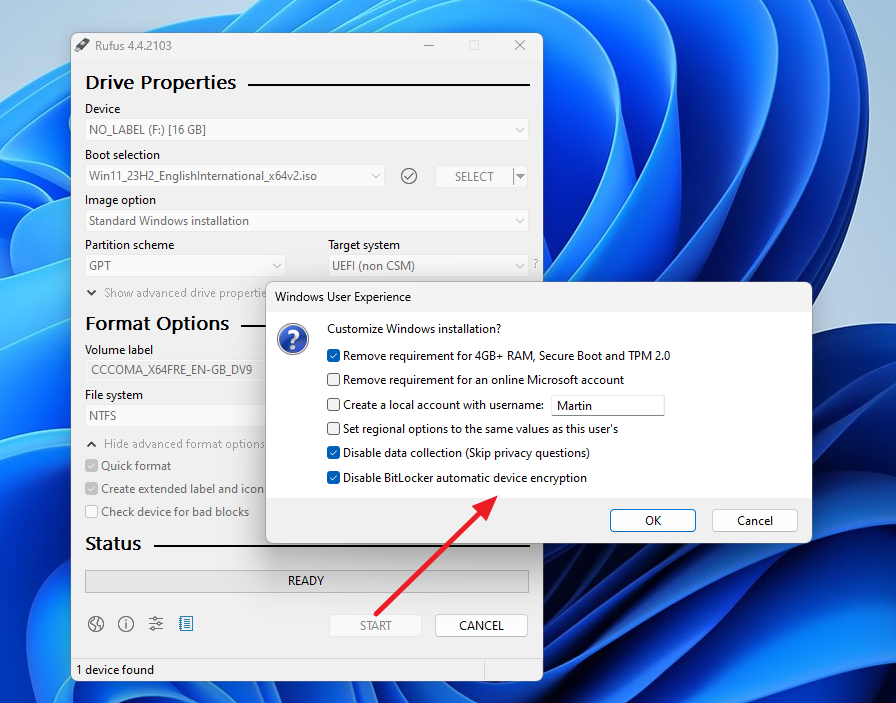

Select Device at the top to pick a device that you want to copy the Windows installation files to. Note that you cannot pick fixed hard drives.
Once done, activate the start button at the very bottom. Rufus displays the Windows User Experience window.
Make sure Disable BitLocker automatic device encryption is checked. This prevents the automatic encryption of drives using BitLocker during installation of Windows.
Select OK to continue. The program writes the files to the selected USB device.
Bonus Tip: check the BitLocker status
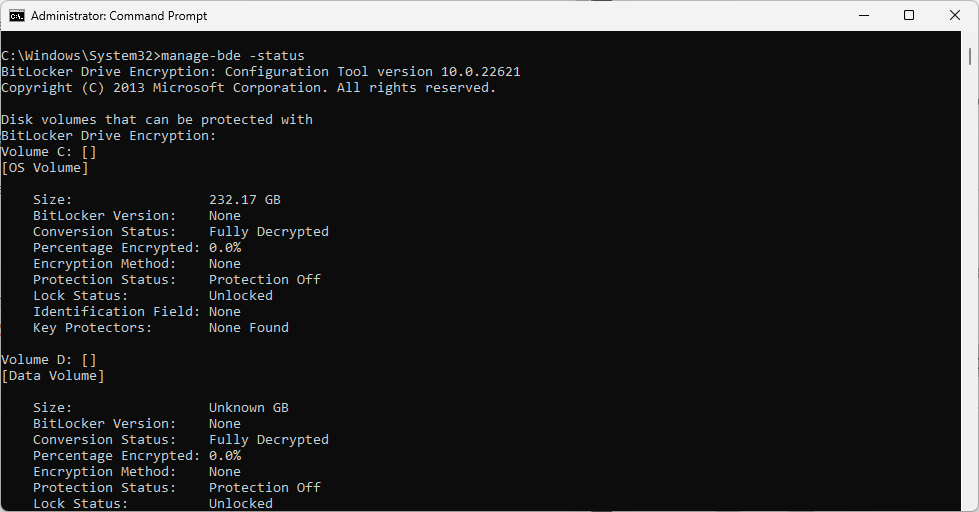

A simple command reveals the status of all drives and partitions in regards to BitLocker encryption. Here is how that works:
- Open Start.
- Type CMD.
- Select "run as administrator" while Command Prompt is selected.
- Paste manage-bde -status and press the Enter-key.
Check any of the following parameters: BitLocker version, Conversion status, Percentage encrypted, Encryption method, Lock status, Identification field, or Key protectors.
If you see "none, "fully decrypted", "0.0%", "None", "Protection Off", "Unlocked", "None", and "None Found", then the drive is not encrypted using BitLocker.
You can disable the protection by running the command manage-bde –off DRIVELETTER, e.g., manage-bde –off C: from an elevated command prompt.
What about you? Do you use encryption, maybe even BitLocker? (inspiration from Deskmodder)


With Rufus, does anybody know if you’re able to choose to download a Windows ISO of the Enterprise SKUs? Last time I used it, Pro seemed to be the highest tier Rufus could pull.
Also disable Bitlocker Drive Encryption Service in services.msc once you confirm drive is not encrypted in any way using manage-bde -status.
More stupid ideas from Microsoft. I don’t need the overhead just like with Windows Defender. Why not provide a check box in the initial setup?
It helps with security (but may give a false sense of security). If your data are in the cloud, leave it.
Just switch off the bitlocker-service…………..
If you dont use it .
I can’t understand why someone could recommend to the readers to not encrypt drives during installation. The article itself contains this big allegorical phrase inside that puts you in the right way of doing right things: “Bitlocker protects data on the PC against unauthorized access by encrypting partitions and drives.”. I can post twice if you all need to read it twice to understand its meaning. However I suppose that you all have the enough sense to just make a clear thought.
So please, let your hard/ssd drive to be encrypted to make your system safe, and also other drivers if you can. Just to protect your personal data, your family photos, your documents, your bills after paying taxes or everything that you want to be permanent safe and away enough from the thieves. If someone robs your computer and it’s not encrypted, everything that the robber will found will be used against you and the safety of your own family. Just use the common sense and do encrypt!
John, the problem is not the encryption, it is that it happens automatically, usually without the user knowing about it. This can lead to problems. Also, there are other tools, VeraCrypt for instance, that are also available.
Thanks @Martin, because I have understood it now more clearly. I meant that not all the users have high level skills on computers. Me myself. My fathers neither. So imho I prefer that some extra security has been given to us by default. It’s like buying a new house, anyone would prefer those houses with an extra security steel entrance door. However you are right that the OS could recommend other software to do such some kind of work. Thanks for the article!
Another very useful article – thank you Martin.
On a humorous note, all of them can start and end with “Get Rufus. Done.”
That’s what I did in March – finally installed Linux Mint. Before I ran an outdated Windows 10 build with updates so disabled you couldn’t enable them if you wanted. But I grew sick and tired of looking at the ugly Windows UI and dealing with it fighting me every step of the way in a cat-and-mouse game where Windows prevents me to operate my computer the way I want.
I’m still using Linux Mint, I’ve never lasted this long with Linux before. Last time was around 2010 with Ubuntu and then I couldn’t stand it anymore, because I played games a lot more and I couldn’t bear the thought of not being able to just download, install and play every game out there..
Now I barely play any games, I fixed my nVidia drivers, can run Turtle WoW, Heroes of Might and Magic 3, Age of Empires 2, I tried running brand new games through Proton and they run well too, if only I ever wanted to play them…
Linux is really a solution to Windows becoming even more of an invasive malware spyware garbage, just people are too ignorant to realize it.
“How to block Windows 11 from encrypting drives during installation”
Easy. Don’t use Windows.
OK that’s odd. Under Win 10 my laptop was unencrypted. After update it told me I needed an encryption key to boot up. Windows was configured without a MS account, so no encryption key existed in my MS account. Microsoft restore did nothing. Dell’s disk space hog recovery system was it’s equal!
Trying to solve the problem, I did some reading. “Windows Pro is required for Bitlocker” raised a few swear words.
My data were all saved to cloud so, no big deal I configured Windows 10 again. Again I checked Bitlocker was off. It was.
A while back I upgraded to Windows 11 Home edition. This time I configured with a user account. Running manage-bde -status, Bitlocker is on. No big deal. Data are still saved to cloud with no issues.
So, Bitlocker can switch itself on unknown to the user. If manage-bde -status reveals Bitlocker is on and you don’t have it configured under your MS account, save the scrip below as a .ps1 file, right-click and run wit powershell. The string of 48 numbers is the computer’s Bitlocker key.
################################
# Self-elevate the script if required
#(https://blog.expta.com/2017/03/how-to-self-elevate-powershell-script.html)
if (-Not ([Security.Principal.WindowsPrincipal] [Security.Principal.WindowsIdentity]::GetCurrent()).IsInRole([Security.Principal.WindowsBuiltInRole] ‘Administrator’)) {
if ([int](Get-CimInstance -Class Win32_OperatingSystem | Select-Object -ExpandProperty BuildNumber) -ge 6000) {
$CommandLine = “-File `”” + $MyInvocation.MyCommand.Path + “`” ” + $MyInvocation.UnboundArguments
Start-Process -FilePath PowerShell.exe -Verb Runas -ArgumentList $CommandLine
Exit
}
}
# (https://www.top-password.com/blog/tag/get-bitlocker-recovery-key-from-cmd/)
# November 28, 2017 – TJY
# Generate a list of Bitlocker recovery keys and display them at the command prompt.
#
# Modified to only display volumes that have recoverykeys, 2022/07/05 CodexIT, MJE
# Identify all the Bitlocker volumes.
$BitlockerVolumers = Get-BitLockerVolume
# For each volume, get the RecoveryPassowrd and display it.
$recovery=@()
$BitlockerVolumers | where KeyProtector -ne $false |
ForEach-Object {
$MountPoint = $_.MountPoint
$RecoveryKey = [string]($_.KeyProtector).RecoveryPassword
if ($RecoveryKey.Length -gt 5) {
$props=[ordered]@{}
$props.add(“MountPoint”,$MountPoint)
$props.add(“RecoveryKey”,$RecoveryKey.trim())
$recovery+=New-Object -TypeName psobject -Property $props
}
}
if ($recovery.count -gt 0) {
$recovery|Format-Table
} else {
“false”
}
# Pause for user to read the result
pause
Rien compris lol
It is my understanding that Bitlocker is only turned on automatically if you sign-in with a Microsoft Account. If you create a local account instead, it won’t enable bitlocker.
Not necessarily. In my case, when I configured Windows 10 Home without linking it to my MS account, it ]partially configured sufficient to cause the problem mention in my post above.
why bother, its easier to turn it off right after the installation once on the desktop, in settings device encryption, by this it only just started and takes only a few min to decrypt and sets to off,
Select the Start Windows logo Start button button, then select Settings Gear-shaped Settings icon > Update & Security > Device encryption. If Device encryption doesn’t appear, it isn’t available on your device , only devices with modern standby enabled,