Microsoft sneaks Secure Boot support into Windows 7 shortly before support ends
Support for Extended Security Updates for Windows 7 is ending today officially. Microsoft will release a last cumulative update for Windows 7 on January 10, 2023 before the operating system is laid to rest.
Users and organizations who run Windows 7 have a few options available to them to continue using their devices. The official path is to upgrade devices to Windows 10 or 11, or replace them with newer devices that run these operating systems.
Those who prefer to stay on Windows 7 may subscribe to 0Patch for less than $30 a year to receive critical security updates for at least 2 years starting with the official end of support. There may also be options to install patches that Microsoft produces for systems that are based on Windows 7 and still supported by the company.
Chinese blog CSDN discovered in October 2022 that Microsoft appears to have added support for Secure Boot to Windows 7 via the September 2022 cumulative updates. Microsoft did not announce the change in the changelog or elsewhere, to the best of our knowledge.
Microsoft introduced support for Secure Boot in Windows 8 and has not backported the feature to Windows 7 during Windows 7's official support lifecycle. Support for Windows 7 ended in January 2020 for all Home customers while Enterprise and business customers could extend the support range by up to three years for a price.
Secure Boot is a security technology that verifies the integrity of core system components, including the UEFI firmware drivers, EFI applications and the operating system. Only if these components are verified through checks is the operating system booted.
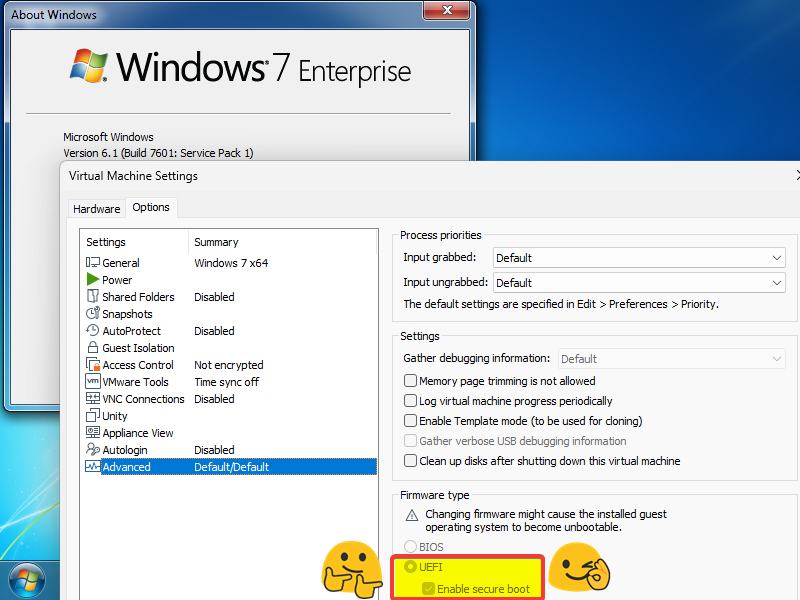
Twitter user Bob Pony published news about this on the messaging site recently. He posted a screenshot of a Windows 7 Enterprise system running Secure Boot. Secure Boot does not work on UEFI Class 3 systems directly to the information published, which means that a workaround is required. The second caveat is that the feature was introduced in an ESU update.
Lastly, it needs to be noted that it feels strange that Microsoft would add support for the feature near the end of the operating system's end of support date. Microsoft did not even reveal that it added the feature, which means that no one outside of the company knows why it was added just months before support end.
Now You: what is your take on this? Why did Microsoft add Secure Boot support to Windows 7? (via Neowin)


there already out there bypass tools both for 7 and 8.1, where you can install updates to clients from server 2008 r2 and 2012 r2.
for more info check the mydigital life forum.
Anonymous said on January 17, 2023 at 6:04 pm
Does it mean that Secure Boot is enforced on Windows 7 machines now ? Could it mean that Microsoft is preventing the use of alternative operating systems on these machines just at the time Windows 7 is becoming obsolete ?
11r20 says Yeppers, All the above. Win7 was the best they ever made.
The Micro$hyyt bean counters don’t like the fact that an operating system they built in 09 belongs to us, and we’ll use it the way we want…I bought mine in 09, a model Win7-Pro with a New HD, Tower, Netlimiter, PiHoled Router etc.
They don’t like us using clean-fast-quiet-secured-locked-down-systems that they can’t manipulate or destroy.
We bought n’ payed for these systems and it appears that “secure-boot” may be the “kill-switch” that can be potentially used on unsecured systems.
“Back to the Future”
Does it mean that Secure Boot is enforced on Windows 7 machines now ? Could it mean that Microsoft is preventing the use of alternative operating systems on these machines just at the time Windows 7 is becoming obsolete ?
https://www.fsf.org/campaigns/campaigns-summaries#secureboot
Either Microsoft had to backport some fix for the bootloader, and decided to not bother with stripping down features – or Microsoft wanted to make running Win7/2008R2 in VMs a tiny bit easier which would also make sense (recall that 2008R2 gets extra ESU year).
Windows 7 will still be used by me for a while. Every update to Windows 11 only makes the situation worse. I hope that the decision makers for Windows 11 are all fired soon. A professional operating system like Windows 7 is something that we desperately need.
Ya also anyone notice the propaganda of climate change all over the operating systems Windows 11 screams it…
What’s that all about smells worst than a prime minister or a president.. I’ve got a bad feeling about all of this.
With all the restrictions around the world for carbon footprints what’s going to happen the OS is going to shut off certain times of day? Thanks but no thanks.
Good catch on the Windows 7 patch though didn’t see that one.
Secure Boot is part of UEFI and even Windows Vista supports it, Microsoft only started enforcing on OEMs with Windows 8, but the feature always been there.
Same way Microsoft is enforcing TPM on Windows 11, but is also a feature that been there for over a decade.
So this article is extremely misleading.
Windows 7 and older versions do not run when Secure Boot is enabled…
Not anyway. Modern stuff works fine, but i still use csm, x670 and even wrx80 chipsets works fine, of course with hacked drivers.
Can you please tell me where I can find the 3-rd party or patched drivers for the new hardware?
here you go:
https://winraid.level1techs.com/t/solution-win7-8-1-drivers-for-usb-3-0-3-1-controllers-of-new-amd-chipset-systems/33603
– “Microsoft appears to have added support for Secure Boot to Windows 7 via the September 2022 cumulative updates”
Wouldn’t concern Windows 7 set to block updates. Last Windows 7 update here goes back to several years.
– “Bob Pony […] posted a screenshot of a Windows 7 Enterprise system running Secure Boot.”
If support for Secure Boot has effectively been added to Windows 7 (via the September 2022 cumulative updates), would this concern Windows 7 Home Edition as well or only Enterprise?
Secure Boot is sort of a joke now, I don’t think its any great security tool baked into the UEFI. If you are still running Windows 7 its probably on relatively older hardware anyway. Many systems probably still using legacy bios and not UEFI. I suppose Microsoft is doing its best to brace these systems for a onslaught of attacks after support ends.
Martin, thanks for informing. Not mandatory, but nice addition to Win7 features.