NVSlimmer: remove unwanted components from Nvidia drivers
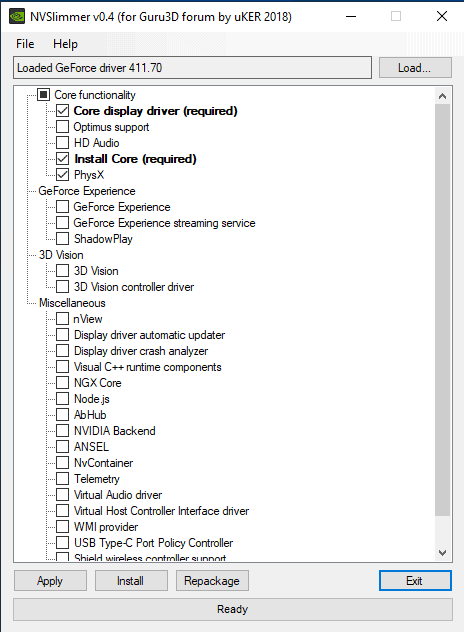
NVIDIA driver slimming utility (NVSlimmer) is a free portable program for Windows to remove unwanted components from Nvidia drivers before installation.
Nvidia graphics drivers have grown considerably in recent time thanks to the introduction of new features and components.
Current drivers install a lot of these components by default even if the PC system does not support certain features or when certain components are not used or wanted.
To name a few: GeForce Experience, Telemetry, ShadowPlay, 3D Vision, Optimus, or backend components required for certain features.
These components take up storage space on the system, may be loaded automatically, and may even submit Telemetry data to Nvidia automatically. There is also a chance that components may have vulnerabilities, like GeForce Experience's node.js back in April 2017.
Administrators and users can do something about it. While it is certainly comfortable to just press install and be done with it, it is usually better to spend the extra minute to install only the Nvidia graphics drivers or at the very least block Telemetry from being installed or disable Nvidia Telemetry.
Remove unwanted components from Nvidia drivers

NVSlimmer is a free portable program for Windows that gives you full control over the installation of Nvidia drivers.
Start the program after extraction on the local system and select the Nvidia driver that you want to install on the system. Note that you need to download drivers separately as the program does not support driver downloads at this point in time.
NVSlimmer analyzes the driver package and displays the detected components in the interface afterward. Only core components, the display driver and Physx are selected by default. All other components, e..g Telemetry, 3D Vision, GeForce Experience, or Nvidia Backend are not selected.
You can select components that you want to install on the system by checking them. Note that you can't uncheck the core driver or component, but that all other components are optional.
The program does not check dependencies at this point in time which means that you may install components that rely on other components that are not installed. The developer plans to integrate dependencies in a future version so that required components get selected automatically when you check certain components.
It is easy enough to run the program again and select missing components.
Hit the apply button after you have made the selection to remove any component that you have not selected from the installation process. Select install in the interface to run the default Nvidia driver installer. The installer will install only the selected components and nothing more.
Select custom installation during setup to verify that; only the selected components should be displayed after you select custom installation.
You may use NVSlimmer to create a new installation package that includes only the components that you have selected. Useful for installation on multiple PCs or systems, or to keep the custom driver installation package in reach whenever you want to re-run it on the PC it was created on.
Closing Words
NVSlimmer is an easy to use program to create custom Nvidia driver installation packages and installations.
Now Read: Improve the performance of Windows PCs with Nvidia hardware








I would recommend that people instead use TinyNvidiaUpdateChecker to do this more gracefully.
The config file can be created at: %localappdata%\Hawaii_Beach\TinyNvidiaUpdateChecker
as the file “app.config” with the text contents of: https://pastebin.com/PxZtcL3Q
Thanks to Martin and various commentators for your gems and EP for your tip-off..
My Lenovo ThinkPad with Win7 PRO 64-bit 4 GB RAM can be very laggy at times. Rendering is often pathetic.
I will clone the HDD and play with the clone, and if I screw up, nothing will be lost.
oh Martin. I just saw this recent blog from the Born Tech & Windows World site mentioning NVTrimmer:
https://borncity.com/win/2018/10/03/warning-avoid-nvtrimmer-for-nvidia-driver-customization/
@EP,
Yeah, I was just reading the same article. The main problem with the NVTrimmer seems to be that it uses 7-zip to repack the drivers. Born considers that to be a security risk because the dev refuses to harden the packer: https://borncity.com/win/2018/02/21/security-risk-avoid-7-zip/
Maybe you should consider removing the article Martin since it puts your reputation at risk if an app you recommended causes data loss, or exposes a user’s system to malware.
I always go to device manager and uninstall the display adapter, also checking the box to uninstall the software, then run DDU.
Tried this software last night, works like a charm, no need to disable the nvidia tasks anymore since there arent any :)
Great tool!
Clean install doesn’t remove all nvidia components; it does reset any changes made in the control panel and profiles. I haven’t found anything that removes all the bits and pieces left in registry after an uninstall. Some are locked; I don’t mess with those much, too much effort to delete and they don’t seem to be causes for issues.
I’ve had installs that became corrupted somehow and created lots of problems with photo and video editing software that couldn’t be fixed without going through the registry line by line deleting entries, after uninstalling.
So, I uninstall before an upgrade, install and if all is OK, good. I install only the driver and hd audio (used for external monitor) nothing else, turn off the telemetry service, then the telemetry tasks with nirsoft’s taskschedulerview, finally block nvidia in the firewall.
There are probably 100 ways to do this but the simpler methods that can be used on most software are what I tend to use to avoid spending days trying to remember what I did 6 months down the road.
System cleaners used without examining what’s being cleaned can royally hose nvidia files.
NVSlimmer seems like a good way to do some of these things with little effort.
Good to know, thanks ULBoom. That’ll interest Yuliya (above comment) and remove the idea I had in mind (without being sure) that a clean NVIDIA driver install meant removing all components before installing new ones. To be logical and cleaner than Mr. Clean i’d have to run the ‘Display Driver Uninstaller (DDU)’ then install the NVIDIA driver with NVSlimmer … another time :)
Yeah, I was leaning more towards this anyway. Always expect the worse outcome. If in the fortunate event turns out to be the exact opposite it can only make you happier :)
I tried to run version 0.5 of the NVSlimmer, but the software failed to run and Windows provided the following error message:
“[Path to NVSlimmer application and application file name] is not a valid Win32 application.”
This was done on a computer running Windows XP Professional with Service Pack 3.
@Q : Works only in Windows 7 and later ?!
Seems this sofware works only on 64-bit systems.
I forgot to mention what seems obvious even if it may not be required :
After having checked the install settings in NVSlimmer and then installing the NVIDIA driver itself, it seems to me better to ‘Perform a clean installation’ by checking this option in the NVIDIA driver installation window. I’d presume not doing a clean install would leave those components we’ve unchecked in NVSlimmer from the previous install, inactive perhaps but why keep them on disk?
There’s an utility called Display Driver Uninstaller (DDU). You can also find it on guru3d. It’s meant to completely wipe the Nvidia driver when run in safe mode. It does a better job at doing a cleanup than Nvidia’s own. I also don’t know what Nvidia means by that setting, whether it will wipe then install only the selected items, or wipe everything then install only the selected items. I didn’t “play” with that setting to know exactly, but I would not trust it to do the right thing in this scenario.
I reviewed it here: https://www.ghacks.net/2014/02/03/uninstall-nvidia-amd-graphics-drivers-completely/
@Yuliya,
“I also don’t know what Nvidia means by that setting, whether it will wipe then install only the selected items, or wipe everything then install only the selected items. ”
As I had understood (or understood the implications of) Martin’s article where he stated,
” I suggest – highly – that you also check the perform a clean installation option unless you have created profiles that you want to retain.” (https://www.ghacks.net/2012/12/26/make-sure-you-only-install-nvidia-drivers-you-need/) my belief is that a clean install removes all components of the driver before proceeding to the new install.
Should I be wrong then the utility you mention, ‘Display Driver Uninstaller (DDU)’ would be the wisest solution to make a truly clean install of the NVIDIA driver through NVSlimmer.
I have no certitude.
Which Box Do I Need To Tick Top Keep NVIDIA Control Panel?
Thanks,
BOB
The NVIDIA Control Panel is independent of the install, nothing to check/uncheck in NVSlimmer.
NVIDIA Control Panel runs via a Windows Service, ‘NVDisplay.ContainerLocalSystem’ which can be disabled if the Control Panel is not or no longer used (i.e. set your NVIDIA preferences in its Control Panel then disable the service)
Tom, I don’t fully understand your answer as the “Control Panel” does comes in the driver package.
Do you mean to say that NVSlimmer has no affect on the installation of the control panel and that it is installed by default no matter what you check or uncheck in the NVSlimmer program?
@Dave, you are totally correct, I didn’t express things the right way. Your suggestion is exactly what I meant. Of course the NVIDIA Control Panel is an NVIDIA component and not a Windows component as my way of putting things could suggest. Indeed i had in mind that it wasn’t handled by NVSlimmer (and no reason to be) and from there on I thought quicker than I worded correctly.
Thanks for finding this one Martin! Greatly appreciated !
I don’t know a single person that wants GeForce Experience or the 3D drivers. So this sounds interesting. But this also removes stuff you can’t normally get rid of like Telemetry, that makes it even neater.
But at v0.4, does it work for everyone? Or a few?
I couldn’t install Nvidia driver on my Win 10 Pro without installing GeForce Experience first and using GeForce Experience to download and install Nvidia driver. Updates to Nvidia driver also use
GeForce Experience as Nvidia control panel doesn’t have ‘check for updates..’.
I never let Windows Update to update drivers.
Boot into safemode. Uninstall nV drivers using DDU from guru3d, disable ‘check for driver updates’.
Worked fine on my end using the latest Nvidia driver.
1- Downloaded NVSlimmer ver. 0.4
(On the Guru3D page mentioned in the article there are 2 download links, one links to latest version 0.4 via a Bitly shortened link, the other to Guru3D mirror which only provides version 0.3)
2- Backed up my system (one never knows)
3- Disconnected the system (for the NVIDIA installer, not for NVSlimmer of course).
4- Ran NVSlimmer 0.4 with only the minimum required (not even PhysX).
5- NVSlimmer immediately asked to install NVIDIA once I had clicked on the ‘Apply’ button.
6- NVIDIA install : I asked for ‘personalized’ install, checked that settings were conform to NVSlimmer : they were.
7- NVIDIA installed perfectly.
8- I made a Repackage of the NVIDIA installer, just to see:
Original Geforce 411.70 Drive : 469,1 MB
Repackaged Geforce 411.70 Drive : 290,0 MB
Quite a difference!
9- Reconnected the system, closed the PC for a cold reboot.
Conclusion : NVSlimmer is a little gem. Thanks, Martin, for this great find. Made my day.
@Tom Hawack
Appreciate the info. I couldn’t bring myself to install 411.70 and instead went with 399.24. Trying to avoid any bugs, I’ve never installed the very latest driver, and I’m not a gamer.
@Martin
Thank You! It did what it was supposed to do. And I like that it can repackage the driver for me. Quick and easy to use.
I like the idea behind this tool. Since I hate the nVidia Experience, I figured out if I download the driver, rename the .exe part to .7z and extract it. I can just install the driver without that dreaded Experience program. Then I would install Everything by Voidtools, search for “nvtelemetry” and delete that, if causes me trouble, I’d use the IOBit Unlocker to force unlock and delete it.
Nice to know there are still some good guys out there doing programming.
I just remove everything but:
Display.Driver
HDAudio
NVI2
PhysX
EULA.txt
license.txt
ListDevices.txt
setup.cfg
setup.exe
I don’t really need a program to do this for me.
nVidia made changes making it more difficult to install extracted drivers, you’ll need to make these changes to the setup.cfg. Haven’t tried this tool yet, looks promising. Not sure its as clean as this method.
Remove these lines;
Keep these lines;
You clearly do need a program, because “GFExperience Folder” is now required, so what “you do” doesn’t even work anymore. LOL
How do you open the NVIDIADriverXXX.exe? Oh wait your use 7z, a program.
You can veiw the contents of the downloaded exe package with Winrar and extract the folders you want.
It’s the only program I use for compressed files as it opens them all so I don’t know what other programs might do the same.
I probably shouldn’t answer, but I’ll waste a few keystrokes on you anyway. Run the sfx archive then close it when you are presented with EULA. Go to C:/Nvidia/ and you’ll find its contents extracted.