Fix: Windows couldn't be installed. We couldn't update the system reserved partition
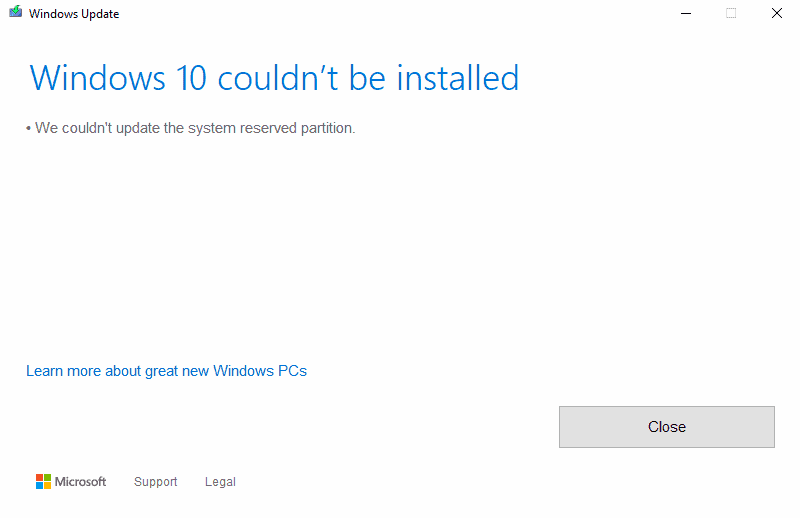
Windows couldn't be installed. We couldn't update the system reserved partition is an error message that you may receive when you try to upgrade Windows.
I ran into the issue on a machine running Windows 10 Insider Builds but users experienced the issue in earlier versions of Windows as well. The error seemed to be common on Windows 8.1 systems that users tried to upgrade to Windows 10.
The system reserved partition contains boot information for Windows. Microsoft notes that users may receive the error "We couldn't update the system reserved partition" if it does not have enough free space. Users may receive error code 0xc1900104 or error code 0x800f0922 when that is the case.
Windows 10 couldn't be installed

Windows Explorer lists all partitions of the PC. Check the system reserved partition on the affected PC to find out more about it. You may notice that it has a size of 100 Megabytes and that most of the space is not free.
The system partition had 15 Megabytes of free space on the Windows 10 PC that threw the error message.
Windows updates may fail if the system partition does not have enough free disk space. Windows administrators can correct the issue by freeing up disk space.
I managed to free up 15 Megabytes of space by deleting all language files but the language file that I needed and running check disk to truncate the NTFS log. This resolved the Windows couldn't be installed. We couldn't update the system reserved partition.
Microsoft's recommendation
Microsoft recommends deleting data on the system partition to free up disk space to free up 15 Megabyte of space (when upgrading from Windows 8.1 or earlier), or 13 Megabytes of space when upgrading Windows 10 to a new feature update.
You cannot just access the data on the system partition and delete the fonts folder as the partition is not mounted to a drive letter and because of a lack of permissions.
Note: You may need to display hidden operating system files. See Show hidden files in Windows 8 and 8.1 for instructions. These work for all versions of Windows.
Step 1: determine the partition style
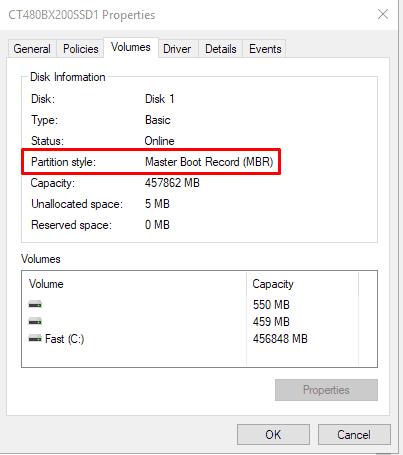
- Tap on the Windows-key, type diskmgmt.msc and use the Enter-key to start the Disk Management interface.
- Right-click on the disk that Windows is installed on, e.g., Disk 0, and select properties.
- Switch to the Volumes tab.
- Check the partition style line to find out whether MBR (Master Boot Record) or GPT (GUID Partition Table) is used.
Step 2: Windows 10 GPT partitions
- Tap on the Windows-key, type cmd.exe, hold down the Ctrl-key and the Shift-key and select the result to open an elevated command prompt.
- Type mountvol y: /s and hit the Enter-key. This maps the drive letter Y to the system partition. See mountvol documentation here. The /s parameter mounts the system partition.
- Switch to drive Y by typing y: and press the Enter-key.
- Navigate to the fonts folder by typing cd EFI\Microsoft\Boot\Fonts
- Type del *.* to delete all font files. Confirm the deletion if prompted.
Step 2: Windows 10 MBR partitions
- Tap on the Windows-key, type diskmgmt.msc and select the result to load the Disk Management interface.
- Right-click on the partition marked System Reserve and select "Change Drive Letter and Paths".
- Select Add in the window that opens.
- Pick the drive letter Y and click ok.
- Open an elevated command prompt: tap on the Windows-key, type cmd.exe, right-click on the result and select "run as administrator".
- Change to the system partition by typing y:
- Use cd Boot\Fonts to switch to the fonts directory.
- Type takeown /d y /r /f . to take ownership.
- Type icacls Y:\* /save %systemdrive%\NTFSp.txt /c /t to back up the permission to the drive.
- Type whoami to display your user name.
- Type icacls . /grant <username you got from whoami>:F /t
- Type del *.* to delete all fonts and press Y when you are asked to confirm the operation.
- Once done, type icacls Y:\ /restore %systemdrive%\NTFSp.txt /c /t to restore the permissions.
- If you run into errors, run icacls . /grant system:f /t
- Go back to Disk Management and hit the Refresh button to reload the data. You should see that the system reserved partition has more free space now.
- Right-click on the system reserved partition.
- Select Change drive letter and paths.
- Select the Y: drive letter.
- Select Remove and click ok.
Step 3: Run the update again
Windows 7 or Windows 8.1 with GPT partition
Use Step 1 from above to determine the partition type. The following instructions are for Windows 7 or Windows 8.1 machines with GPT partitions:
- Open an elevated command prompt. Tap on the Windows-key, type cmd.exe, right-click on the result and select "run as administrator".
- Type mountvol y: /s to mount the system partition.
- Type taskkill /im explorer.exe /f
- Type explorer.exe to restart Explorer with elevated privileges.
- Open Explorer and go to Y:\EFI\Microsoft\Boot\
- Remove all language folders but the folder of the language you want to be used, e.g. en-US for US English, de-DE for German and so on.
- Remove font files at Y:\EFI\Microsoft\Boot\Fonts to free up more space.
- Reboot the device. This removes the driver letter.
- Run the upgrade.
Windows 7 with MBR partition
- Assign a drive letter to the system reserve partition. Use the instructions from Step 2: Windows 10 MBR partitions to do so.
- Open an elevated command prompt. Tap on the Windows-key, type cmd.exe, right-click on the result and select "run as administrator".
- Switch to drive Y by typing y:
- Run the command takeown /d y /r /f .
- Back up the permissions: icacls Y:\* /save %systemdrive%\NTFSp.txt /c /t
- Type whoami to display your username.
- Type icacls . /grant <username you got from whoami>:F /t
- Open the Boot folder of the system reserved partition (drive letter Y) in Explorer.
- Remove all language folders but the folders of the languages that you want to use.
- Truncate the NTFS log file with the command chkdsk /L:5000 /X /F
- If truncating the NTFS log file is not enough, run the following commands to delete the USN Journal and recreate it:
- fsutil usn deletejournal /D /N Y:
- fsutil usn createjournal m=1500 a=1 Y:
- If truncating the NTFS log file is not enough, run the following commands to delete the USN Journal and recreate it:
- Restore permissions with the command icacls Y:\ /restore %systemdrive%\NTFSp.txt /c /t
- Run icacls . /grant system:f /t to adjust the ACL back to System.
- Run icacls Y: /setowner “SYSTEM†/t /c to set the owner of the drive to System.
- Remove the drive letter in Disk Management.
Windows 8.1 with MBR partition
Note: You need to have an external drive with at least 250 Megabyte of space.
- Assign a drive letter to the system reserve partition. Use the instructions from Step 2: Windows 10 MBR partitions to do so.
- Open an elevated command prompt. Tap on the Windows-key, type cmd.exe, right-click on the result and select "run as administrator".
- Switch to drive Y by typing y:
- Run the command takeown /d y /r /f .
- Type whoami to display your username.
- Type icacls . /grant <username you got from whoami>:F /t
- Type the following command: attrib -s -r -h Y:\Recovery\WindowsRE\winre.wim
- Verify the drive letter of the external drive in Explorer, we use F: but your drive letter may be different.
- Type mkdir F:\Recovery\WindowsRE
- Type xcopy Y:\Recovery\WindowsRE\winre.wim F:\Recovery\WindowsRE\winre.wim /h
- Type C:\Windows\System32\Reagentc /SetREImage /Path F:\Recovery\WindowsRE /Target C:\Windows
- Type del Y:\Recovery\WindowsRE\winre.wim /F.
- Run the upgrade.
- Type (on an elevated command prompt) xcopy F:\Recovery\WindowsRE\winre.wim Y:\Recovery\WindowsRE\winre.wim /h
- Type C:\Windows\System32\Reagentc /SetREImage /Path Y:\Recovery\WindowsRE /Target C:\Windows.
- Remove the drive letter from the system reserved partition.
Now You: Did you run into upgrade issues lately?





Use PowerShell to assign a letter to the recovery partition:
1) diskpart
2) list disk
3) select disk 0
4) list partition
5) select partition 1
6) assign letter=X
7) Now you can navigate to drive letter X using My Computer / Explorer and delete all the files located in the “Boot\Fonts” folder.
8) remove letter=X
9) Windows Upgrade / Installation should now work.
Thank you, works like a charm (GPT)! :-)
Worked. Thanks alott
Hello Support, system reserved on our two domain primary has Ben full so it won’t let install new updates what’s most safest approach here to clear some space or extent partition and please let me know steps for both it’s a vsphere windows server 2012 r2
I was trying to do an in-place upgrade to my VM’s but the system reserve partition did not have enough space so here’s how I fixed it:
1.Rebooted virtual machine with a Windows 2019 ISO – Select Recovery Environment
2.Open elevated command prompt and run below commands
>diskpart
>list disk
>select disk
3.Select the system reserve partition volume and run the below command
>format fs=ntfs
4.Exit diskpart
5.(Assuming D is system drive), run the following commands
>cd to D:\windows\system32\
>bcdboot D:\windows /s C:
>bcdedit /set {bootmgr} device partition=C:
>diskpart
>list disk
>select disk
6.Select the system reserve partition volume
7.Mark that partition active by typing “active”
8.Exit the command prompt
9. Reboot the machine to Windows and do an in-place upgrade again.
You are Great ! It’s perfectly worked for me. I had Win 8.1 and only 14 MB free space on this partition (GTP). I’ve just deleted all fonts and update to Win 10 started to work. Thanks !
From what I have gleaned from various sources there is a change in terminology. Since the terminology is muddled I’m going to be very specific on where I get the following data. I’m not sure if its an MBR to GPT thing or a BIOS to UEFI thing or a combination. Running Windows 10, my GPT drive on a UEFI system there is no partition called an SRP. There is a EFI partition which is listed as 100MB by the disk manager accessed by Computer Management. When I use the Microsoft recommended procedure for freeing space by deleting everything in the Fonts directory I get 14,156,800 bytes free using the dir command. The upgrade to the 2004 version of Windows 10 fails to update the SRP. I’m guessing that the EFI partition is the “new”ish incarnation of the SRP and most of the so called pundits haven’t updated their instructions. I’m also about to assume that 100M is too small and I will have to work out how to grow the partition. I have seen some references saying 200N is a good idea. Are there any other ideas out there?
Thanks, It worked for me
Didn’t work. I will say that the same syntax on the microsoft is missing an entire line of the instructions, rendering the entire thing useless. But in my case, using the exact syntax above I am not able to up space. The best I can do is (At the step where we backup the ownership of the partition)
“No such file or directory” But if I keep going to try deleting the fonts I get
“the filename, directory name, or volume label syntax is incorrect”
Attrib doesn’t work either. This is really stupid that microsoft makes their software virtually impossible to work with.
If there are file system errors found and fixed, users can try upgrading to Windows 10 again, and this time the “Windows 10 upgrade couldn’t update system reserved partition” error shouldn’t emerge.Â
Thanks Martin! That worked perfectly for me with Windows 7 to Windows 10!
I appreciate that I could have used a utility instead, but with your instructions, I actually learned something interesting and it only took a few minutes.
Cheers.
Use a partition utility (eg EASUS Partition Master) to increase the size of the reserve partition. 5 minutes. No deleting, renaming, command line gobbledygook.
Hello, are those settings applicable for windows 10 as well? Im trying to update windows 10 from 1803 to 1903 but instead im getting “couldn’t update reserve partition ” thank you in advance
Although all steps performed well on Win10-64, my System Partition (y drive) still is fully occupied of 500 MB.
Can’t be emptied.
How can I do that?
The system I have does not have an SRP. How do I get the update iinstalled?
You guys are great, I tried everything prior to finding this post to no avail, soon as I did what you suggested above it worked perfectly, thanks very much for your help!
It worked! Thanks so much!
IT WORKED GREAT!!!! I have been trying for at least 9 months to get my laptop to update. Microsoft support was completely useless, even when I showed them the error of not enough space in the partition. They wanted me to do a wipe and fresh installation, which I was having nothing of… Anyway, the instructions were easy, made sense, and worked. THANKS! Kevin
thanks alot
Thank you sooooooo much mate, it finally works!!!!!!
I never allowed Windows to create that system hidden partition. It makes things easier when it comes to backup/imaging. And to do that just create the partition/s prior to installing Windows with GParted without leaving any unallocated space.
The main drive on all my systems has the same partition scheme: 64GB (65 536MiB) for Windows and the rest for storage. Using an exact size makes things easier when it comes to imaging one partition and restoring it to another PC, at least when using Windows’ built in imaging tool.