How to delete downloaded Windows Update files
Windows Update works for the most part pretty reliable. It is an automated system of Microsoft's Windows operating system that handles the downloading and installing of updates for the operating system.
At best, it is a silent service that runs in the background; it may ask you to restart the PC every now and then though as that is still required for many updates, and it sometimes may do so without user interaction.
When you run into issues though with updates, you may spend hours or even days figuring out what is going wrong.
I cannot update one of my PCs to the Windows 10 Fall Creators Update for instance because of a bluescreen that I get whenever I try to do so.
One of the things that you can try when it comes to updates, is to delete downloaded Windows Update files to start over.
If you suspect that something is wrong with the files, or if you want Windows Update to run a new check for updates to download new versions of updates that were released by Microsoft, then you may find the following tip useful for that.
If you run Windows Insider builds on a PC for instance, you may skip an already downloaded update to a new build to download a newer build and avoid having to update the system multiple times.
How to delete downloaded Windows Update files

It is thankfully pretty easy to delete all cached update files. This works on all supported versions of Windows, including Windows 7, Windows 8.1 and Windows 10.
- Open the Start Menu (tap on the Windows-key or click on it).
- Type services.msc.
- Right-click on the result, and select "run as administrator" from the context menu.
- Locate the Service Windows Update. The services listing is sorted alphabetically by default. Click on name to revert the order so that you don't need to scroll as much.
- Right-click on the service Windows Update and select Stop from the menu.
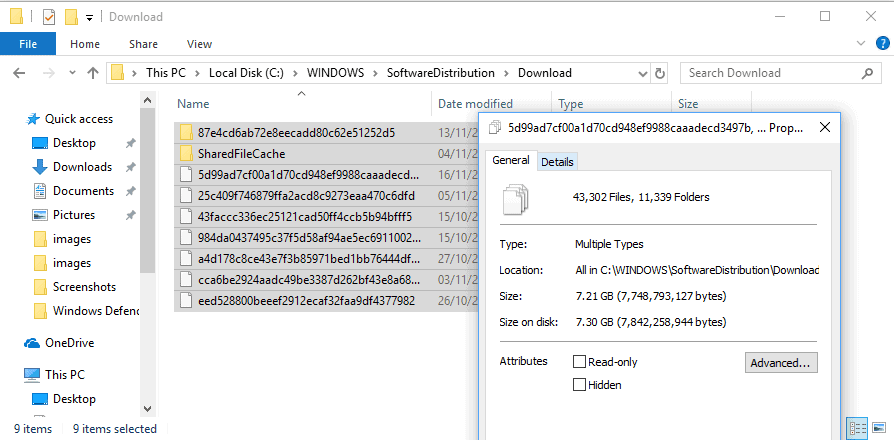
- Go to C:\WINDOWS\SoftwareDistribution\Download using Explorer or any third-party file browser. If you navigate to the folder manually, you may need to enable the showing of hidden files first.
- Do so with a click on File > Change folder and search options.
- Go to View, and scroll down until you find "Hidden files and folders" listed.
- Select "Show hidden files, folders and drives".
- Remove the checkmark from "Hide protected operating system files (Recommended)".
- Click Apply, then OK.
- Select all files of the folder. The easiest way to do that is to use Ctrl-A while the folder is active.
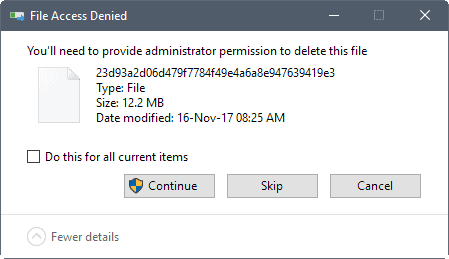
- Hit the Delete-key on the computer keyboard.
- Windows may need administrator privileges to delete certain files. Select "do this for all current items" and click continue to grant the permissions.
- Go back to the Services window.
- Right-click on the Windows Update service, and select Start from the list of options.
You can re-run a check for updates once all files have been deleted. Please note that Windows Update will download all updates anew when you clear the update cache. This can lead to Gigabyte large downloads.
Clear the Windows Update cache from the command line
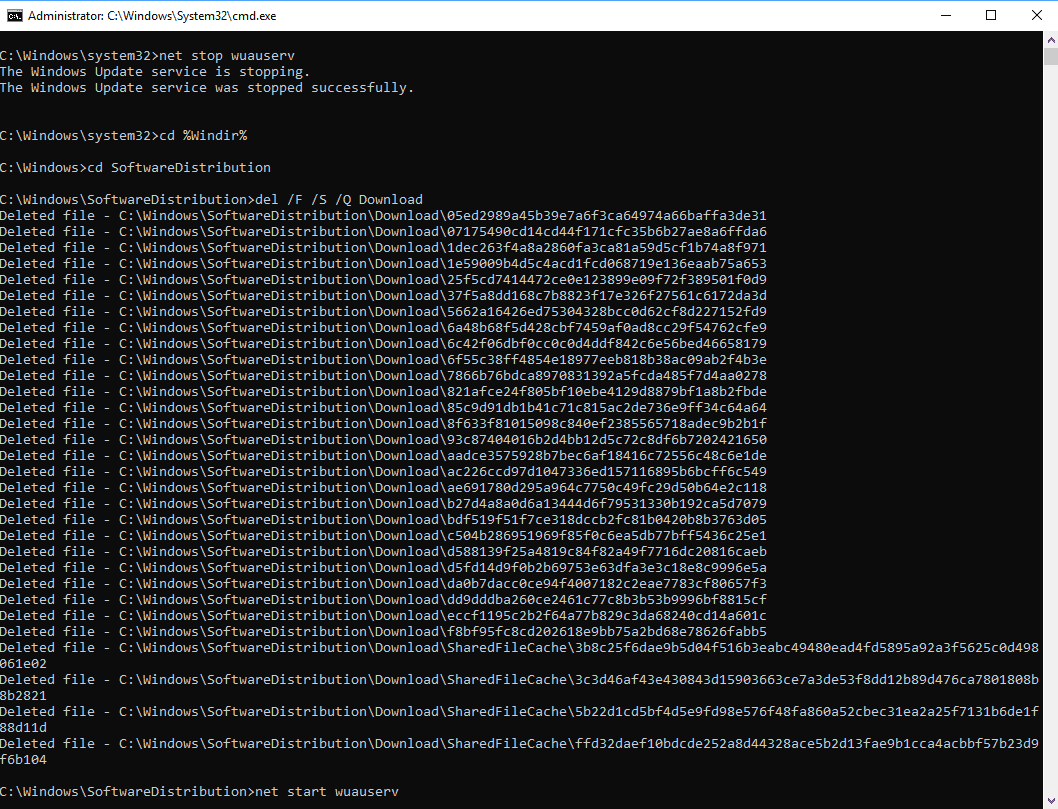
You may purge the Windows Update cache from the command line as well. While you can type the following commands on an elevated command prompt manually, you may create a small batch file as well toautomate the process.
Here is what you need to do:
- Tap on the Windows-key to bring up the Start Menu.
- Type cmd.exe.
- Hold down the Shift-key and the Ctrl-Key before you select the cmd.exe result. This opens an elevated command prompt.
- Accept the UAC prompt that Windows displays.
- Run the following commands and hit enter after each line:
- net stop wuauserv
- cd %Windir%\SoftwareDistribution
- del /f /s /q Download
- net start wuauserv
The commands explained:
- net stop wuauserv -- This stops the Windows Update service.
- cd %Windir%\SoftwareDistribution -- Switches to the SoftwareDistribution directory of the Windows installation.
- del /f /s /q Download -- Deletes the Download folder of the SoftwareDistribution directory with
- /f -- force the removal of read-only files.
- /s -- include files in subdirectories.
- /q -- in quiet mode to surpress prompts.
- net start wuauserv -- Starts the Windows Update service.
We have uploaded a batch file to our own server which you may run to execute the commands automatically. You need to right-click on the file and select "run as administrator" as it requires administrative privileges.
You can download the file with a click on the following link: (Download Removed)
Note that it is supplied as an archive that you do need to extract before you may run it.
Tip: Check out these Windows Update related articles and guides
- Latest Windows Updates and Service Packs overview
- Fix Windows Update errors with new Windows 10 repair tool
- Quickly analyze Windows Update errors
- How to find out more about Windows updates before you install them








Next time, straight to the deletion instructions.
Thanks for the .bat file, helpful time saver.
Hello All,
I follow the process you shared and it delete the patch but when i click on check for updates under windows update in windows 2012 R2 wsus client or any other wsus client all the patch which i deleted came again. not sure why this is happening.
Please suggest
amazing. almost 4gb deleted. thank you
Amazing results: Began with only 418 MB available storage on my C drive before emptying the SoftwareDistribution folder, which contained Win 10 ver 1903 repeatedly failing to complete installation over the past month (I tried and tried, not enough space). Immediately after: 5.98 GB. After restarting: 5.24 GB. I’m using the free Winaero Tweaker to keep Windows Updates toggled off indefinitely to prevent the folder from automatically refilling with the incompatible 1903 on my WIn 10 Home edition cheap 32 GB laptop. Manufacturers are now no longer allowed to pre-install Win 10 on low storage 32 GB devices. I’ll be stuck with the soon-to-be unsupported Win 10 ver 1803 until I can buy a new laptop next year. Glad I found this aricle, saved me!
Muito bom! Obrigado pela dica! :)
Wow, thank you so much, used the .bat file, wiiiiiiiped ooooooooout…TOO
Could I do this to clean up my server as well?
Wow, thank you so much, used the .bat file, wiiiiiiiped ooooooooout…
Thank you so much for this article, you have no idea how much easier you’ve made my life. Thank you!!!!!
I did this. There was less than 10meg in it. not really worth the trouble
I had 975 MG! I’ve cleaned it out, but I know what’s going to happen: Windows is going to download those stupid third-party drivers and what have you, and I’ll have to deal with that again.
Wait…
>You can re-run a check for updates once all files have been deleted. Please note that Windows Update will download all updates anew when you clear the update cache. This can lead to Gigabyte large downloads.
So, if I clear out the C:\WINDOWS\SoftwareDistribution\Download folder and then my system checks for updates on its own (say the next day), is it going to redownload EVERYTHING again?
If so, how the heck can you clean this out without it doing that? or is that not necessary?
Keith, only updates that have not been installed. Installed updates are left untouched.
Great, thanks, Martin. Wondering, then, if there’s a way to figure out which have not been installed so you can just leave those. But thanks again.
Okay, tech-challenged senior here…am running Win7, do I need to do this? Is it really something I should try? Or is this for Win10 only? The title should reflect if it’s only Win10. Is this something I even really need? Is it better left to the tech people who know what they’re doing and can understand everything in this description? I have very little idea what these comments are even about.
You don’t need to clean the folder usually. There are some exceptions: a) if you run into update issues as described in the article, b) if you want to clear up space after all updates are installed properly and leftover files are still in the folder.
This works in all recent versions of Windows, not only in Windows 10. Just try and open C:\WINDOWS\SoftwareDistribution\Download in Explorer and see if you get a listing of folders or files.
Wow! I just did that and cleaned up over 300MB! Thanks for the tip.
Easier just to rename the SoftwareDistribution file. The OS will rebuild it again on the next reboot.
You’ll need to run “net stop wuauserv” and “net stop BITS” first of course, but then run: “rename c:\windows\SoftwareDistribution softwaredistribution.old” (all without quotes) from the same elevated command prompt.
Restart wuauserv and BITS again afterwards and then reboot the system.
Cant you do something similar with DISM?
You’ll have better luck if you turn off the windows update service before you try this. Sometimes you may have to stop other services, but usually that’ll do the trick by itself. For particularly pernicious cases, I have a script to do all of it. It also clears out catroot:
net stop wuauserv
net stop bits
net stop cryptSvc
net stop msiserver
erase /F /S /Q c:\windows\softwaredistribution\*.*
rmdir /S /Q c:\windows\softwaredistribution
erase /F /S /Q c:\windows\System32\catroot2\*.*
net start wuauserv
net start bits
net start cryptSvc
net start msiserver
(just realized I need to add the old catroot folder in there too. Sorry…)
/fighting the windows update wars every day…
Windows update working in the background without the end users having any say about it, no information being provided about what the updates are…
Along with totally obnoxious and unacceptable telemetry, these are all reasons that I’ll never touch Windows 10 with a barge pole.
SoftwareDistribution\Download folder is never cleaned by Disk Cleanup. It only cleans WinSxS.
I’ve been noticing an influx of very very rude people here lately. Hope they go away soon… or learn to be polite.
Running Disk Clean-up as Admin will allow one to do this also.
https://i.imgur.com/1hoqQCq.png
Thanks for the tip. This never worked reliably for me though.
Hi Martin, what happen if i deleted the downloaded file? does it impact the system, like cache ? windows update? please do enlighten us.. thank you
-Haikal
It simply removes the cached update files but does not impact the system in any other way. It does not remove installed updates.
I always thought that Disk Cleanup removed old Windows Update files, among other things.
Am I wrong?
This was very informative but I have a different problem. Windows has presented me with a list of updates that are needed but I only want to download and install the Windows Defender security update files. I don’t want to install the new feature update as I’ve had problems and had to restore my system. How do I pick and choose which of the presented files to download and install?
The files presented in C:\Windows\SoftwareDistribution\Download don’t have meaningful names so I have no idea what to delete and what to keep. Can you provide any additional help?
Thanks
It does if marked, but doesn’t delete all files.