Backup your GNU/Linux system with CrashPlan

Backup, backup, backup...This is the biggest thing that I wish everyone would follow when messing around with your computer, regardless of operating system but especially with GNU/Linux.
GNU/Linux is fairly stable nowadays, but anyone who uses it regularly knows that this can change in the blink of an eye, and so...backup!
There are plenty of different ways to backup your system, but one that I have found very easy to use is a piece of software called CrashPlan. CrashPlan is one of very few user-friendly graphical tools to create backups, and it does it’s job well. CrashPlan is available for Windows,Linux, and MacOS.
Installation of CrashPlan
Installing CrashPlan is fairly straightforward:
- Arch / Manjaro users can install it via the AUR, and other distribution users can install it manually. Visit https://www.crashplan.com/en-us/thankyou/?os=linux – your download will start automatically.
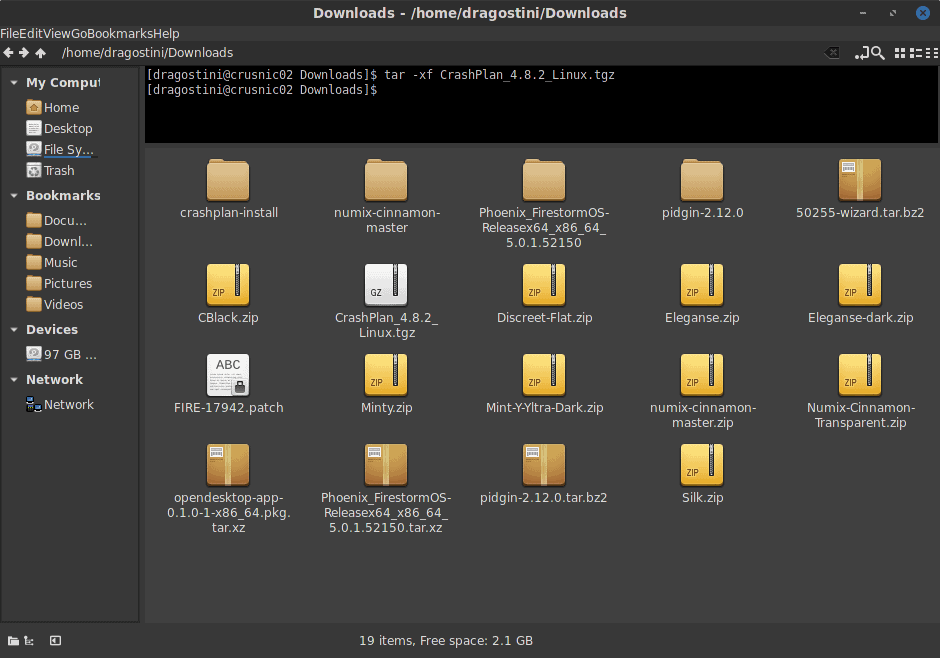
- Next, we extract the archive:tar -xf CrashPlan_4.8.2_Linux.tgz
- And then we run the installation script: ./install.sh
- Follow the on screen instructions and install away!
There are some notes included in a ReadMe file that I’ll paste here, that you should be aware of:
Installation Notes:
- The CrashPlan app uses the Oracle Java<TM> Runtime Environment (JRE) to run. If you do not have a compatible Oracle JRE installed, the installation script downloads and installs it alongside CrashPlan. This does not overwrite your system's installed Java.
- Once installed, the CrashPlan app can be launched by using the command 'CrashPlanDesktop', which is linked from a directory chosen during installation (default: /usr/local/bin/CrashPlanDesktop).
- The CrashPlan service is installed and configured to run from a directory chosen during installation (default: etc/init.d/crashplan) and linked from '/etc/rc2.d'.
- On some Linux distributions, you may need to add the following to '/etc/init.d/boot.local': /etc/init.d/crashplan start
Starting up CrashPlan and backing up the system
One CrashPlan was installed, because my OS uses SystemD I had to start the service a little differently:
- sudo systemctl start crashplan.service
- sudo systemctl enable crashplan.service
Once that is done, start up CrashPlan either via your applications menu, or via terminal by typing CrashPlanDesktop
Once the application has started, you’ll need to register a free account which only takes a brief moment, and then we can get started.
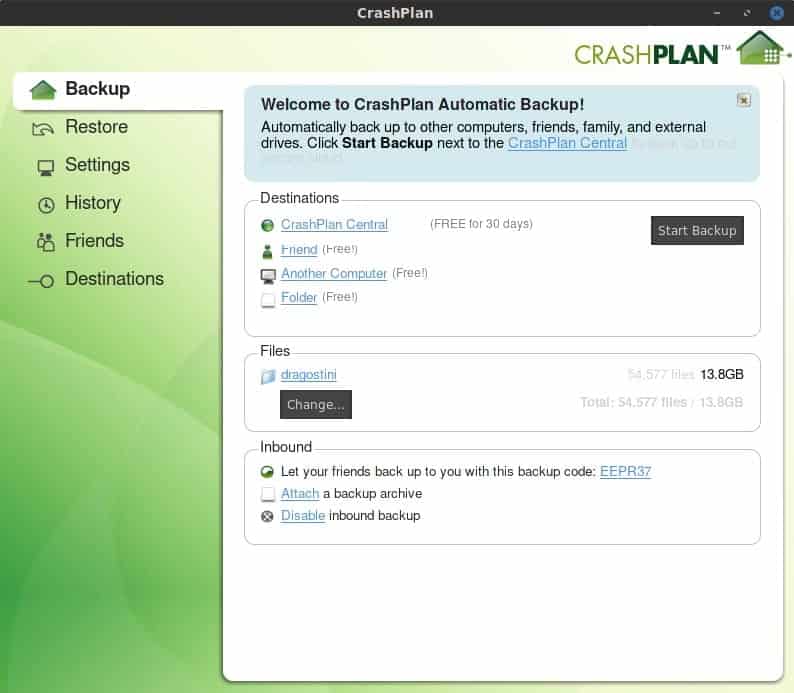
CrashPlan has numerous options for where to backup your system, and includes a 30 day free trial giving you the option to backup your system to the CrashPlan Central remote servers.
You can check out the feature comparison of free and subscription-based CrashPlan accounts here.
The core differences are:
- Pro users get unlimited online storage space for backup, free users may only back up locally or offsite to other computers.
- Pro plan support multiple backup sets, and back up continuously (free once daily).
- Pro plan retains unlimited file versions, and supports web browser and mobile app access, and web browser restore.
However, you also have some other options at your disposal which are always free:
- Back up your system to a friends computer
- Back up your system to another machine of your own
- Back up your system to a local folder or removable drive
The idea of using a friends computer is pretty neat I have to say. I, for example, fix numerous friends machines on a regular basis and so having them back up their systems to my machines could be handy, so if they break something I can restore their system, and they know that I have a copy of their system for safekeeping. This is done by using a code that is given from one friend to another, entered into the application, and then starting the backup.
The method of backing up to “Another computer†is pretty straightforward too; simply sign into the other machine with the same email address used for CrashPlan, and then select that second computer from the list of computers inside CrashPlan, and start the backup.
Overall, I highly recommend it, it’s fairly fast at what it does, and is extremely straightforward and user-friendly with very little configuration needed!
What about you? How do you back up your files?


Hi Mike,
“Pro users get unlimited online storage space for backup, free users may only back up locally or offsite to other computers.
Pro plan support multiple backup sets, and back up continuously (free once daily).
Pro plan retains unlimited file versions, and supports web browser and mobile app access, and web browser restore.”
Are the pro plan backups dated snap shots or a synced mirror image (or both)? Snap shots would be useful for preventing ransomeware. i.e. Not backing up already encrypted ransomeware files. Is the “free once daily” for the free version or does it also apply for the pro plan? I would prefer if it was done once every so many minutes – happy to use the pro plan if it will do this. Also has anybody tried this with Raspbian? Raspberry Pi’s are low on power consumption and would be ideal for constant backups.
Is there any chance of a follow up article of using Crashplan with a Raspberry Pi? Is there an affiliate link for you?
Ive been using gparted from my live distro, however I only create a new backup when there been quit a few updates pushed, every 1-3 weeks usually. Keeping all my personal stuff on a seperate partition helps alot here.
1st todo clean up and get rid of old kernels
2nd is boot into my live distro and plug in my spare flash drive.
3rd is open gparted and shrink my linux partition down to about 5gb
4th right click on said partition and hit copy, go to top right drop down menu and select the spare flash drive. When the window opens just right click on it and select paste.
Takes about 18 minutes to finish, both flash drives are 2.0 so… However it only takes about 3 minutes to reinstall. The whole process takes about an hour for me.
Note if the spare flash drive is not formated correctly gparted will through a popup, just read it carefully, only takes about 30 seconds to correct the problem.
I highly recommended running in Docker: https://github.com/JrCs/docker-crashplan
Works great on NAS as well.
tar, dd, rsync. Read Arch Wiki and skim man pages, write script and move on… you know, like most other Linux users.
Mike:
Thanks for this great, clear article!
An innocent question:
I come from the MS Windows OS world,
where JAVA was always
to be avoided for its many security problems,
As recommended by Brian Krebs
(and many others),
I totally UNinstalled JAVA in Windows.
I now ONLY use UBUNTU Linux 32bits.
Q:
Should I still avoid Java in Linux?
Is Java still a security problem and nuisance in Linux…?.
Thanks for any guidance, opinions…
Hello, I like to add that “only” Crasplan like alternative with build in deduplication is Duplicati2 ( https://www.duplicati.com/ or https://github.com/duplicati/duplicati ) It work on linux and Windows
Or do you know any other backup program who does block dedup ( except backuping NTFS deduped volume with wbadmin :-) )
No, not for Linux, and it’s one of the major drawbacks when using Linux. SystemBack helps, but what is really needed, as I see it, is someone to take over Remastersys, especially for the Ubuntu based distros. The tool was a gem, and I’ve yet to find a developer/coder who can replicated the beauty and quality and functionality of the program. With Remastersys, the user can simply make a full system backup in .iso form as a bootable distro with all of the changes that were made, the files saved, the programs installed, etc. I think the only distro that has the functionality now is PCLinuxOS.
mx linux has exactly this(their own version of remastersys), which can be used as a usb/dvd installer or run live with persistence.
Also check out “Pinguy Builder” which is a takeover of remastersys
As an aside, Fedora 25 is screaming fast on a USB drive w/ persistence–just trying it out. Sort unbelievably fast and clean. Fast boot. Maybe 15 seconds on a USB.
I use Crashplan on my windows workstation. It’s been a solid off-site backup solution for me for years. I also use it to backup my parents laptop to my workstation. We’ve been pretty happy with them.
Or use Veeam Endpoint Backup, which is great too.
Hint: The title of the article is “Backup your GNU/Linux system ..”