Change Network Adapter Priorities in Windows 10
If a computer running uses multiple network adapters, say an Ethernet connection and a Wi-Fi connection, it uses priorities to decide which adapter to use.
Note: The following guide is for Windows 10, but it should work on previous versions of Windows equally well for the most part.
Windows 10 does a good enough job usually when it comes to picking the right network adapter if multiple options are available. Sometimes though Windows may get it wrong, or you may want to prioritize a different adapter than the one selected by Windows.
Considering that you may have quite a few adapters installed -- think Ethernet, wireless, VPN, and virtual machines -- you may need to adjust the priority manual.
Change Network Adapter Priorities in Windows 10
You have two options to change adapter priorities in Windows 10. You may either use PowerShell for that, or navigate your way through a series of network interface menus to do the same.
I prefer PowerShell, as it is easier and gives you a better overview of everything. So, lets start there.
The PowerShell Way

First thing you need to do is open a new elevated PowerShell prompt:
- Tap on the Windows-key on the keyboard, type powershell, hold down Shift and Ctrl, and click on the Windows PowerShell link that is displayed.
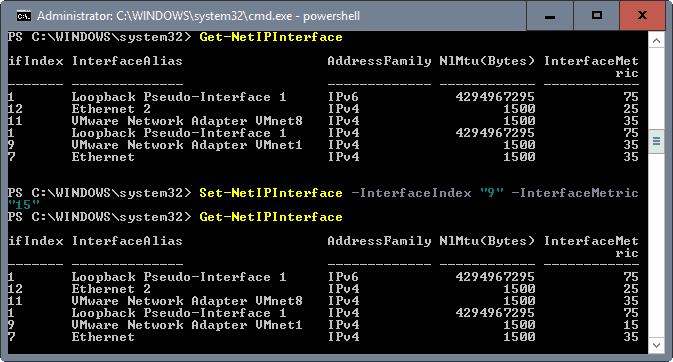
This opens an elevated PowerShell prompt. Note that you may also launch PowerShell from an elevated command prompt window by typing powershell. The screenshot above shows how the interface looks like when done that way.
The first command that you want to run is Get-NetIPInterface. This displays all network adapters, their interface index number, and the interface metric.
The index is a unique number of each adapter, the metric the priority of that adapter. Also, it lists all adapter known by Windows at that point in time.
To change the priority of an adapter, look at the InterfaceMetric column. Windows lists the priority of the adapter, and priorities of all other adapters.
Run the command Set-NetIPInterface -InterfaceIndex "Index of the adapter you want to change the priority for" -InterfaceMetric "new priority of the adapter".
Example: Set-NetIPInterface -InterfaceIndex "11" -InterfaceMetric "90"
This changes the priority of adapter 11 to the value 90.
Adapters with a lower InterfaceMetric number are prioritized over adapters that have a higher number.
Use the command Get-NetIPInterface to list the adapter information table again to verify the change.
The interface method
If you prefer to use a graphical user interface, you can do that as well. Note that it requires quite a bit of clicking, and is not as straightforward as the PowerShell method.
The main reason for that is that you don't get an overview of all network adapter priorities in the graphical user interface.
While you can in theory check the value for each adapter individually, this would mean even more clicking and is not recommended. I suggest you run the PowerShell command Get-NetIPInterface to get a reading on those directly.
Step 1: Tap on the Windows-key, type ncpa.cpl and hit the Enter-key to get started. This opens the Network Connections listing.
Step 2: Right-click on the adapter that you want to modify the priority for, and select Properties from the context menu. This opens the properties window of the adapter.
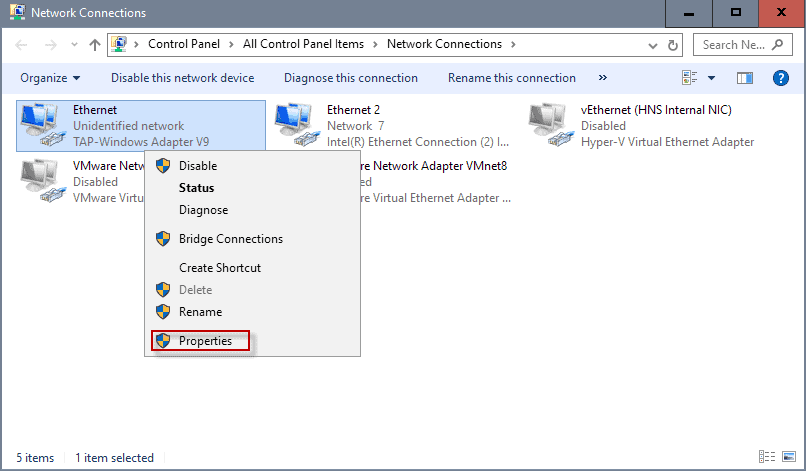
Step 3: Locate Internet Protocol Version 4 (TCP/IPv4), select it, and click on the Properties button. Note: If your connection is IPv6, select Internet Protocol Version 6 (TCP/IPv6) instead.
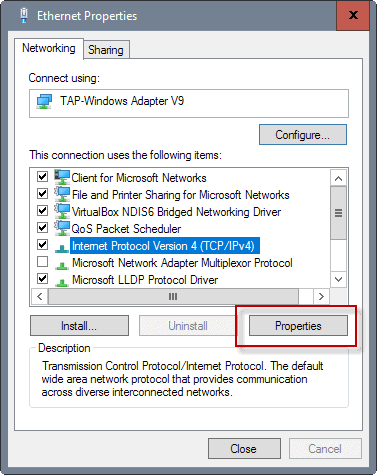
Step 4: Locate the Advanced button on the next window that opens and click on it.
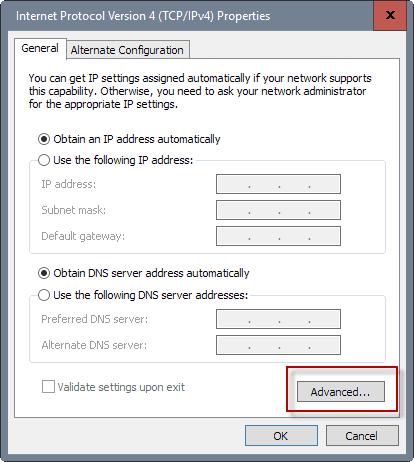
Step 5: There you find Interface metric near the bottom. Remove the checkmark from the Automatic metric box, and enter a new custom Interface metric number. Make sure you select a value of 2 or higher, as 1 is reserved for the loopback adapter.
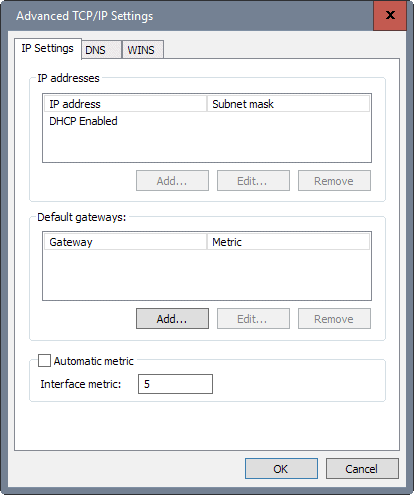
Step 6: Click ok, and repeat the process for any other network adapter you want to change the priority for.
I suggest you verify the priorities using the PowerShell command used above.
Now You: How many adapters are installed on your PC?






Barry here from Perth,
Thanks Martin, I needed to make my Windows 11 PC use the Starlink on a wifi conection rather than the backup 4G Netgear M2 modem on a Telstra hotspot connection accessed through the household Ethernet. Changed the metric on the ethernet to 150. Presently I have both entering an ASUS AC-88 router as WAN #1 (the Starlink) and WAN #2 (the Netgear 4G plugged into port #1 on the router). Works well I think, at least accessed remotely via realVNC.
n Windows 10, when you make adjustments to the binding order and save, if you re-open the Adapters and Bindings dialog box you will notice that your changes do not persist. This feature was deprecated in Windows 8 and cut from the Windows 10 product as there are no longer any components that utilize the binding order. Instead, components such as DNS and TCP/IP use the routing and interface metrics to determine which interface would be used.
If you are using multiple NICs and you need to increase the priority a specific NIC has over others, useSet-NetIPInterface –InterfaceIndex “xxâ€â€“InterfaceMetric “xx†(https://technet.microsoft.com/en-us/library/hh826125(v=wps.630).aspx)to define the weight for the interface. By default, Windows uses the Route Metric + Interface Metric to determine which route has the highest priority by choosing the route with the lowest value.
And as an FYI…for some reason I now see the Ethernet adapter list first in ipconfig and not the wifi. Previously wifi was listed first. I don’t know what has changed or if there was an update or if I did anything to change in the multiple attempts I made to try to get it working. In the Network and sharing adapter still is listing wifi first but the routing seems to be ok now.
I would like a ps script that sets the if metric to 5 for the only ipv4 interface that has a gateway set. since we have a 2nd one that doesn’t have a gateway address.
$colItems = Get-WmiObject -class “Win32_NetworkAdapterConfiguration” `
| Where {$_.DefaultIPGateway -ne $null}
foreach ($objItem in $colItems) {
set-netipinterface -interfaceIndex $objItem.interfaceindex -InterfaceMetric 20
}
Seems to work, although I still see a yellow exclamation on status in the lower right and it is indicating the interface that doesn’t have a gateway, I am not sure if it has an effect on the operating system.
I too have incorporate this only to see it fail. I have a 2016 server with 6 NIC’s. I only allow traffic on Nic #1 to have public access for updates or remote services. All other NIC’s are denied public access. This worked for a few weeks, now however the NIC with the metric of 3 for some reason is chosen by Windows when performing Win update searches etc. I observe this via the firewall traffic. Very bizarre and frustrating!
Dear Martin Brinkmann,
I have set the InterfaceMetric for Local Area Connection less than that of Wireless network connection,
Even I can see the changed value in interface metric column, but still my computer is giving priority to Wireless over LAN (Ethernet),
I can send you the screenshot for the same if you give me your mail ID,
Please help me how can i prioritize LAN over WiFi.
Just another example of the stupidity of Microsoft. It is time to end this company.
I have found that Windows does not obey the metric. Several applications still use (in my case) a Bluetooth adapter I am using to tether to a mobile data network with a metric of 25 for IPv4 and 40 for IPv6 instead of an ethernet adapter with a metric of 10 for IPv4 and 20 for IPv6.
I would appreciate any advice or solutions people have.
Thanks everyone for all the input to this discussion.
I too have found that Windows 10 does not obey the metric value. I’m using an old software package that would choose the NIC based on the provider order as set in Windows XP.
I’m wondering if anyone has found a solution to this issue since the last comment was over 12 months ago.
These are beautiful instructions. I have tried instructions from several sites. In each case either the GUI options are missing or grayed out, and when prompted to log in as Admin the promised next window still never appears, or Powershell ignores my changes (thanks for the reminder to run Get again).
Is this because I have the hokey, I mean “home” version of Windows 10?
I’m so tired of starting, and immediately having to restart, the laptop to get it to recognize the ethernet cable.
Great!! Thanks it saves me lots of time!
Is it possible Windows can use both wifi and ethernet simultaneously? If not, why not? This would hopefully increase the bandwidth available for local file transfers for one thing.
Did you find a answer to this?
I’m thinking that a higher number means higher priority – is that correct?
I think that is what Martin said.
Lower number adapters have a higher priority.
I tried your PowerShell commands, but Get-NetIPInterface does not work on Windows 7. Are these IP interface commands only available in Windows 8 and above?
Why a 5 ? The article didn’t seem to explain the range of values for the GUI version of how to do this.
You just need to make sure that the values are higher or lower than others. Five is a free value that is very low, and it puts the selected adapter at a higher priority than any other except for loopback. I could have picked 2, 9 or 14 as well, or any other free number.
The following method works fine on Windows Server 2012 R2 and Windows 8 and I hope it will be same on other windows as well. Instead of manually specifying the interface metric you can use the GUI method listed below
1. Open “Network connections” as usual and then press and release “Alt” key once, this will bring up menu items
2. Under top menu select “Advanced > Advanced Settings…”
3. Now the resulting widget will have the connections order under the tab “Adapters and Bindings”
4. You can use the Up and Down arrow on the selected connection to make sure how the adapter preference are required for you.
The connection which is at the topmost spot gets the first preference.
They have removed “Adapters and Bindings” for Win10.
I just tried this on my Win10 machine, but unfortunately there aren’t separate listings for my different hardware interfaces – I.E. Hardwire vs. WiFi. :(