Windows 10: display 30-days worth of network activity

Monitoring network activity can be a complicated, tedious process, but it is also essential in finding out which programs connect to the Internet, and how much data they upload or download in the process.
While you can use all sorts of programs for that, from the built-in Windows Firewall which reveals if a program requests Internet connection access over third-party solutions like the excellent NetBalancer, Networx or Free Process-Traffic Monitor to hardware-based solutions.
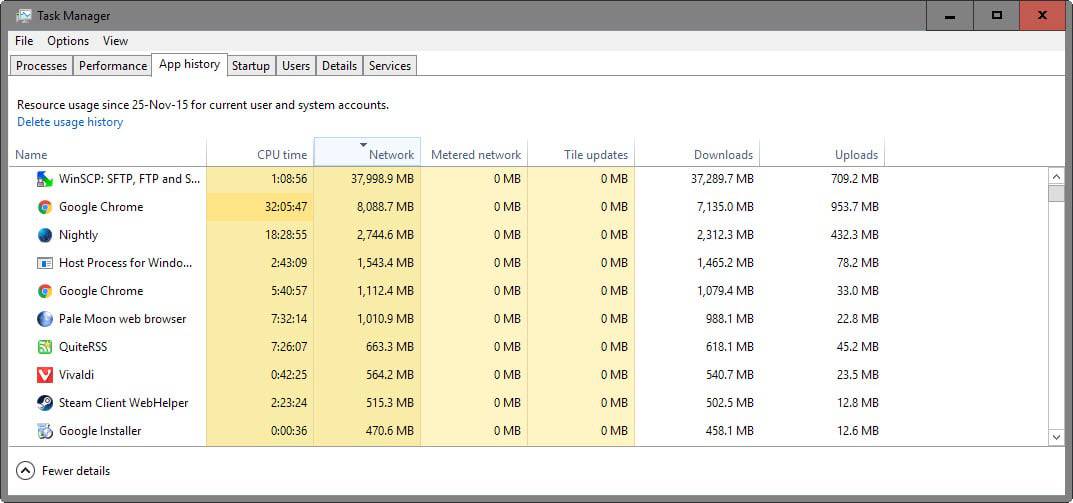
Microsoft built a solution right into its Windows 10 operating system that is good for a quick overview of what is going on as it reveals network activity for all apps and programs that ran on the computer in the past 30-days.
Network Activity History
Windows logs the information automatically even if users of the system don't make use of it. This means that you will get a full network activity history even if you never configured Windows 10 to provide you with those information or even opened the interface that highlights the information.

Microsoft built the information into the task manager of the operating system. Here is what you need to do to list the network activity of apps and programs on Windows 10 machines:
- Use the shortcut Ctrl-Shift-Esc to open the Windows Task Manager.
- Select "More details" if you only see a list of programs but nothing else to switch to the detailed view.
- Switch to the App History tab in the window. You will notice that only apps are listed on the page by default.
- Select Options > Show history for all processes. Doing so adds legacy programs to the listing so that you get traffic information for all programs as well.
The page lists the following information for each program:
- CPU Time.
- Network utilization.
- Metered network utilization.
- Non-metered network utilization.
- Tile updates (apps only)
- Downloads.
- Uploads.
Downloads, uploads and non-metered network are not displayed by default. You need to right-click on the header of the table to enable those options individually.
Network, as well as downloads or uploads are good indicators of a program's network activity. You can click on any column header to sort the list of programs using it.
This way you can sort programs by how much network traffic they have used, or by how much they have uploaded to the Internet.
The latter can reveal interesting privacy-related information, for instance if a program is listed as having uploaded data even though it does not really require an Internet connection to work.
You could then block certain programs from accessing the Internet, or even remove them from the system if suspicious behavior is recorded.
Closing Words
Windows 10's App History Task Manager page provides you with a quick -- but thorough -- overview of network activity of processes running on the system. It can also highlight processes that use the most cpu time for example, which can also be valuable information.
It may make sense to go through the listing from time to time to check up on processes to make sure they behave and don't communicate with the Internet.
You do need other software, network monitors like Wireshark to find out more about the data that is transferred by a listed process.


Good to know about this trick to show non-Metro apps. Previously, I thought you had to go into Settings (Data usage) to see this.
I got 3 months worth of home internet usage in the last 3 days! I blew through my bandwidth cap and I’m cringing just thinking of the ISP bill to come! What’s the problem and how can it be stopped? This is on a laptop with Windows 7 which was upgraded to Windows 10 a couple of months ago, yet it spent a couple of hours upgrading Windows 10 just a few days ago. Now, since that upgrade, another major bandwidth disaster! Following the above investigation on Task Manager shows Chromium consuming 130GB since Dec 21, 2015!!
Any thoughts on using Wireshark to monitor unencyprted traffic of another IP?
I’m developing a simple internet-of-things device, and for debugging, I’d like to use a laptop running Wireshark to monitor the IOT’s traffic.
Unfortunately, I haven’t had much luck entering monitor mode with Wireshark and Acrylic (using Win8 or with live linux dvds (kali, nst22, ubuntu, reaverpro).. not sure if it’s a driver, hardware*, or installation issue. For example, I understand the version of the winpcap driver shipped with Wireshark (windows) doesn’t support monitor mode, so it’s necessary to use more tools (airmon-ng, etc): http://www.willhackforsushi.com/books/377_eth_2e_06.pdf
*I’ve tried a few usb wifi adapters that have different chipsets: Usb Netgear A6200 (Broadcom BCM43526), 6 Realtek based devices: RT3070/RT3072/RT3290/RT5370/RTL8187L/RTL8188cus
I can’t see why ** I ** would need such data, but I sure can see how m$oft can make money out of such data.
That’s just another of the “we are doing this for the customer, who doesn’t need it, but we sure like it,” that win10 is becoming infamous for. Make it sound a like a benefit to the customer, oh wait, I am NOT a customer I am only a lessee of the OS so I guess it really is their data.
I am with d3x — above.
As Martin pointed out, this is very useful security and debugging data. **I** am glad MS incorporated this simple access to the data. This is anything but nefarious for the overwhelming vast majority of users. As other have mentioned, the logs are easily cleared (once or regularly) or even blocked.
Windows 10, aka Windows Botnet
Thanks for this tip, even though I can’t easily use it because I replaced Windows 10 Task Manager with Microsoft’s Process Explorer. However your reference to NetBalancer is super! The standalone application works great from https://netbalancer.com/ .
Works also in Win 8.1.
The question remains, how to disable this logging?
A crude but simple and effective way to stop nearly all Windows logging in one stroke is this: open the Windows Services screen (run services.msc) and find the entry “Windows Event Log”. Normally, in the Status column, this will be listed as “Running”.
Once you’ve selected this Event Log service, click “Stop the service” in the top-left corner of the window. The logging will stop now, but it will recommence automatically again the next time you start Windows. Should you want to disable the logging service permanently, in the same Services window right-click on the Event Log service, open Properties, and in the “Startup type” dropdown list select “Disabled”. Now, no logging will ever happen again.
Windows will run just as fine with the Event Log disabled. No major problems at all! However, depending from your situation, you might encounter a few minor problems. Like, when you want to use some analyzer program that needs Windows event logs to gather its data (example: some Nirsoft utilities will remain blank if your event logs are empty). Also, after a crash, you won’t be able to use your event logs to look for the possible cause of the crash. However, in normal life you really won’t miss the logging at all.
If this solution is too drastic for you, then consider deleting all Windows events logs on a regular basis. You will still be building logs for one week or so, just in case you might need them, but then clear them out. The popular cleaning app CCleaner has an option to do just this: in the CCleaner window, in the left (Windows) column, under Advanced, tick “Event Logs”. Then every time you run CCleaner, it will delete the Windows event logs.
You can also create a .BAT file with the following information and then schedule it with elevated permissions to run however much you need/like it to run:
@echo off
wevtutil clear-log Application
wevtutil clear-log Security
wevtutil clear-log Setup
wevtutil clear-log System
pause
exit
This uses the builtin Wevtutil which is meant to work with command line to process log information. If you wish to backup before clearing it, you can just add /backup:backup.evtx at the end of each item you wish to backup.
Thanks Henk for yet another User 101 simplified guide. I use CCleaner to do this. Easy and effective :-)