How to Add Keyboard Input Languages to Ubuntu

It is easy to type in multiple languages in Ubuntu. This tutorial will guide you through the simple steps to adding keyboard languages to Ubuntu and show you how to modify the settings for keyboard shortcuts to toggle between languages. You can switch between different keyboard layouts, preview and print the layouts, and alter settings at any time.
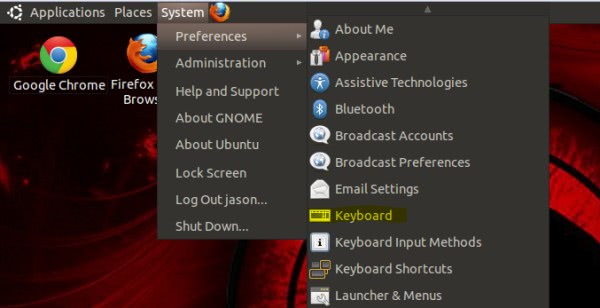
To add keyboard languages in Ubuntu, click on “System†and this will open the System menu. Select “Preferences†and then “Keyboardâ€.
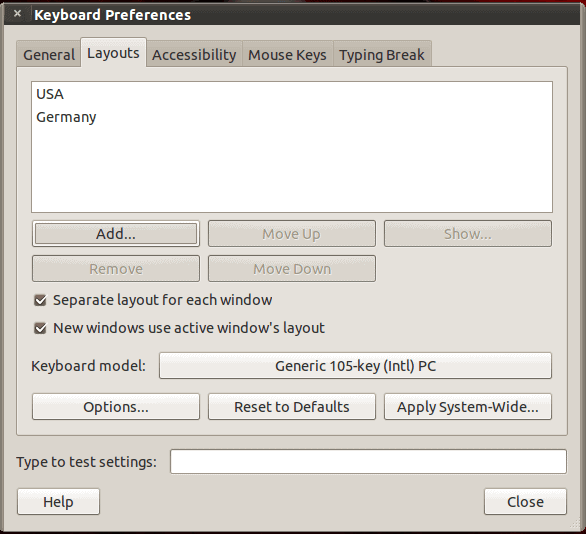
This opens the Keyboard Preferences dialog in which you can select different language layouts. Click the “Layouts†tab and then click “Addâ€.
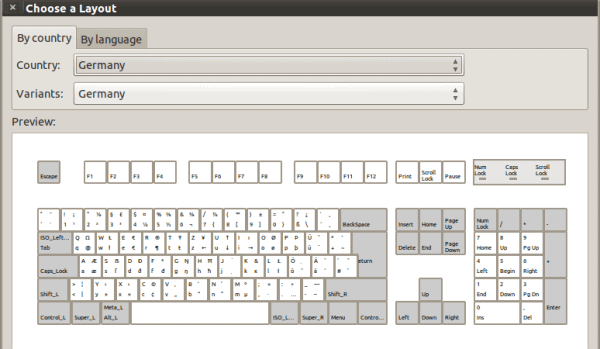
Now the Layout dialog box opens. Scroll through the various different countries and variants to select the desired language layout that you want to set. Keep in mind that you can set multiple languages and the default will not be lost. In this demonstration, we are selecting basic German for the keyboard layout. Select by country to choose any language and then select any applicable variant. Certain countries, such as the United States, can display several different languages. When your selections have been made, click Add and you are able to preview the keyboard layout for that language setting.

You are also able to set the layout by language and set a variant. When you have completed your selections, click Add.
In this case, the keyboard language was set both by country and by language. You can do either one, but the layout may vary somewhat if you do not set by country and by language. This is something you will have to experiment with, as the settings will be different for each country and language. Always view the preview to be sure that it is what you are looking for or at least close to what you are looking for.
Notice that we now have two languages displayed in the Keyboard Preferences. Both are immediately usable and you can add additional languages or simply close the dialog.

Now that multiple languages have been installed, a new icon will be displayed in the System tray. This will be located in the upper-right portion of the screen. An abbreviation of the country for which the keyboard is set is shown here. Click on the icon to reveal the list of languages and to change languages. You may also access Keyboard Preferences here to add more languages.
Click on “Show Current Layout†to preview the keyboard layout for a selected language. Here, the language was switched to German and we get a layout preview.
You can print this layout easily from this screen. At the bottom-right you will see the Print button. Click Print and you have an easy reference to keep beside your keyboard for reference.
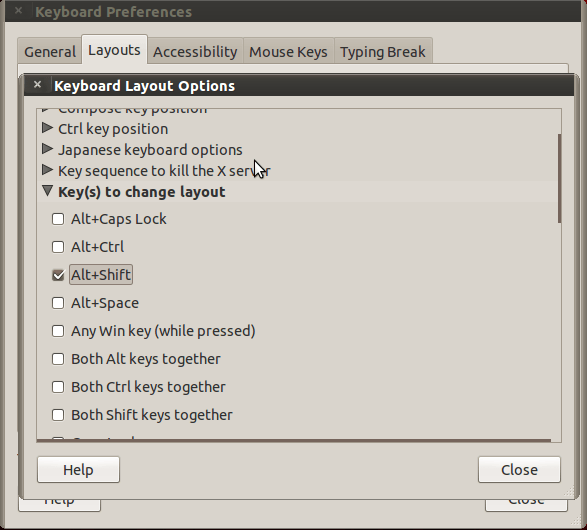
To change keyboard shortcuts for switching languages, open the keyboard preferences dialog and click the “Layouts†tab. Now chose the keyboard shortcuts to switch between input languages. For example, check the box next to “Alt+Shift†and this will be the shortcut to change keyboard languages. Choose the shortcut that is most convenient for you.

There are other options in Keyboard Preferences to customize keyboard settings, should you desire to experiment with these. This covers the basics for adding keyboard languages to Ubuntu.
Advertisement


Thanks a lot, this was very helpful for me ;)
In Theory t seems to be very easy…
However the Truth/Practice is sometimes different!
On the Ubuntu v11.04, I have added the Greek Language Keyboard.
I tried using the “Alt-Shift” combination only to find out that it does NOT work at all!
Nor does any other combination work!
I have managed to Add the Ubuntu Client to Windows Active Directory & I am ready for prime time – only without Localle Keyboard…!!!
Googled it & fould a few other guys with SAME problem.
Then tried Mint – to find that HP Networked Printer S-ware crashed – So no Printers. I do have Keyboard though…
REAL CONGRATS GUYS!!!
In this manner, I don’t see you beating MS House NOT even by the End of this Century!
In the keyboard layout dialog which you used to add the Greek keyboard there is an Options button. Click on it. Expand “Keyboard Layout Options” option “Key to choose 3rd level”. Make sure that “Any Alt key” is checked. Then your Greek keyboard will perform as you expect.