Add parental controls to your GNOME desktop

I will preface this by saying I am not a champion for any type of censorship. But when there are children involved, there are times when this is very appropriate. But parental controls are not just about blocking specific web sites from your children's view. Parental controls also includes keeping your children off the computer all day and all night. Because many children (regardless of age) can get into the habit of spending way too much time on their PC it's good that there are software solutions that can monitor and control those habits when the parents can't always be around to keep it in check.
One such tool for Linux is GNOME Nanny. GNOME Nanny works to block sites visited and times used for web browsing, chatting, email, and even PC use time. And, unlike making use of a Proxy, GNOME Nanny is incredibly easy to use. Let's take a look at this helpful tool.
Installation
There are a couple of ways to install Nanny. If you are using Ubuntu you can simply do the following:
Open up a terminal window.
Issue the command sudo add-apt-repository ppa:nanny.
Issue the command sudo apt-get update.
Issue the command sudo apt-get install nanny.
Once Nanny is installed you are ready to take advantage of this tool.
Usage
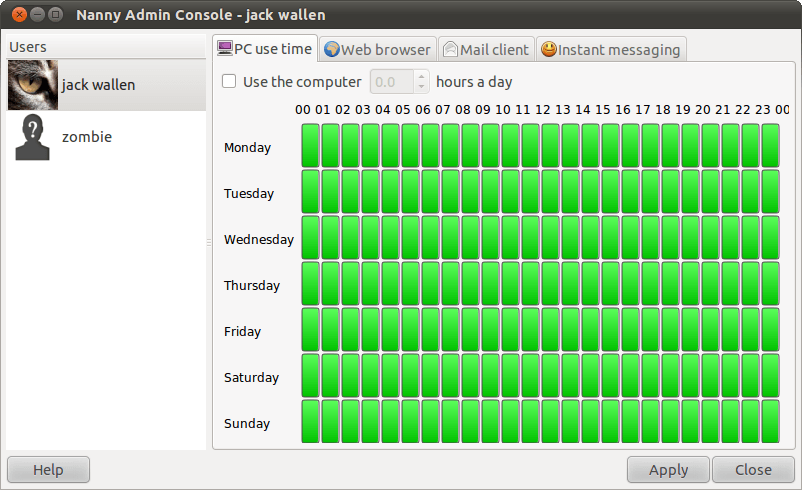
To start up Nanny click System > Administration > Parental Control and then enter your sudo (or root user) password. When this window opens (see Figure 1) you will first need to click the button to give you admin privileges (without the admin password you can not gain the privileges necessary to make changes to Nanny).
Once you have been escalated to admin privileges you can then schedule usage time for PC, web, email, and chat usage. Before you start setting up services to be blocked you will first want to select a user. One of the nice things about Nanny is that it allows you to set completely different configurations for all users on the system.
After you select a user, to set allotted times for each service, just click on the tab for the function you want to control, check the box for "Use..." and then set the times for use. The best way to set the time allowed is to click on the green blocks (each green block is actually two half hour increments). If a block is green it means it is a usable time. If a block is red it means it is a non-use time.
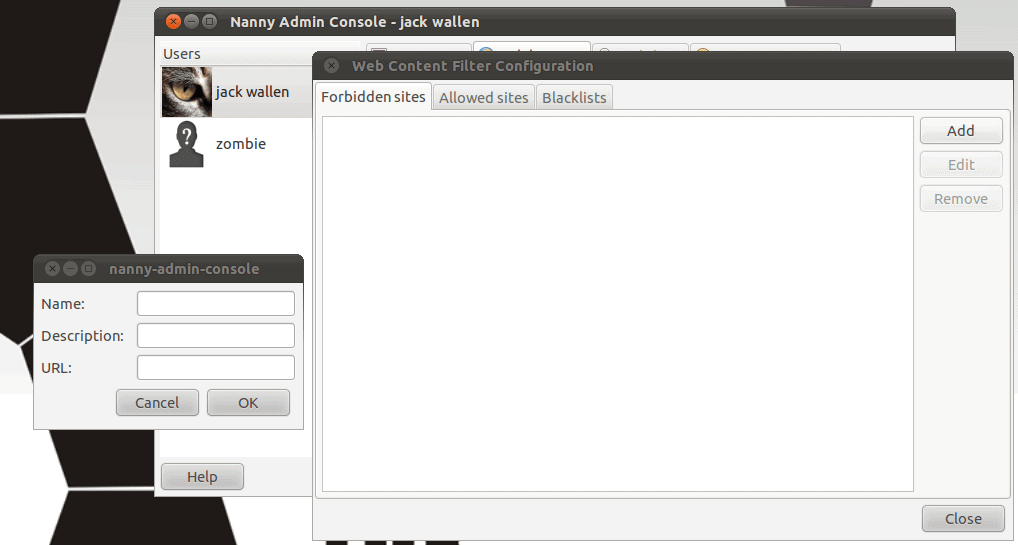
If you want to block certain sites from being viewed click on the Web Browser tab and then click on the Configure button. When you do this the Web Content Filtering Configuration window will open. In this window click Add and then enter the details for the site you want to block (see Figure 2).
After you've added a site, it might take a moment for the configuration to take effect. But once it does, that site will not be reachable by anyone. You can also import blocked sites from Blacklists. To do this click System > Administration > Blacklists. You will need to already have the blacklist on your machine, but the import process is very straight-forward.
Final thoughts
If you have a need to add parental controls to a Linux box, look no further than GNOME Nanny. Not only will it offer very predictable results, it is incredibly simple to set up and manage.
Advertisement


I can install Nanny on Ubuntu 10.10 and configure access for a “Desktop user”.
In the Destop User’s session, Nanny is started and shows it’s status correctly, but the session is not really blocked.
Any idea?