Upgrade Ubuntu from 10.04 to 10.10

If you are currently using Ubuntu 10.04 and are interested in 10.10 you have choices - you can burn yourself an ISO and do a complete, fresh installation, OR you can upgrade using apt-get without having to bother with a re-installation. Of course I should warn you that, as of this writing, Ubuntu 10.10 is still in beta. That doesn't mean you have to avoid the upgrade. It does, however, mean you run the risk of not everything working correctly. But if you are all-too-antsy to get that precious 10.10 on your machine...the task is actually quite simple.
In this article I am going to show you how to, from both the GUI and from the command line. After you are finished, you should have a working version of Ubuntu 10.10 beta. Of course, as 10.10 comes out of beta you can continue to update and have a full released version in no time.
NOTE: You can ONLY do this upgrade from 10.04. You can not upgrade from any earlier release. Also make sure you DO back up all of your data. Even though the upgrade process has become very reliable, you never know when something could go south.
From the GUI
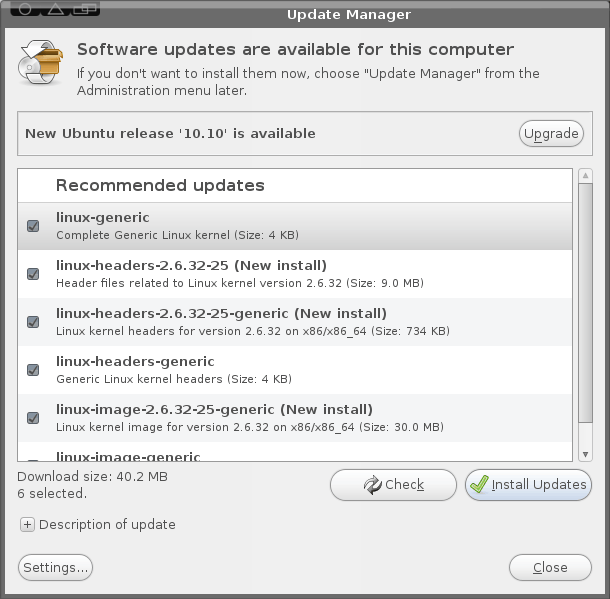
Let's tackle this task from the GUI tool first (as that is how most will want to do this anyway). The first step is to open up the update manager in in "development release" mode. To do this hit Alt-F2 and type update-manager --devel-release and hit Enter. When you do this the update manager will open with a new addition - the Upgrade button (see Figure 1).
Before you actually hit the Upgrade button, you MUST install any and all updates for your system. If there are none listed click the Check button first. If you see any updates go ahead and click Install Updates and allow those updates to finish. NOTE: If the updates require a reboot, do so BEFORE you continue on to the upgrade.
Once you have completed all updates it is then safe to click the Upgrade button. Walk through the steps for this upgrade (they are very straight-forward) and reboot when completed.
From command line
Believe it or not, upgrading from command line is just as easy as it is from the GUI tool. The first step is to update your system. So open up a terminal window and issue these two commands:
sudo apt-get update

sudo apt-get upgrade
Of course, you will have to enter your sudo password for the first command. Once that is complete you may need to restart your computer (depending on if the kernel is updated or not). After that, you are ready for the upgrade. The first step is to issue the following command:
sudo apt-get install update-manager-core
Now we need to make a simple edit to the /etc/update-manager/release-upgrades. This file determines the default behavior for the release upgrader. The line you need to change is at the bottom of this file. Change it from:
Prompt=lts
to
Prompt=normal
Save and close that file and then issue the command:
sudo do-release-upgrade -d
When  prompted, click Y to continue on with the upgrade. Once the upgrade is complete, you will need to restart you computer.
Final thoughts
Linux does make it easy to upgrade from release to release. I have run these upgrades many times and only rarely have I encountered a problem. Does that mean they are 100% guaranteed? No. Things happen...so please, make sure you backup all of your data before attempting this process.
Advertisement


10x geek, proved most usefull to me, for those whom do not trust this article, please do a backup, then try this
Found a related site on how to update to Ubuntu 11.04
http://www.ubuntucommand.com/ubuntu-upgrade-command/
thanks,
zach
You should change the title of this to include “Upgrade Ubuntu from 10.04 to 10.10 development release” otherwise remove your reference to “-d” in your steps.
Advising people to use development release as a production release isn’t wise.
Noooo! This is a trick, or it is ignorance, at best. unless you WANT, to foul up your stability, do not do this!
Upgrade within the tier only. That works better than anything. It’s AMAZING. Do not upgrade to new releases; of a non-rolling release! It’s just stupid. The only purpose it serves, is to test the broken (for MOST people) managed distribution upgrade. This managed upgrade thing, only works when the release is very outdated, then it might have some use (maybe a sever; where stability is paramount).
Clean install instead, and to a SEPARATE install, for the new unfinished (and just released) versions. Wait; until at least 3 months AFTER a release is final; before you install Ubuntu on your “production”, or main working system.
You have to know NOT, to go to far, unless you want a basket of poo. To many newbies are already dismissing Ubuntu (and the like); because they tried a Beta, and/or just released version. This is different, than the closed software word. Don’t just grab the latest number!
PEOPLE! Clean installs are not only more solid, they are faster to do. It is NOT worth it; to try to save your tweaks. Your lost tweaks, will be the least of your problems; if you try to upgrade in to the next tier. If this bothers you too much, you should be helping with something like Linux Mint Debian Edition. It’s too new now; but it is a rolling release! it can (dist) upgrade(better), when the time is right. Still, you will need patience.
Right now, if you like the time saving things Ubuntu offers, CLEAN INSTALL IT ONLY! Again, ONLY install (for stability on the progressive new stuff) no less than 3 months AFTER an official release date.
Go ahead and play with the new version if you want. SOME people are just fine with that. SOME people get along by managed upgrading; BUT only long term testing will tell and you probably will not be the SOME. Point is, just install it SEPARATELY, to play. KEEP your production system until later. Like at least 3 months with a new, preferred system .
TRUST ME!
The up side to all this is, Ubuntu can rework whatever needs reworking AND you can stay with a former version a lot longer than you would guess. Until the time is right, for you and your purposes.
Dang people. Ubuntu is not just a testing plaything. People have to LIVE with it, day to day. You know?
For Kubuntu, go to this link for a detailed upgrade procedure.
https://help.ubuntu.com/community/MaverickUpgrades/Kubuntu
I am doing mine right now using the following commands.
Make sure you have the latest updates/upgrades for Kubuntu 10.04 using the following:
sudo aptitude update
sudo aptitude safe-upgrade
Open the Run Command dialog by pressing Alt+F2. Type into the box
kdesudo “do-release-upgrade -m desktop -f kde -d”
And off it goes. I will post later about any issues I might encounter.
The upgrade completed smoothly and successfully. Not even a single issue.
Tested few things and first indication is that the upgrade is pretty good. Now it is time to check the functionality of everything else.
A little tip from having installed upgrades before. If possible, run it in download only mode first. From Synaptic, it is a check box. I don’t remember if it is in the update manager. From command line it is “apt-get dist-upgrade -d”.
This makes it much smoother later because as it goes to install, it already have everything locally. You can run the download only upgrade an extra time just to be sure that it doesn’t download anything new. Once it has nothing left to download, proceed as normal with the upgrade.
Thanks Jack.
I know this is a bit off topic but is the bytecode interpreter now included given that the truetype patents have expired worldwide?
The ugly fonts in Linux have always kept me from converting.
i did the upgrade from inside ubuntu the other day and it screwed up the install.
might just wipe the drive and chuck an osx86 thing on there. it would be more useful to me
I did excactly the same… just considering trying again…..