Tweak your RGBA enabled desktop

Recently I covered the addition of RGBA support in Ubuntu (see my article "Enable RGBA support in Ubuntu").
I've had a lot of people contact me about various tweaks to that desktop to further refine the look. So I thought I would take the time to show you just how to tweak a Ubuntu desktop to give it a more complete look for complete RGBA goodness.
Why RGBA? If you are a fan of good old Transparency (like me) then you understand this is something Linux has needed for a long time. Yes it can sort of be done through Compiz with some tweaking...but not GTK+-wide.
That's what RGBA support is all about, allowing a themable transparency throughout the GTK+ widget set. The only problem I have found (outside of non-GTK+ apps not playing well with RGBA) is that certain features don't want to accept the transparency as well as others. That and a need to give the desktop some finishing touches. And that is just what we are going to do here.
First things first
One of the things you are going to want to do, upon completion of adding RGBA support, is to install the Emerald decorator. Why would you want to do this? Because Emerald will give you the feeling of continuing that RGBA support into the window decorations, whereas the default decorator will not.
I've covered Emerald before (see my article "Add Emerald for slick window decorations") so installation shouldn't be a problem. Once installed you want to use the right theme. For the Murrine themes I have found the Glassified Mac theme to work best. You can browse through the entire Emerald Themes page to find the one that matches your desktop perfectly.
One of the issues you might find is that you have to replace your window decorator every time you log out and log in. This can be a hassel. Instead open up the CompizConfig Settings Manager (click System > Preferences > Compiz Config Settings Manager), do a search for "decorations" (no quotes), select Window Decoration, and replace the command with /usr/bin/emerald. Now your default window decorator is Emerald.
The panel
Probably one of the biggest glitches is portions of the GNOME panel just don't seem to want to work with RGBA. It took me a while but I figured out a "way" around it.

The biggest issue are the three main menus. No matter what you try you can not get them to work with the transparency. So what I found is to get rid of that applet (it's actually one applet called Menu Bar) and replace it with the Main Menu Applet.
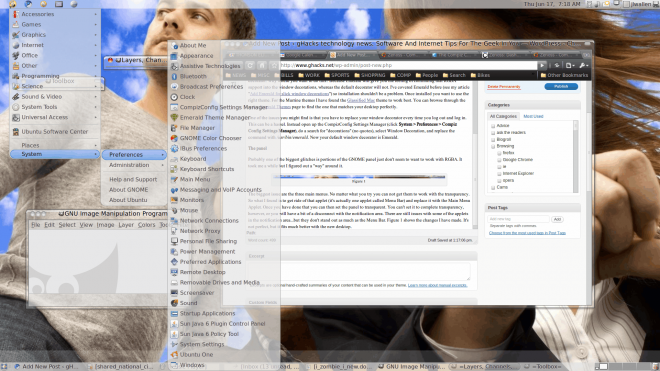
Once you have done that you can then set the panel to transparent. You can't set it to complete transparency, however, or you will have a bit of a disconnect with the notification area. There are still issues with some of the applets in the notification area...but they don't stand out as much as the Menu Bar. Figure 1 shows the changes I have made. It's not perfect, but it fits much better with the new desktop.

What does that new Main Menu applet look like when used with RGBA support? Take a look at Figure 2 for a sample.
Final thoughts
The addiction to eye candy is a rough one. You find yourself tweaking and tweaking until you think you can tweak nor more...until you find yet another tiny customization that looks better. The RGBA-enabled desktop is a fairly slick one. I hope you find it to be as eye-candy-tastic as I have.


I absolutely love this. My desktop, menus et al look great.
I have selected the water effect and the wiper effect and I am enjoying a rather tranquil experience.
I have tried to have these effects be available at startup to no avail. I tried xmacro and placed the macro command as a startup option. But I still have to press then in order to activate the effects.
Is it possible to have the water effect stick without having to press the key combination everytime I boot my PC.
Thanks again for a great tip.
Henry.