Five handy tools in the GIMP toolbox

For many Linux users, The GIMP (GNU Image Manipulation Project) seems to mostly be a tool of mystery and confusion. The biggest reason for this is lack of exposure. Most users that complain about The GIMP's interface really only need to get to know the interface. I have covered The GIMP a few times here on Ghacks (Check out our GIMP content), but I have yet to break this application down to it's handiest of tools. And that's what this article will do...take some of those tools from the toolbox, the ones you should know the most, and help you to become familiar with them.
Some of these tools you might already know, some of them you may not already know, some of them you will be very glad you now know. So, with that said, let's get our GIMP on!
Remember the "toolbox"
Before we start with the tools, let me remind you where the toolbox is. When The GIMP opens, three windows should appear:
* The Main Window
* The Dockable Dialog Window
* The Toolbox
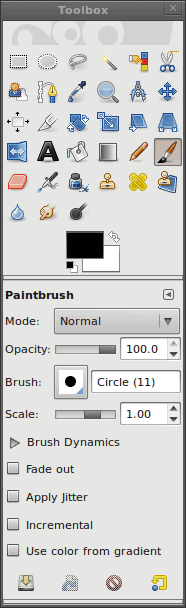
The Toolbox (see Figure 1) is the window that allows you to pick your tool of choice. In order to select a tool, you only need to click its button. When you do select a tool, the lower pane will change according to the tool you have chosen. By default, the Paintbrush tool is selected.
Now, let's take a look at those tools you should know the most.
Move tool

The move tool (see icon in Figure 2) allows you to move your selections around on your image. This is one of the most used tools in The GIMP, but often the most overlooked. Most users assume, once you have placed an element on your image, you can just move it around at will. You can, if the move tool is selected.
Color tool

The color tool (see icon in Figure 3) is one of those tools you will soon wonder how you worked without. With this tool you can select a single color on your entire image. Say, for instance, you have an image with a red background and you want to copy everything but the red background. You can select the Color tool and then click on the red of the background. This action will select everything on your image that is of that exact same color. You can then invert your selection and then copy the contents. You have to be careful using this tool as it does include all of that same color from your image. So if there is red in the portion of the image you want to copy, it will be left out.
Color Picker

The color picker (see icon in Figure 4) is a simple, but very useful tool. When you select a color with the Color Picker it places that color in your color palette. The selected color will be selected as your foreground color. This tool will keep you from having to try to guess the exact colors for your work.
Measure tool

This tool (see icon in Figure 5) is for anyone that has to do exact work. When you use this tool you select two points and at the bottom of the image window and drag the second point to its destination. During the dragging you will see, at the bottom of the image window, the length (in pixels) and angle (relative to horizon).
Scissors selector

There are numerous ways to select a portion of your image. One of those tools is the Scissors select tool (see icon in Figure 6). This tool allows you to place points on your image and the tool will automatically connect those points using intelligent edge fitting. The best way to describe intelligent edge fitting is to show you (see Figure 7).
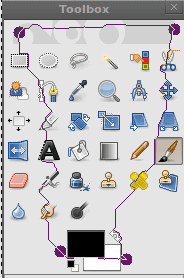
As you can see, the lines connecting each point attempt to attach themselves to any edge along the path. This is a very handy way to make cut outs of images for illustration purposes.
Final thoughts
And there you have it...five handy GIMP tools that you may not have known about. It is one of my goals to help people see that The GIMP is not as difficult as it would see, nor is the interface as bad as some think. I hope you find these GIMP tools as handy as I do. We'll revisit this topic and cover five more handy GIMP tools later.
Advertisement


I have question about Scissors selector – it is really very good tool – but times to time it is going different way than I want. Is it possible delete last point (or even more)?
For what it’s worth, I wrote a brief tutorial on the Resynthesizer, which can be found at: http://www.oregoncanoesport.com/rambotribble/gimptutorial02/gimp_resynth.html
An excellent introduction into GIMP: http://www.meetthegimp.org
I recently stumbled onto the Resynthesizer plugin for Gimp (thanks Penguin Pete) and it is brilliant. It has to be added to Gimp, it is found in most repositories as gimp-resythesizer.
Use the selection tool to make a part of an image you want gone, select resynthesize and watch it disappear like it never existed. Start with something small and experiment with the settings.
It does not get any easier than that.