Final stages of the eGroupware Installation

We are plowing forward with the eGroupware installation. We have already been introduced to eGroupware (see my article "eGroupware: Your Exchange replacement has arrived"), we have also seen how to take care of all the prerequisites (see my article "How to install eGroupware"), and finally we've seen how to create the header.inc.php (see my article "Creating your header.inc.php for eGroupware"). Now it's time to continue on with the installation and take care of simple application management.
In this article I am going to walk you through the section of the eGroupware installation that takes care of the final stages of the eGroupware installation. Once you are done with that, your eGroupware site will be ready to go.
Where are we?

The last thing you did was create the configuration file /var/www/egroupware/header.inc.php. Now it's a matter of finishing up the installation from a page that is set up in stages (see Figure 1). You will have logged in by now and are ready to take care of the first stage in this final step.
Stage 1: The first stage is to create the database. You have to supply the charset, DB root username, and DB root password. For the charset, just let it as the default. The username/password will be for the username that can connect to the database you created for this setup. Once you have entered that information click Create Database. You should get the warning: Your database is working, but you don't have any applications installed. When you do get that warning you will also see a button labeled Install all applications. You are now ready to click that button.
Stage 2: When you click the Install all applications button. When this
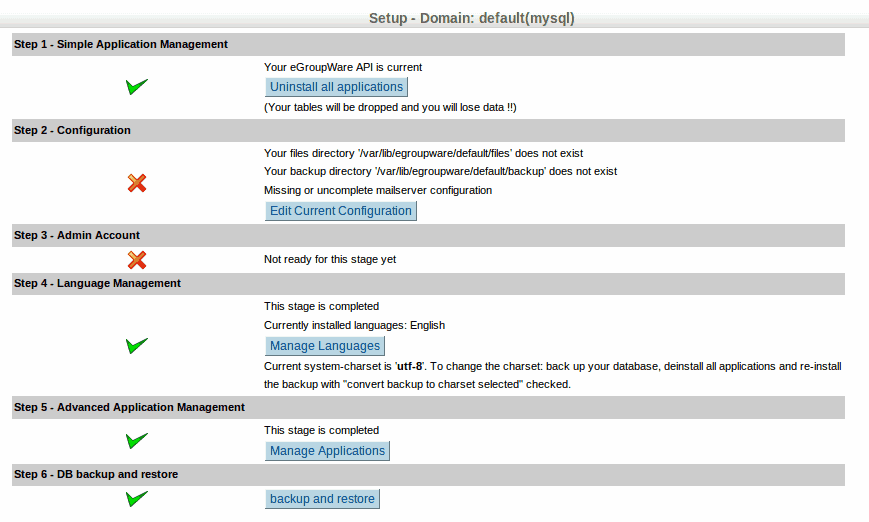
stage finishes you should see If you did not receive any errors, your applications have been installed. At that point click the Re-check my installation button. Now your setup page should look similar to that in Figure 2. As you can see there are only two stages left in the installation.
Stage 3: As you can see, in the Step 2 Configuration section we have neglected to create a couple of directories. This is simple. Open up a console window and issue the following commands:
- sudo mkdir /opt/egroupware
- sudo mkdir /opt/egroupware/default/
- sudo mkdir /opt/egroupware/default/files
- sudo mkdir /opt/egroupware/default/backup
- sudo chmod -R 777 /opt/egroupware
Now, oddly enough, we need to click on the Edit Current Configuration button and enter the following:
Full path for users and group files: /opt/egroupware/default/files
Full path to the backup directory: /opt/egroupware/default/backup
Click Save and you should be complete. Of course those directories could have been created during the prerequisite stage of the install, but I wanted to highlight how you could go back and re-configure at any stage of the installation. NOTE: If there are any other issues in your Current Configuration, now is the time to take care of them.
Stage 4: The final step is to click on the Create an Admin Account button. When you click on that you only need fill out the information for the admin account. All of the information is straight forward. You will notice two check boxes. One is to allow the admin access to all installed applications. Although they warn you this can be annoying, I tend to prefer it this way so my admin user can see everything. You can also opt to have eGroupware create demo accounts. This is users choice. You will be creating accounts anyway - so this is up to you.
That should do it. When you click Save on this you should have all green checks and be ready to log into your eGroupware installation. You will find a TON of stuff to configure now. Start playing around and see what eGroupware has to offer.
Advertisement


“sudo chmod -R 777 /opt/egroupware” – bad plan
You should determine what user apache is running as and then change ownership to that user:
$ ps -ef | egrep ‘(httpd|apache)’
$ sudo chown -R apache:apache /opt/egroupware
and optionally, fixup the permissions:
# the following resets all permissions under /opt/egroupware to a sane default
$ find /opt/egroupware -type f -exec sudo chmod 640 ‘{}’ \;
$ find /opt/egroupware -type d -exec sudo chmod 750 ‘{}’ \;