Fast access to templates in GNOME

Right-click on your GNOME desktop and take a look at what is inside the Create Document menu. More than likely nothing. Why is that? This menu, as well as the Nautilus File > Create Document menu, are there for templates. But by default, there are no templates to be found. Why? Because you have to create them and put them there.
But you don't want to just have any file type inside of the the Create Document option. Instead you will want to have the type of documents you use most frequently. Depending upon where you access this feature, the document, and the icon for that document, will be displayed. For instance, if you right-click on the desktop that new document will appear on your desktop. If you use the Nautilus menu the icon for your new document will appear in the directory you accessed the menu entry. Let's take a closer look.
Templates
The first thing you will need to do is create some templates. These templates can be actual templates (documents with formatting and styles) or just blank templates. The easiest way to create them is to open up the tool that will be used to work on the the individual file. Let's use OpenOffice.
Open up OpenOffice and do the following:
- Create and save a blank text file as a template (.ott). Name it Text.
- Create and save a blank spreadsheet (.ots). Name it Spreadsheet.
- Create and save a blank presentation (.otp). Name it Presentation.
NOTE: When you create a presentation template you might want to create a template with all the trimmings instead of just a blank one.
Take note of where you saved those files as you save them. I am going to assume they are saved in ~/Documents. Now close out OpenOffice and open up a terminal window. What you need to do now is to move those templates into the ~/Template directory. you can do that with the following commands:
mv ~/Documents/*ott ~/Templates
mv ~/Documents/*ots ~/Templates
mv ~/Documents/*otp ~/Templates
Of course you can just save the templates to the ~/Templates directory from within OpenOffice.

Go back to the desktop and right-click anywhere to bring up the menu. You should now see three new entries in that menu (see Figure 1).
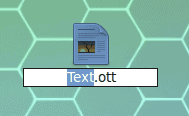
But what happens if you click one of those entries? When you do an icon will appear waiting for you to rename it (see Figure 2).
After you give this file a name you can double click the file to open it in the associated tool.
You can of course create template documents from just about any tool. Create image templates within GIMP and save them to the Templates file. There is a trick with files like images. If you create an image on the desktop and double-click it, the image will open in the default viewing tool - which is not GIMP. So you will want to right click the new icon and select Open With > The GIMP.
Final thoughts
If you've ever wondered why the Create Documents menu was empty, now you know why and how to populate it with file types. This is a very handy way to have quick access to create often-used document types.
Advertisement


