GNOME Panel tips and tricks

GNOME is one of the more stable and user-friendly desktops around. And of course, like most of the Linux-verse, with a little tweaking you can make it even more user-friendly. The GNOME panel is one aspect of the GNOME desktop that certainly does not escape possible tweaks.
In this tips and tricks article you will see a few little tweaks you can make to the GNOME panel to make your desktop more productive, efficient, and just plain cooler. NOTE: For this article I will be using GNOME 2.28. If you are using an earlier release some of these tips may not work.
Auto-hide problems
You may have found yourself in this situation. You create a new panel, set it on either the left or right side of the desktop, and configure it to auto-hide, only to find that you can not un-hide that panel. This is a problem that can happen when certain elements are added to a panel (the GNOME Main menu for example).
It seems no matter how long you hover your mouse near the edge of that hidden penal (the action to un-hide the panel), it won't come out. If this is the case, fret not, there is a way to get it back. For the GNOME desktop there is a tool called gconf-editor. This tool allows you to set configuration options for all tools and applications in GNOME, without having to open up the tool or application.
To start this tool hit <Alt>F2, type gconf-editor to open up the necessary tool. What you need to do is navigate to: /apps/panel/toplevels/<desired panel>/ and then uncheck the auto-hide box. In the case of my right side panel the panel name was panel_2. The results of unchecking that box will be immediate. You do not need to save any settings, just close the gconf-editor and you are done.
Add drawers to clean up your panel

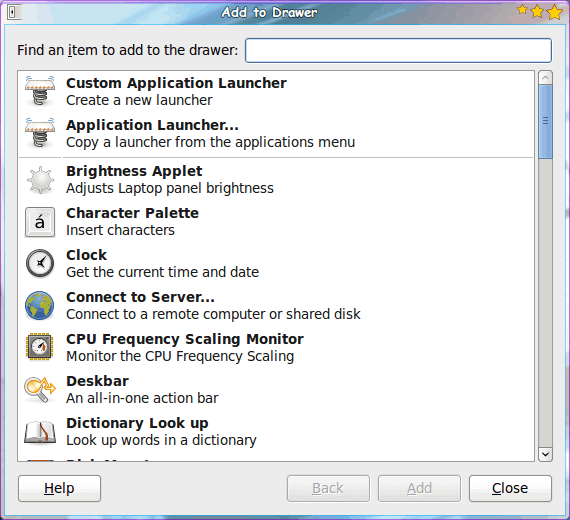
You may not know this but you can add drawers to your panel. A draw is an expandable item that can hold multiple elements without adding more clutter to your main panel. Say, for example, you want a drawer to hold system tool items. To do this right-click on the panel and select Add To Panel. From the resulting window select Drawer and then click Add. A new icon will appear on your panel. Once that Drawer icon is on your panel, right click it and select Add to Drawer. From that new window (see Figure 1) you can select what you want to add to your drawer.

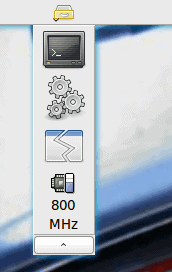
After you have added the contents to the drawer, all you have to do is click on the drawer icon in order to get to the contents (see Figure 2). You can configure this drawer further by right-clicking the icon and selecting Properties.
Add a KDE-like menu

This is a feature many might not have know existed in GNOME. If you like the way the new KDE main menu looks and feels, you're in luck with GNOME. Right click your panel, select Add to Panel, and select GnoMenu to add a different type of GNOME menu to your panel.
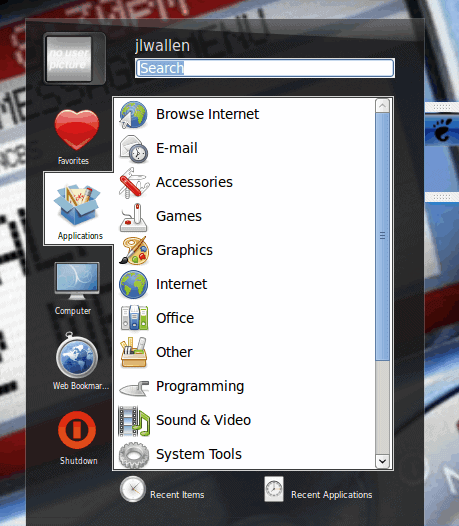
As you can see (in Figure 3) I have added a GnoMenu element to a right-side panel. Â This menu behaves very much like the KDE menu. You can add favorites by simply right clicking a menu entry and selecting Add to Favorites from the resulting menu.
Move panel elements
If you need to move an icon or element around on the panel you can do that. All you need to do is right click an element and select Move from the resulting menu. As soon as you do that your cursor will change and you can immediately move that item around. You can even move elements from one panel to another by selecting Move and then moving your cursor to the target panel.
Once you are happy with the location you can always right click the element and select Lock to Panel to avoid any accidental moving or deleting. You can then unlock that element by right clicking and unchecking Lock to Panel.
Final thoughts
The GNOME panel is a very flexible tool that can make your desktop experience much more efficient and less cluttered. These tips are just the scratching the surface of all you can do. Have you found a cool trick for the GNOME panel? If so, share it with your fellow Ghacks readers.


To move an item, there’s not need to right click, just middle click and drag it.
@john doe: Terribly sorry about leaving this out, but you have to install Gnomenu. Download it from this site:
http://www.gtk-apps.org/content/show.php/GnoMenu+-+consolidated+menu+for+gnome?content=93056
untar it with tar xvzf filename.tgz
change into the new directory with cd directoryname
issue the command sudo make install
log out of gnome and log back in. you should be good to go.
sorry about that. i had forgotten that was an app i had to install.
aww…there it is. thanks man =)
works great. good post!
hrm, i can’t find “GnoMenu” in my applet listings. running 32bit Karmic 9.10.
where is it?