How to create a bootable USB Ubuntu drive

The Ubuntu desktop distribution is full of nifty tricks. One of those tricks is the ability to create a bootable USB Ubuntu drive quickly and easily. Used to be this trick wasn't so easy. Not only did you have to format the USB drive, you had to manually create the file systems, copy the files, add a boot loader, and hope that it worked. Sometimes it didn't, so you'd have to start all over again. All of this was done via the command line.
Now there are loads of tools to use for this purpose. I have already covered the Unetbootin tool in my article "Install Linux on a USB drive with Unetbootin." This time around we are going to do the same trick with a tool that comes pre-installed on any modern Ubuntu distribution. It's all graphical interface and all easy going.
What you will need
- A USB drive with at least 700 MB in size.
- Either an ISO image or the Ubuntu Live CD
And a little bit of time. If you don't have either the ISO image or the CD you can just download a fresh copy from the Ubuntu site.
Once you have everything you need, you are ready to go.
Starting the tool

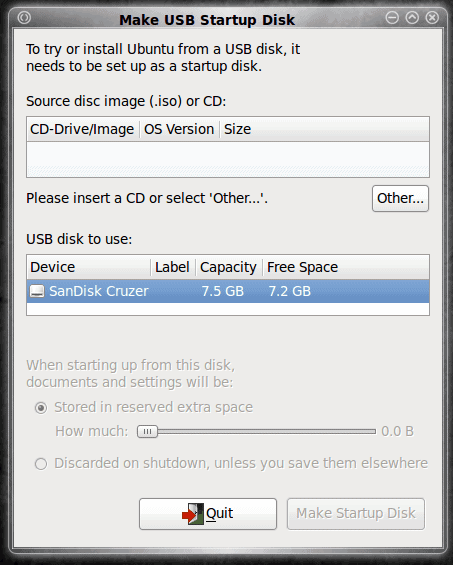
You will find the USB creator in the Administration sub-menu of the System menu on the GNOME desktop. The entry you are looking for is called "USB Startup Disk Creator". Click that to open up the main window (see Figure 1).
As you can see (in Figure 1) there is neither an image or a CD listed. You either have to insert your Ubuntu CD or, if you're using a downloaded image, click the Other button and navigate to where you've saed your image file.
When you insert your CD it will be automatically detected by the system and listed in the USB Startup Disk window. When this happens everything that is greyed out in Figure 1 will be at your service.
You will notice the only option available is for saving documents and settings. If your USB drive has enough extra space you can designate a portion of that drive for this purpose. With this feature you can effectively have a portable version of Linux that is far more than just a "startup disk".
Creating the disk

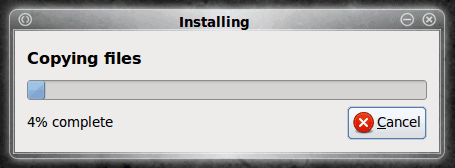
When you have selected your image to use and configured your free space you are ready to go. Click the Make Startup Disk button and the main windo will be dismissed. During the creation process you will see a progress window (see Figure 2) that will let you know how much is done and what is happening. The phases of this creation are:
- Copying Files
- Creating persistence file
- Making persistence file system
Once all three phases are complete you will get a dialog window telling you installation is complete and you can now reboot your machine with the USB drive. Of course when you boot a machine with this device it has to be able to boot from a USB device. Most modern machine can do that so it shouldn't be an issue.
Final thoughts
As far as tools of this nature, the Ubuntu USB disk creator tool is one of the easiest and most reliable. It's not the most flexible; but for what it does, you can't beat it. If you're looking to have a portable Ubuntu distribution you can carry with you, make use of this user-friendly tool.


Can you actually use the USB stick on any other computer with different sets of
hardware (sound card, video card, lan, etc..) ?
Will it work considering that different sets of drivers are needed?
Its working for me. Nice article
I want to use that usb while boot with that usb
please tell about this logmein software freedownload
Just tried this too. Pretty cool. Installed, booted just fine. Good to have a tool around in case something goes wrong on my system.
Hi,
I went through the process of creating a bootable, persistent USB Drive for Ubuntu.
My requirements were:
I wanted a full Ubuntu install
I wanted it to use all of the 16Gig USB I had as I wanted to be able to load movies & music on it.
I wanted to be able to boot any PC with the USB without any chance of making changes to the PC – the thought of inadvertently installing Ubuntu on my work laptop after a couple of beers didn’t appeal.
I didn’t want to change the PC that I installed it with – I especially didn’t want the PC to need to have the USB fitted as I would be taking it away with me a lot.
After trying a variety of methods including Pendrivelinux, Unetbootin and the Ubuntu USB creator which all proved unsatisfactory in failing to meet one or more of the above criteria, I found a much better and easier option.
Get a live CD.
Go into the BIOS of the PC and disable your hard drive – hit F2 (usually, look at the start-up screen for the Set-Up option) when you start it and remember to write down the changes you make so that you can undo them.
Fit your USB
Reboot the PC from the Live CD
The USB should be the only hard drive that the install sees, (Check that it is though, and if it’s not, then you’ve done something wrong, bail out & start again).
Do a normal install following one of the many guides on the net.
Once you’re done, reboot the PC and change the BIOS back as you did at the start.
Doing it this way is much, much less hassle & you get much better & safer results.
To boot any PC with the USB, just fit the USB, switch on, choose the USB to boot from (typically hit F12 when you switch it on) and you’re good to go.
cool!!!!!
Great article. I was looking for it.