Build a custom firewall with fwbuilder

For the Linux operating system there are plenty of possibilities when it comes to firewalls. One possible option is Firestarter (You can read my "introductory" article "Firestarter: Simple to use desktop firewall" for an example of one such tool).
You could also get very granular with the command line tool iptables. Of course most administrators do not have the time or inclination to deal with such heavy-hitting tools as iptables (if you do have the time, however, iptables is incredibly powerful). So where do you go to get something user-friendly AND powerful? One such option is fwbuilder.
Fwbuilder is a powerful firewall creation tool that works by adding objects to build a customized firewall. An object can be just about anything from a firewall, a library, a host, interface, address, DNS name, etc. The idea is you piece objects together to form a cohesive whole that works together to form a complete firewall. The only problem most run into is, when you fire up fwbuilder, where do you start? It may seem a bit confusing at first, but you know where the first step is, the rest of the journey is pretty clear.
Installing fwbuilder
I will touch briefly on installing fwbuilder, because it will not be found on your default system. And although you will find fwbuilder in your respository, it will be an outdated version. So to install the latest version first open up your /etc/apt/sources.list file and add the following (Note: I am installing this on Ubuntu 9.04.):
deb http://www.fwbuilder.org/deb/stable/ jaunty contrib
Before you update apt you will need to add the GPG key. Download that key and then issue the command:
sudo apt-key add PACKAGE-GPG-KEY-fwbuilder.asc
Now issue the command:
sudo apt-get update
Finally you can install with the command:
sudo apt-get install fwbuilder
Once installed you will find fwbuilder in the Administration sub-menu of the System menu (The entry will be labeled Firewall Builder).
Building a firewall

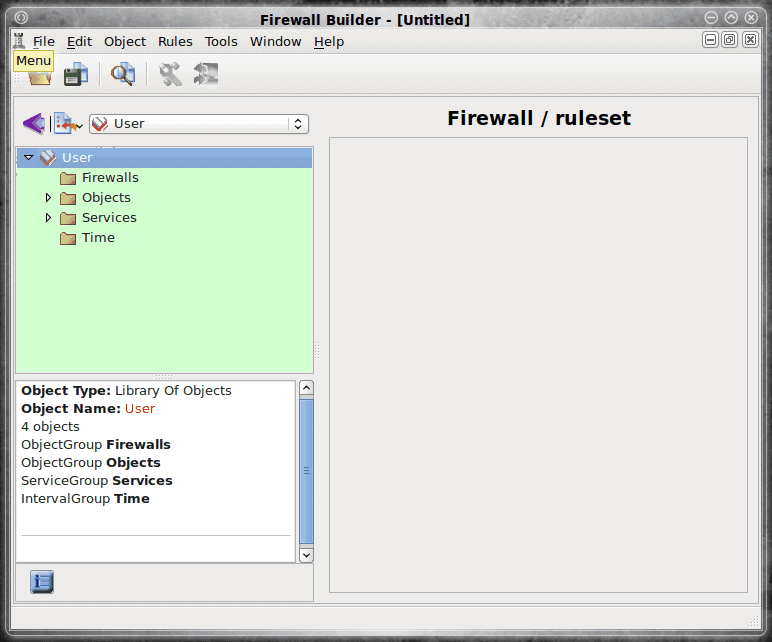
When you start up fwbuilder the main window (see Figure 1) will not seem very intuitive. The first thing you need to do is create a new firewall. To create a new firewall click the Object drop-down which is the icon to the immediate left of the User drop-down. Or you click the Object menu and select New Object (which will open the Object drop-down menu). From this drop-down select New Firewall.
When you add a new firewall object a wizard will appear. Before you can move beyond the first screen you have to do the following:
- Name your firewall.
- Select the firewall software the machine is running.
- Select the OS the firewall is running on.
In the first screen of this wizard is a very important option (if you want to make life easy for yourself). You can base your firewall on pre-configured templates. For new users this is always a good place to start. And even though you choose a pre-configured template, you can still customize this firewall.
But we're building a customized firewall, so no templates here.

The next screen asks you how you want to define your interfaces. There are two methods: Manually and using SNMP to automatically discover the interfaces. Manually is the most reliable method of course so select that option and click Next.
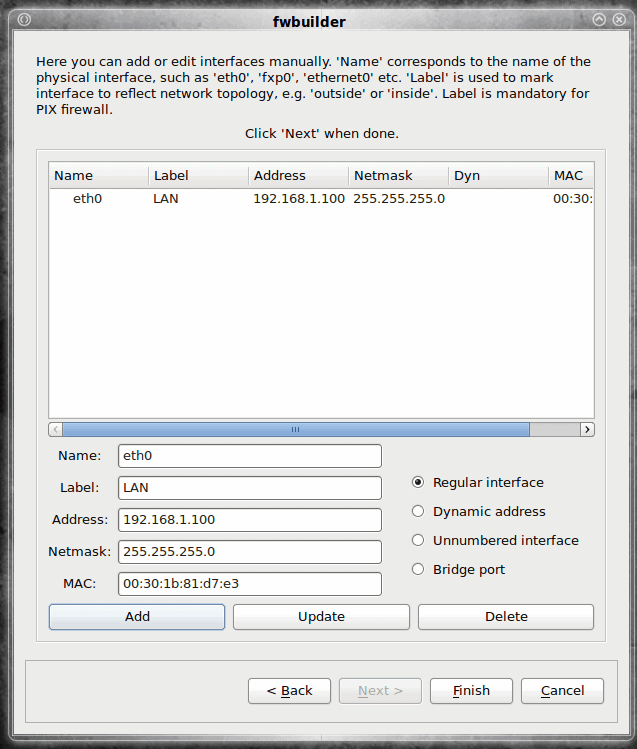
In the device setup window (see Figure 2) you will enter the information for your networking device. Once you have entered this click Add. If you can't figure out the MAC address you can always use the Networking Tool application under the Administration sub-menu of the System menu.
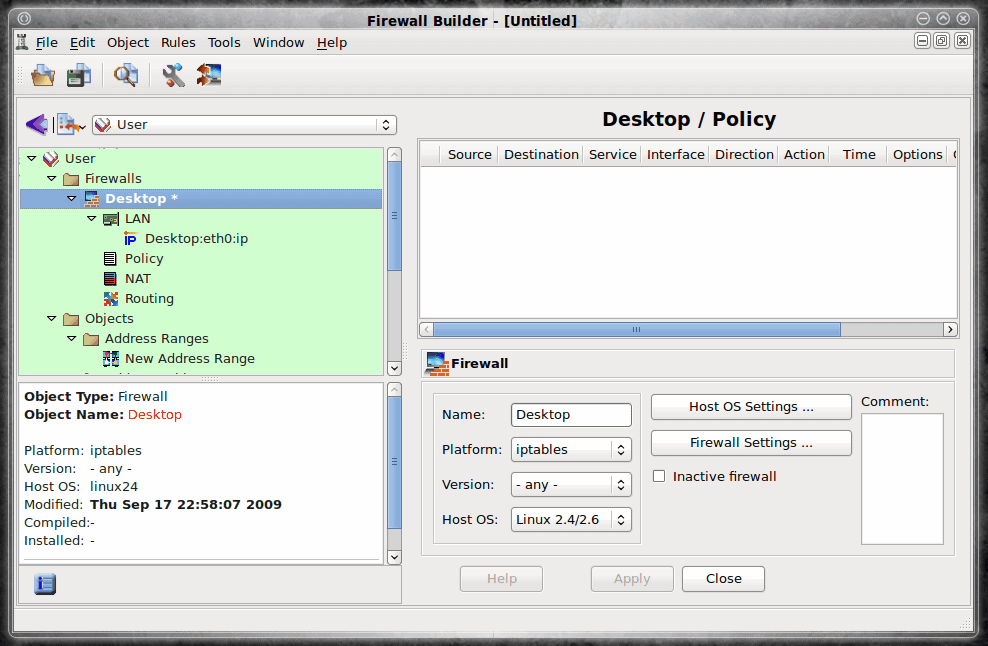
Once you have added the device click the Finish button. If you have a machine with two networking devices add your second device and then click Finish. You will now be in the window where you will add rules to your firewall. In the upper left pane click on the name of the firewall to open up the Desktop/Policy window (see Figure 3).

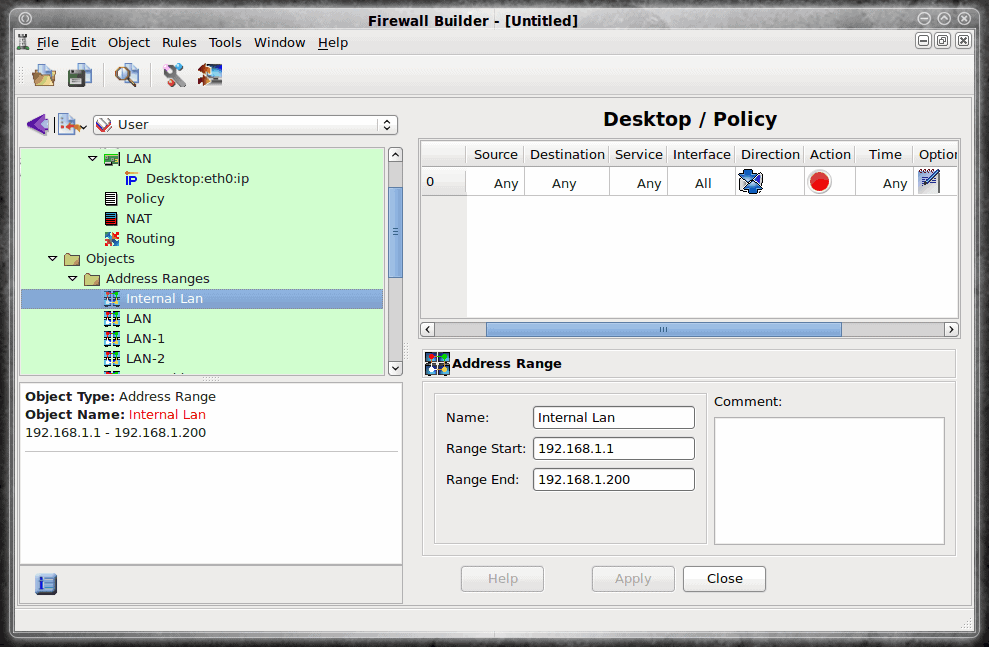
What you want to do is right click within the upper right pane and select "Insert Rule". When the rule is inserted it will be fairly worthless. You will notice much of the policies are listed as "Any" or "All". In order to change this you have to add new objects. Let's say, for example, we want to create an address range that will cover our entire LAN to be used as a destination. To do this click on the Object drop-down and select New Address Range. The lower right pane will change where you can enter the values for your range. I will enter the following:
- Name: Internal LAN
- Range Start: 192.168.1.1
- Range End: 192.168.1.200
You can add a comment if you like.

Now click Apply and that object has been created. This is where the fun begins. As you can see (in Figure 4) my new object is listed in the lower left pane. What I do is click and drag that object into the section of the new rule I want to apply that object to. So I want the Internal Lan object to apply to the Destination section of the rule so I will drag it to that section to apply it.
Now create as many objects as you need for your firewall and click and drag them to apply them. But don't think you have to limit yourself to one rule. You can add as many rules to this firewall as you need.
Once you have completed building your firewall right click the firewall name (in my example it would be Desktop from the upper left pane) and click "Compile". This will open up a compilation wizard that is simple to walk through. The compilation will create a file with the same name as the firewall and an extension of .fw. After the compilation is complete right click the firewall name and select Install. The installation wizard is also a simple walkthrough of steps. You will have to give a user for the firewall to run under as well as the password for that user. Also you will have to select if you are going to run in test mode or not. If you are install the firewall in test mode it will not be permanent. If you install in regular mode fwbuilder will ask you how soon you want to reboot your machine (so the firewall can take effect.) I suggest running in test most first. If this works then go back through the Install process and allow for full installation (including reboot).
Final thoughts
Fwbuilder is a powerful tool that allows you to create very customized firewalls. I highly recommend this tool for anyone serious about Linux security.


