Take screenshots with Shutter in Linux

Previously I wrote about taking screenshots in Linux with various applications (see "Taking screenshots in Linux"). In that article I left out one of the most powerful tools for taking screenshots - Shutter. Shutter is the new name for the project that was once called GScrot. GScrot is the GUI version of the handy Scrot command line screenshot tool.
- Shutter's feature list includes:
- Fullscreen, window, area screenshots
- Website screenshots
- GNOME integration with tray icon
- Session collection (each screenshot will be opened in a different tab in the Shutter window)
- Embedded drawing tool
- Upload/Export tool
I have used many tools for screenshots before. Shutter, however, blows them all away. No it is not as simple as hitting the PrntScr button, but it is far more flexible and powerful than anything like it. With that said, let's install this tool and see how it's used.
Getting and installing
I will be installing this in Ubuntu 9.04, so this tutorial will reflect that choice. You won't find Shutter in your standard repository. You have to add the Ubuntu PPA repository. To do this you need to open up a terminal window and issue the command:
sudo nano /etc/apt/sources.list
You want to add the following to the bottom of that file:
deb http://ppa.launchpad.net/shutter/ppa/ubuntu jaunty main

deb-src http://ppa.launchpad.net/shutter/ppa/ubuntu jaunty main
Once you've added the repository you will need to then add the PPA gpg key with the following command:
wget -q http://shutter-project.org/shutter-ppa.key -O- | sudo apt-key add -
With the key added you can now update your sources with the command:
sudo apt-get update
and then install Shutter with the command:
sudo apt-get install shutter
Accept the dependencies and let apt-get do its thing. Shutter will be installed and you are ready to go.
Using Shutter

Basic usage of Shutter is simple:
- Open up the tool from the Accessories sub-menu of the Accessories menu.
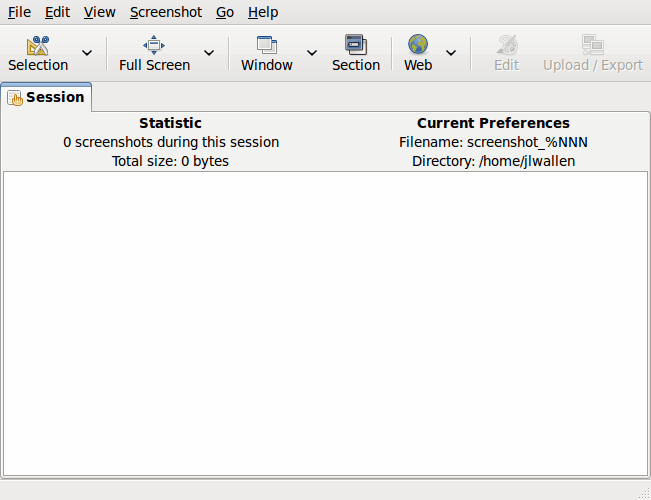
- From the main window (see Figure 1) click the button that corresponds with the type of screenshot you want to take.
- Save the screenshot in the filetype you desire
Here are some notes specific to each type of screenshot you will take:
Selection: When you opt to take a screenshot of only a section of your screen the screen will dim and an instructional window will appear telling you exactly what to do. You can scroll in to enlarge a section but this does not appear in your screenshot.
Full Screen: The full screen screenshot will not include Shutter in the picture.
Window:Â A hand cursor will appear for you to click on the window you want to take the screenshot of.

For the most part Shutter works exactly as you would expect. There are some nifty features that you might not be aware of. For example, Shutter has an outstanding set of plugins to take advantage of. To use the plugins click on the Screenshot menu and select the Execute a Plugin entry. This will open up a new window (see Figure 2) where you can select a plugin to use. Say, for example, you wanted to add a watermark to your screenshot. You can do this by first taking the screenshot, and then opening up the Plugins window and selecting the Watermark plugin. You can then be specific about what you want your watermark to say, where you want it, and what font size you want.
There are a number of other cool plugins to use. Scroll through the list and play around to see which ones you like.
Website screenshots
Taking a screenshot of a website is simple. Click on the Web button and then enter the URL you want to snag. There is one thing you should know about taking a screenshot of a web site: Depending upon how long the page is, the screenshots can get rather tall. Taking a screenshot of the Ghacks page renders an image that is 1025x3459 pixels in size. Fairly large for a screenshot. Of course you can crop that image to use only what you need.
Final thoughts
Shutter is one of the finest screenshot tools available to Linux. If you haven't used it you should immediately install it and use it. Be warned, you will wind up spending a lot time playing around with Shutter. It's handy and it's fun.


Hi, any ideas of how to make plugins start automatically? I want every single shot with watermark, can I do that?