Simple GNOME Note Taking with Tomboy

Tomboy is one of those applications that, once you start using, will quickly become one of the tools you are dependent upon. It allows you to keep your notes both organized and quickly accessible. But don't think Tomboy is just a place where you jot down quick reminders. Although it does make for simple jotting, Tomboy has a number of other features that take it well beyond a sticky note.
The Tomboy feature set includes:
- Notebook Creation: Keep notes organized in notebooks.
- Quick Access: Open Tomboy quickly from the panel icon.
- Table of Contents: All notes are arranged in order of creation.
- Search: Search all of your notes.
- Formatting: Format text, even add bullets and indenting.
- Synchronize your notes: Either with a local file, ssh, or on a WebDAV-enabled server.
- Plugins: Add plugins to Tomboy to extend its functionality.
Getting and Installing
The quickest way to install Tomboy is to open up the Add/Remove Software utility, do a search for Tomboy, select the results, and click Apply. Once Tomboy is installed there is one other piece of software you will need to install, and that is mono-addins. If you do not install this final app Tomboy will install but will not run.

Once you have Tomboy installed log out and log back in and you will see the applet living in the GNOME Panel (in the Notification Area as shown in the image to the left.) The applet is the yellow "note" with the pencil. If you left click on that you will see a small menu appear with three option entries at the top and, below the separator, a list of the newest notes.

If you know you are going to be a power-user you might want to first create a few notebooks in order to keep the mass of notes you will generate organized.
To create a new notebook just click on the Notebooks submenu and select New Notebook. Once you have a notebook created you can go to the Notebooks menu and click the Create Note entry for whichever notebook you want to create a note for.
Synchronize Your Notes
This is my favorite feature of Tomboy. I tend to use ssh to handle the sync details. In order to sync with ssh you have to install sshfs on your system. To do this open up the Add/Remove Software utility, do a search for sshfs, select Fuze-Filesystem, and apply the changes.
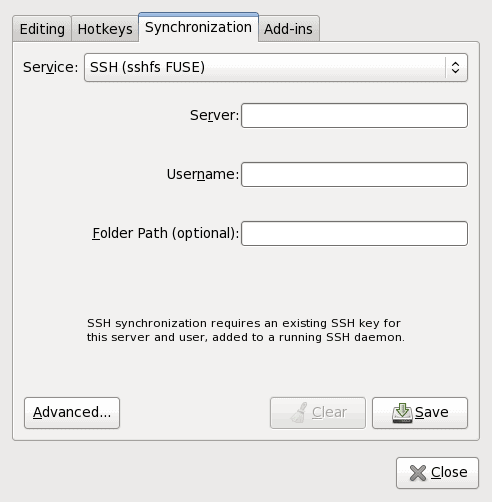
Once you have installed that you might want to either kill tomboy or log out and log in. If you do not do this Tomboy will not be able to find sshfs. Once you are ready right click the Tomboy applet, select Preferences, go to the Synchronization tab, select SSH from the dropdown, and fill out the necessary information.
One of the nicest aspects of Tomboy is the ability to sync your notes from one machine to another. You can set up synchronization from the Preferences window (accessed from the right click on the Tomboy applet.)
Once you hit Save you will be asked for the remote user password.
In the Folder Path, if both local and remote machines have Tomboy installed, you might select ~/.tomboy if you want to use the same directory on each machine. You will also have to set up both machines for ssh syncing (if you plan on using ssh).
Using WebDAV is the easiest, but it will require a WebDAV server setup.
Final Thoughts
I try very hard to keep myself organized. Tomboy is one of the many tools I use to accomplish a semblance of organization. I am fairly confident once you try Tomboy you will find it one of those tools you can't go without.
Advertisement


