Gather Wireless Information with Wavemon

If you're like me you like to have as much information as you can about whatever it is you are doing. Wireless access is no exception. When using wireless so many things can go wrong. You can have a weak signal, too much noise, strange frequency variations, and many other issues. Without the tools to find these issues you may never know what is keeping you from getting the speeds you should be getting.
The wavemon tool is a very handy tool to have in your arsenal that will help you gather information you might not otherwise have. With wavemon you can see Signal levels, Noise levels, Signal to noise ratios, frequencies, TX power, sensitivity (if available), bitrate, and so much more.
One of the only issues that might turn you off of wavemon is that it is an NCurses tool. This means the tool is run in a terminal window (I have found it runs best under Eterm) and uses ASCII to create the information it offers. Don't let this cause you not to want to use wavemon because it is a very useful tool.
Getting and Installing
Wavemon is downloaded and installed from source. Download the tarball from the Wavemon site and save it to your hard drive. The installation steps are simple:
- decompress wavemon with the command bunzip2 xvzf wavemon-current.tar.bz2
- untar the archive with the command tar xvf wavemon-current.tar
- cd into the newly created directory with cd wavemon-current
- generate the make file will ./configure
- install wavemon with make ; make install
- start wavemon with the command wavemon
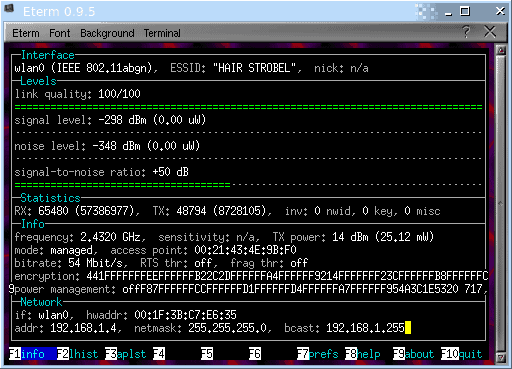
As you can see, in the image on the left, the Wavemon info window offers a lot of information.
At the bottom of the screen you will notice there are 10 possible options (of which some have no entries). Each of these options are different screens you can view.
The list of windows is:
- F1: Info. This is the main window that opens upon start up. This is where you get most of the information from wavemon.
- F2: Level Histogram. This displays a real-time bar-graph of Signal level, Noise level, and Signal-to-Noise Ratio.
- F3: Access point list. This feature has not been implemented yet.
- F7: Preferences. Configure Wavemon.
- F8: Help. Like a lot of Linux applications, wavemon shows the developer has a sense of humor. When you hit F8 for help it displays the message "don't panic". That's it. There is more help by reading the man page (issue the command man wavemon).
- F9: About. Get all the information you need about the current wavemon release.
- F10: Quit.
You can also start wavemon with a few handy options. Those options are:
- -i This will override auto detection and use a specified network interface.
- -l Use linear level scales instead of logarithmic scales.
- -r Generate random levels for testing.
Final thoughts
If you need more information than your standard networking tools offer, and do not want to dump any extra cash into a third party offering, wavemon is just the tool for those looking to know everything there is to know about their networks. It's easy to use, offers a ton of information, is open source, and has a tiny foot print.


my dyslexia strikes again. maybe i shouldn’t be typing without my glasses on. ARGH! it’s been one of those days.
btw – i had to re-upload the image because the first image wasn’t displaying correctly.
Thanks Roman and MarTin! ;-)
is that part of April’s fools joke Jack? ;) look at your comment.
Jack, mistake in the tags: liux instead of linux.
thanks Roman, fixed.
Dante: Don’t think I’ve ever seen a signle-to-noise ratio (or some of the other information you get from wavemon) listing on a mouse hover in Windows.
Can’t resist :) Much like that guy that keeps posting – “Linux already has this”.
Windows has this already. Just hover your mouse over the network connection icon on your lower right :p