How To Create Multiple USB Stick Partitions
USB Sticks cannot contain multiple partitions by default on Windows. The main difference lies in the terms fixed and removable disks. Fixed discs can have multiple partitions while removable disks cannot by default.
Usually, external hard drives are fixed disks while other USB storage media is removable instead.
It is however possible to create multiple partitions on an USB stick by modifying and installing a new driver which disguises the USB stick as a USB hard drive. It is highly recommended to backup all data on the USB stick before continuing so that you can restore it should things go wrong.
Users who want to create multiple partitions need a file called Hitachi Microdrive which contains the new driver that we are going to modify first and install afterwards.
Unpack the package to a new directory on the hard drive. The first step is to find out the exact name of the USB device that you want to create multiple partitions on.
The information can be found in the Windows Registry. Pressing [Windows R], typing [regedit] and hitting [Enter] will load the Registry editor.
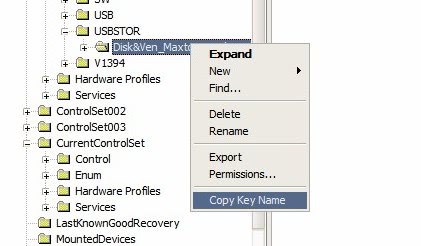
The information are located in subkeys of the Registry key HKEY_LOCAL_MACHINE\SYSTEM\ControlSet001\Enum\USBSTOR. The name of the USB device can be found by clicking on the [+] sign in front of the key. All USB devices should be listed there. The name of the USB device can be copied by left-clicking the subkey, right-clicking afterwards and selecting Copy Key Name from the context menu.
The key needs to be modified because it contains the full path. The best way to do that is to paste the contents into a text editor and remove all chars before Disk&Ven.
Now that this is done we need to copy the part that is left to the Windows Clipboard again by selecting the text and pressing CTRL-C.
The driver information need to be edited in the next step before the new drivers for the USB stick are installed. Load the file cfadisk.inf in an text editor and locate the [cfadisk_device] section.
Replace the chars IDE\DiskIBM-DSCM-11000__________________________SC2IC801 in the first line with the name of the USB device that you are going to use. Remove every other line in the category so that only the line with our modified USB stick name is shown in there.
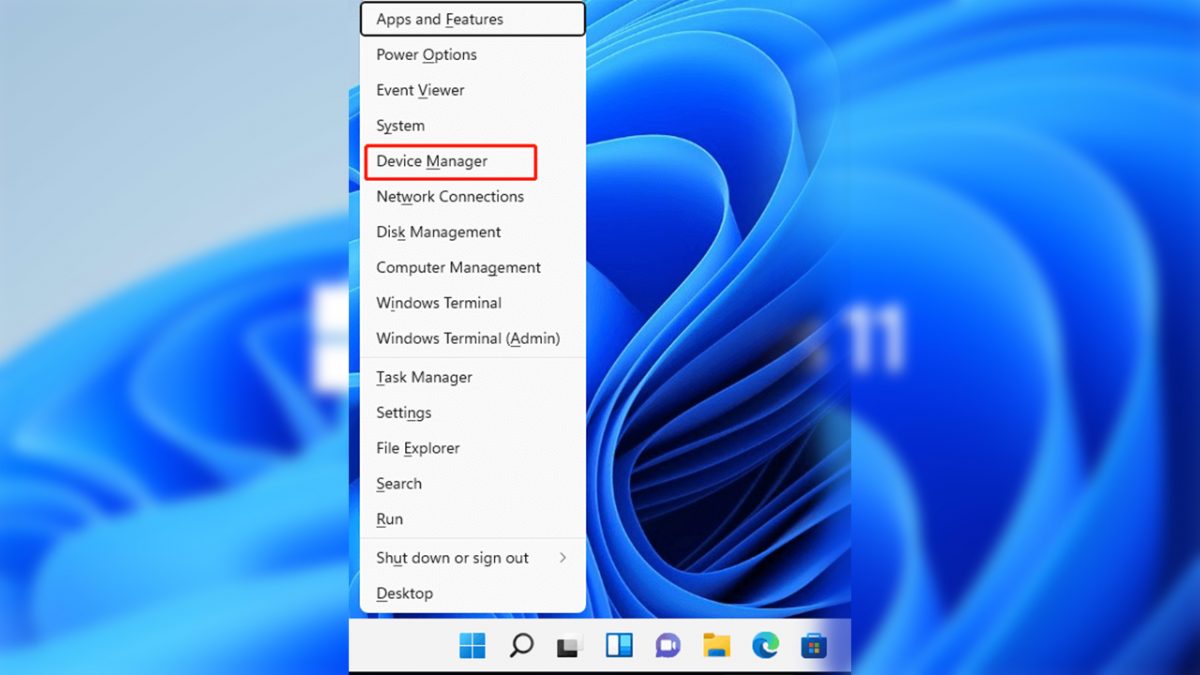
The driver is now prepared and can be installed for the USB stick. Open the Windows Control Panel, the System category and there the Hardware tab. A click on Device Manager will load the Windows Device Manager which lists the computer hardware. The USB stick should be located in the Disk Drives category. Right-click the USB stick and select Update Driver from the context menu.
The Hardware Update wizard should pop up. Select the option Install from a list or specific location in the window and click next.
Check the Don't search. I will choose the driver to install option in the next window and click next again.
A click on Have Disk in the next window will open a file browser. Locate and pick the file cfadisk.inf that has been modified previously. Clicking on OK will check the driver and show a warning message that the driver is not digitally signed. Press next on that screen.
Ignore the warning message and continue by clicking Yes. Windows should now start the installation of the driver for the USB stick and display a message that it finished the installation.
Windows is now requesting a reboot of the system to load the updated drivers properly. The USB stick should now be recognized as a hard drive. This makes it possible to create multiple partitions on the USB stick with a software partition program.
Please note that only systems with the updated drivers will recognize the additional partitions. Connected the USB stick to a computer without the modified drivers will only show the first partition of the USB stick.




Detailed guide how to do it you can find here:
http://agnipulse.com/2011/11/partition-usb-flash-drive/
I must correct myself ;-) It is possible to mount second
partition with Bootice, but only one partition is accessible
at a time. So one must switch between partiotion, but it is
better than nothing.
can we use usb pendrive as local disk and
and then can we make usb as HDD to window xp installation so that i can install window on usb pendrive
plz help me bro..my notebook hdd goes dies………
But with Bootice it is not possible to “mount” such (second) partition
in Windows file system! It is common known problem with USB sticks :-(
There is an easier way to partition USB Flash Drives using Bootice.
There is no need to install any filter driver.
http://agnipulse.com/2011/11/partition-usb-flash-drive/
Thanks, it worked for me.
it does not work for 64 bit os. have you have any idea.
worked! great, love it!: ) thank you
yeahh i know but the problem is that the site doesnt let me…
here email is
thekddude [at] gmail.com
:-) Keshav, dude, your email is not visible to anyone, unless you put it in the text of the comment…
ummm the hitachi microdrive was availble for download on xpefiles…. but the site cloased down i tried to find other sites for the microdrive but I failed…. so does anyone know where i can download the hitachi mircodrive on a working site????
thx
xpefiles.com is up for me
If you left your address, I would send the files to you directly, but ummmm sorry.
jan
my emails
u are great thank u
Nice post, thanks. Unfortunately, in Windows 7 I can not correctly remove the media after this change. How do I revert the setting, if necessary?
jan
This is awesome! Worked just you illustratively instructed.
Why this is not a standard feature in Windows-based drivers is annoying beyond belief. Multi-partition HDDs and UFDs are becoming commonplace as they become more desirable. The detection and mounting of partitions and their filesystems on ATA/ATAPI/SCSI/SATA devices of all kinds has been a feature of Unix/Linux systems since their infancy. Does Microsoft thinks it is in its interest to keep their users ignorant?
Worked for me, but i ended blowing it up the first time
Rob, when you say it “worked for me”, what do you mean?
Windows 7 64bit OS?
Mine works fine in a 32 bit OS, but does not work in the 64 bit.
The only way to make the hack work in 64-bit OS would be to recompile the cfadisk.c file in 64-bit compiler. I guess there are changes to be made, to the addressing used, in the driver code. Until somebody does this, we are stuck…
I’am using a Windows xp OS and i can’t find the file cfadisk.inf can somebody help me please
Is there a way to make this work on a Windows 7 64bit version.
I have a laptop that has Windows 7 32 bit and this works great.
sir i want to be partitioned my USB Drive in to 2 parts ,
so i cant do this ,
if any possibility then please inform me.
thanks….
you dont need to be partitioned. your partition is just a little below, but you can reach it with your hands i think.
Be aware, although this does work, it is only recognised by the target machine as a hard drive, any other machine will only see the first partition
Im sorry dear mister Teddy Bear (who ‘commented’ above) that I decided to be a tool many moons ago when i first started visiting ghacks. Though to be honest I can really see why I posted that comment, but now I cant take it back so why dont you stop being a Tools Tool!
Oh by the way, im no longer a windows fanboy. :)
Hope you bothered to get updates so you can have a read of this.
Joshua Brighton (who commented above) is a tool…
Agreed.
Is there a 64bit version of the Hitachi driver ? If not, it will not work on Vista x64 … :-(
When taking screenshots I would advise the use of the built-in feature of only print screening the current window.
This can be achieved by pressing Alt+Print Screen. The use of this feature will make your website seem that much more reputable