Disable the Windows Guest account correctly

The Windows XP guest account is not only used to allow guests to login to Windows XP but also to authenticate the computer in peer to peer networks. Disabling the XP guest account is therefore only advised if you do not use file sharing, printer sharing or Internet connection sharing.
Please note that file sharing refers to the build in Windows XP functionality and not applications like Bittorrent or Emule.
Disabling the account in the User Accounts menu of the Control Panel does not disable it, but simply removes the icon from the login screen. Users who connect to the computer in Peer to Peer networks still authenticate as guests.
To fully disable the Windows XP guest account you need to use the following command on the command line.
- Open the command line with the shortcut Windows-R, enter cmd and hit return afterwards.
- Use the command net user guest /active:no to disable the guest account
When you do, the consequences listed above take effect. Windows XP Pro users can alternatively disable the guest account in Computer Management. Navigate to Local users and groups in Computer Management and click on the Users menu.
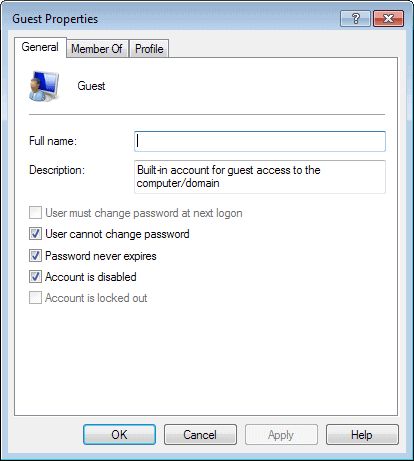
The right pane displays all current user accounts. Right-click the guest account and select Properties from the menu. Check Account is disabled to fully disable the account.
Please note that this works under newer versions of Windows as well.
If you are running Windows 7 or Windows 8, do the following to load the computer management tool:
- Tap on the Windows-key, type computer management, and click on the result that is displayed to you.
- When the Computer Management window opens, navigate to Computer Management (Local) > Local Users and Groups > Users.
- Here you find listed all local user accounts of the system.
- Locate the Guest account and double-click on it.
- Check the "account is disabled" box to disable the guest account on your system.
If you prefer to use the command line, remember that you need to run it with elevated privileges by right-clicking on it and selecting to run as administrator.


