Change all Drive Letters in Windows

Don't you think it is annoying that Windows assigns drive letters automatically to certain drives such as the floppy disk drives A: and B:?
The A: drive letter is assigned even if no floppy disk drive is installed on the system. There is a way to reassign all drive keys in Windows by manipulating the Windows Registry which helps you get rid of the issue.
A word of advise before I'm going to explain how this is done. Do not try to change the assignment of the drive letter C: which has to stay the way it is. If you change it Windows will not boot anymore if it boots from that drive and you don't adjust the boot loader as well.
So, what you need to do is to open the Windows Registry by hitting Windows + R, typing regedit and pressing the enter-key afterwards. You may get an UAC prompt at this time which you need to accept.
Navigate to the following key: "Hkey_Local_Machine\System\MountedDevices". If you do not find any entries in the right window after clicking on MountedDevices you need to right-click the entry and select Permissions from the menu. The adminstrator needs full right to access the key, you can assign the rights temporarily as you may reset them afterwards to their initial values.
You do see a lot of DosDevices entries in that pane when you scroll down. Now, what you need to to is change the letters. Please note that I did not try to remove the entry for drive A: completely and cannot therefore tell you what is going to happen on your system if you try to do so.
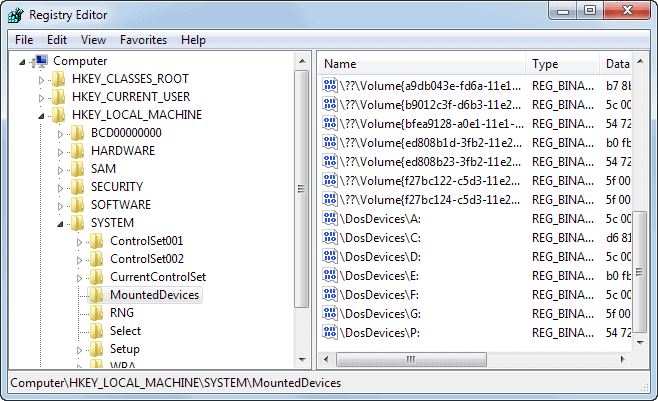
You do change drive letters the following way:
- Select the drive that you want to change
- Hit F2
- Change the letter after \ to another one that is currently not assigned
- Changing the floppy disk drive from A: to Z: would mean to change the entry \DosDevices\A: to \DosDevices\Z:
This is a pretty good way to assign a different drive to A: which can be useful if you have an old program that only writes data to drive A: for instance. This is useful as well if you want to order your drives in a different order, which can be helpful if you have a lot of partitions on your system.


This does nothing.
I used to have an external drive under Z, and I no longer have the drive. But every time I try to install software, it often fails because it can’t find volume Z. If I delete \DosDevices\Z: will it hurt anything?
Martin – I don’t think so…
I don’t have a floppy drive installed so I can’t test. My CDR and DVDR drives both show up under Disk Management and I can change drive letters for them.
But the letters A and B are not available to select for any drive, so your method would be the go there.
I like to assign letters to my logical drives based on their content, so D is for [My} Documents; M is for Music; X is for… well – you can guess ;) and so on.
Never had a need for A or B, but if I do, now I know what to do – thanks! :)
fastdump is it possible to change the drive letter A: this way ?
In Windows XP you can go to Control Panel > Administrative Tools > Computer Management… select Storage > Disk Management… then right-click on the volume that you want and select ‘Change Drive Letter and Paths’ to change the assigned drive letter.
Also, if you choose to remove the drive letter altogether, you can then go back and assign/mount a logical drive to a specific NTFS-formatted empty folder (kinda like reassining the default folder for ‘My Documents’, but google this technique for more info and caveats before attempting!!!)…
Not sure if ‘Administrative Tools’ are only available in XP Professional but not XP Home.
thanks netking :D
p.s. i had an instance where what was meant to be C:\ assigned itself G:\ during the install of XP. When i got into windows, i was able to revert to C:\ using the method you describe Martin.
For registry edition, I recommend Reghance, which is much more cool than the Windows Regedit.
You can get it here :
http://www.majorgeeks.com/RegHance_d468.html