Disable automatic reboot after Windows Updates in Windows 10
One of the most frustrating experiences on Windows is the operating system's default updating behavior.
Windows is configured to download and install patches automatically when they become available. Many require a restart before they are fully installed on the system, and Windows will restart the system automatically if that is the case.
While you can delay the inevitable restart if you are in front of the PC at that time, there is little that you can do about it if you are not.
Previous versions of Windows allowed you to block Windows Update restarts using the Group Policy or Registry, but it appears that these options don't work currently on Windows 10.
Disable automatic reboot after Windows Updates in Windows 10
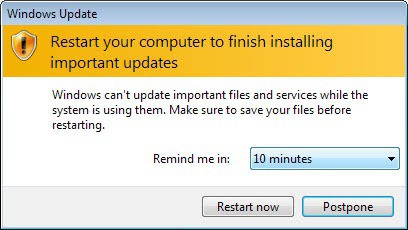
At least some users reported that they cannot block Windows 10 from restarting the PC after updates are installed. They changed the Group Policy entry that let them do so on previous versions of Windows, but it does not do a thing on Windows 10 on their PCs.
There is another solution as Reddit user Scurro points out on the site. It is a bit technical in nature, as it requires the disabling of a scheduled task, and taking ownership of the file associated with that task.
The process itself is straightforward however, here it goes:
Step 1: Task Scheduler

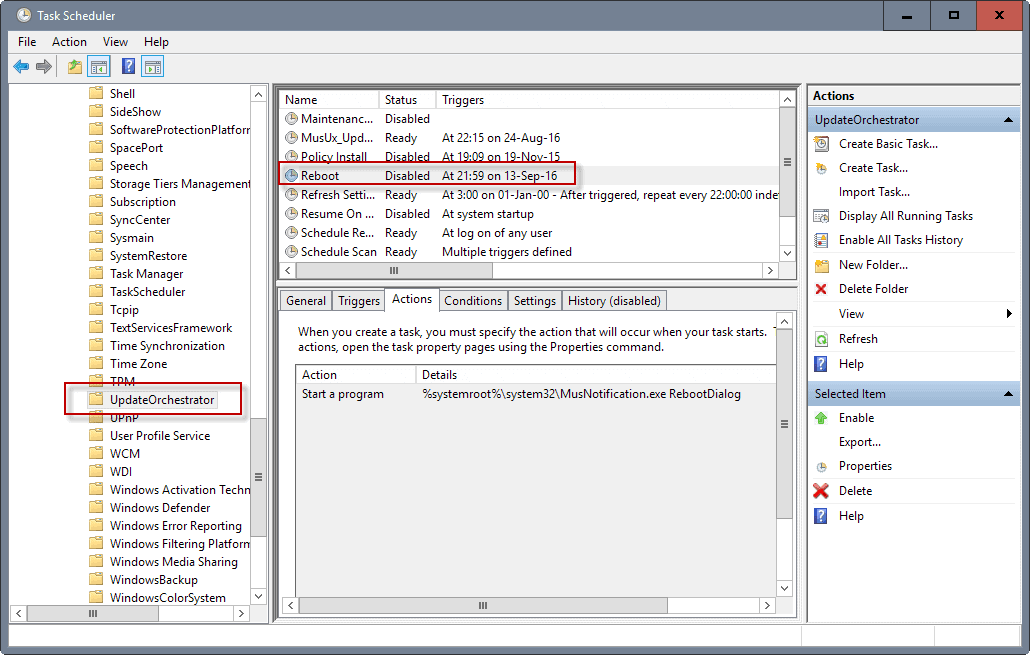
First thing you do is open the Windows Task Scheduler and disable the reboot task. Here is how that is done:
- Tap on the Windows-key on your keyboard, type Task Scheduler, and hit enter.
- Use the left pane to navigate to the following task: Task Scheduler > Task Scheduler Library > Microsoft > Windows > UpdateOrchestrator
- Locate the task with the name Reboot, right-click on it, and select Disable from the context menu.
This completes the first step in the process.
Step 2: Download and run Take Ownership
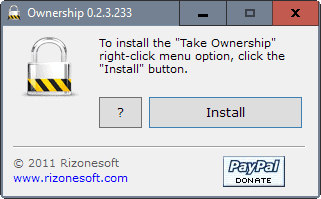
While you can take ownership manually, I suggest you use a program for that instead as it makes things a lot simpler.
- Download Take Ownership from this Ghacks article (we host the program on our own server).
- Extract the archive on your system, and run the executable file afterwards.
- Click on the install button to add a "Take Ownership" option to the right-click menu of File Explorer.
- Verify that the option is available by right-clicking on any file in File Explorer or on the desktop.
Step 3: Take Ownership of the reboot task file
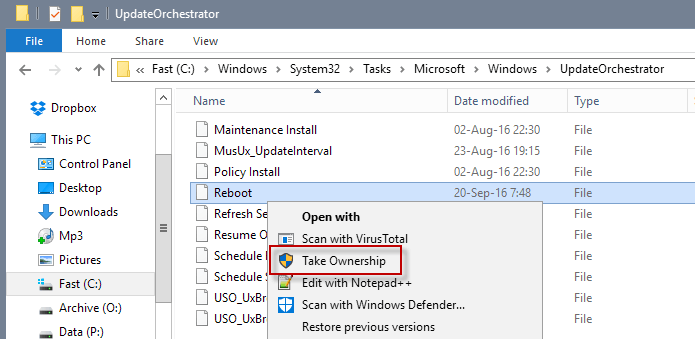
Now that all preparations are done, it is time to take ownership of the reboot file. We need ownership later on as we will remove access to reboot for all other users and groups.
- Open a File Explorer window.
- Navigate to the location: C:\Windows\System32\Tasks\Microsoft\Windows\UpdateOrchestrator
- Please note that you can copy and paste it, as it is easier than navigating to the location manually.
- Right-click on the file called Reboot, and select the "Take Ownership" option from the context menu.
Step 4: Disable access to reboot for all other users and groups
- Right-click on Reboot and select properties.
- Switch to Security, and click on the Advanced button.
- Select the "change permissions" button to edit permissions for the file.
- Select "disable inheritance" next, and on the prompt that opens "remove all inherited permissions from this object".
- This should remove the majority of users and groups.
- Remove any other user or group still listed there.
- Click on the "add" button afterwards.
- Click on "select principal".
- Add your username under "enter the object name to select", and click "check names" afterwards.
- Click ok.
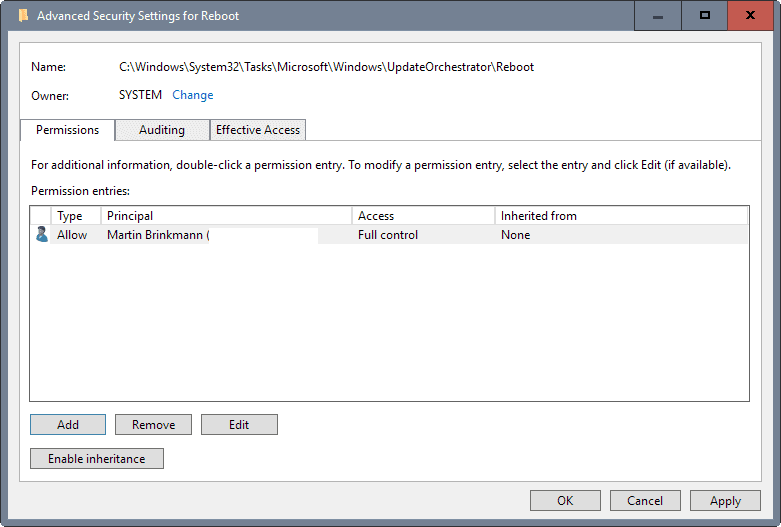
- Select Full Control on the next page and click on ok.
- You should see one permission now on the "Advanced Security Settings for Reboot" page, and that one permission should be full control for your user account.
- Click ok to complete the process.
The result of this lengthy process is that updates get installed automatically, but restarts are not scheduled anymore.
Now You: How do you handle Windows Updates?





Disable Reboot* tasks in \Microsoft\Windows\UpdateOrchestrator isn’t sufficient as they are reactivated by windows.
The best solution I found is to create a task as the System user which disable these tasks every hour using the following commands :
C:\Windows\system32\cmd.exe /c “schtasks.exe /change /TN \Microsoft\Windows\UpdateOrchestrator\Reboot_AC /disable”
C:\Windows\system32\cmd.exe /c “schtasks.exe /change /TN \Microsoft\Windows\UpdateOrchestrator\Reboot_Battery /disable”
great work, thanks
Thanks for this, after so many times leaving my home automation system in havoc in the middle of the night,
I am hoping this will bring me back to control MY system, and not some “high level thinkers” without knowledge or fantasy how a system might be “used” and who think a PC is only used for 8 hours max in a family house?
I’ll be experimenting with the solutions posed here for my Win10AU home PC. I’m also looking at the last solution posed at
http://tunecomp.net/disable-automatic-reboot-after-updates-installation-in-windows-10/
I want to have confidence the way I choose to “fix” this design flaw stays fixed until I choose to “unfix” it. :-)
@Chris: I’ve tested it and think white space should be fine. To see your actual user name, hit windows-key+r and run this command: “cmd /K whoami” (not the quotes, of course). You’ll see something like “domain\john”, here “john” would be the user name.
I’m getting a message saying my name is invalid for the add principal. Is it because it has a space it?
Your username might not be what you think it is inside the system, especially if you’re logging in with a Microsoft account. Open the Add Principal dialog and then click Advanced->Find Now. Scroll down the list until you find your username/email, select it, press Ok, press Ok.
You can take ownership without using a third party tool (at least in professional): open the file’s properties and go to the security tab. Click on ‘Advanced’ and you should see the current owner in the upper part of the window. Click on ‘Change’, enter your user name and click ‘Check Names’. Unless you got an error message, you can now ‘OK’ your way out of the window cascade. Done.
That works in the standard edition, too. And if you get an error after “Check Names”, just click on “Advanced”, then “Find Now” and you get a list.
I have not seen any mention on this site of the Windows 10 problem of random restarting – and I don’t mean after an update download.
Why people still think of such a complicated ways??? Just disable the update service and enable it once a week or month to update and then disable it again. You can even create shortcuts with the command if you are that lazy…
Because I want my computer to be updated, just not rebooted while I’m in the middle of something.
Manually turning the service off and on is annoying and it’d be another thing I’d have to remember to do. The method described above however allows Windows to download and install the updates, let me know that it’s done so, and I can simply reboot once I’m done whatever I’m doing.
People think of complicated ways because easy ways are blocked by people who think they can dictate how we work and how we should be inconvenienced. Anyway, this is my no means more complicated than moving and renaming a file, which you do all day long.
I find it certainly more complicated (or rather, annoyingly cumbersome) to enable and disable the service every month, let alone every week. Automation rules (or in this case disabling some automation) – set it and forget it. Took me less than 5 minutes to implement this solution. Great idea, Martin!
I just went to do that and there is no longer a ‘disable’ option under Properties. So I found this page.
How about only step 1 + rename Reboot -> Reboot.bak ?
It would probably get re-added at one point then.
Well.. Not yet… Done this about 2 weeks ago..
I did this just a little while ago after getting fed up waking to find my computer off. This seems like the only way to do it as the GP method doesnt work anymore. Guess I will have to wait and see how well this works.
I haven’t updated to the anniversary edition yet, but I’ve just disabled the windows update service. I had problems at home with it downloading updates and slowing my internet at inopportune times. Also we use it at my church and can’t have it deciding to restart in the middle of a service.
As a computer technician, half my though, my eyes glazed over and I just scrolled put the rest. My company user doesn’t seem to bother me in the first place with forced updates, and since it can start up in 30 seconds in the first place, updates are no problem. Neat solution. Too much trouble. Thanks for the info though.
My problem with automatic updates isn’t the amount of time it takes for the reboot to take place. It’s the fact that Windows doesn’t seem to be able to recognize that there are times when my computer is in the middle of running a really long-lived task which MUST NOT be interrupted for any reason: be it datalogging where even one second of inattention could lead to a completely useless dataset, or compiling a really large piece of software, or synthesizing a comprehensive test suite on a complicated FPGA design. It just isn’t practical for me to stand there watching my computer for the 20 to 30 hours it takes for the task to complete.
In the mean time, with the default behavior of the Anniversary Update, when an update is pushed to my machine, the best case scenario is that I’ll get a notification in the afternoon (given Microsoft’s typical schedule for pushing out updates) of an update that will automatically be installed the next morning at 3:00 AM. If I catch the notification in time, I can schedule the update to manually install at some time within the next 7 days.
At the moment, that setting is grayed out and inaccessible, except for the tiny interval between the time when an update has been downloaded, and 3:00 AM the next morning when the update is installed no matter what. Alternatively, I can set my computer’s “Active Hours” for a time when I know my computer won’t be doing anything important. But there is no setting for “My Computer Will Be Active All Day Every Day For The Next 36 Hours”.
If I miss the notification, or if the notification comes up after I’ve gone home for the day, then the install/reboot will happen at 3:00 AM, no matter what. That’s useless if I already know for a fact that the test I’ve been running since 8:00 this morning will most definitely still be in the thick of it by the time the scheduled moment rolls along.
For me, the problem could be solved if the “Custom Restart Time” option was accessible all the time, instead of only when an update is already pending. When I was just about to start a long-lived task, I could say to myself, “I know that any automatic reboot at any point during the next 36 hours would cause me to irretrievably miss the ongoing logging of important data from my experiment. I’d better tell Windows about it, so it won’t go behind my back and reboot in the middle of the experiment.”
Thank You for your time & effort you put in these articles.
Good info. Microsoft must have Rube Goldberg working for them.