Check if System Restore is enabled on Windows 10

If you have set up Windows 10 on a new machine or upgraded to the new operating system from a previous one, or upgraded to a new version of Windows 10 from an older version, you may be surprised that one of the system's core restoration features, System Restore, may not be running.
System Restore is a handy feature that creates snapshots of certain files and information before critical operations such as updates or software installations takes place.
This enables users of the system to go back to a previous state if things went wrong along the way.
With System Restore disabled on at least some machines, it falls to the user to make sure backups are created regularly so that the system can be restored if the need arises.
Verifying that System Restore is enabled
If you run Windows 10, you should check the System Restore preference to find out whether it is enabled or not.
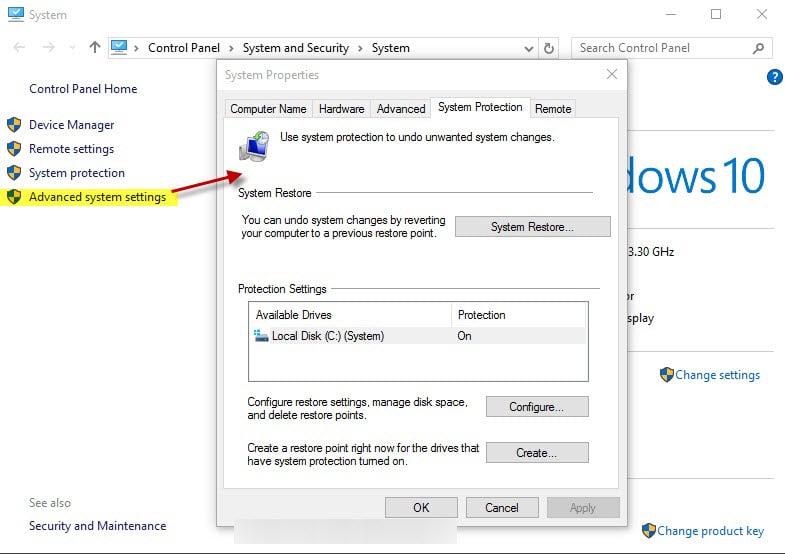
- Use the shortcut Windows-Pause to open the System control panel applet quickly.
- Locate the "advanced system settings" link on the left and click on it.
- Switch to the "system protection" tab on the next screen.
- There you find listed all drives connected to the system and their protection state. A state of "on" means that System Restore is enabled for the drive.
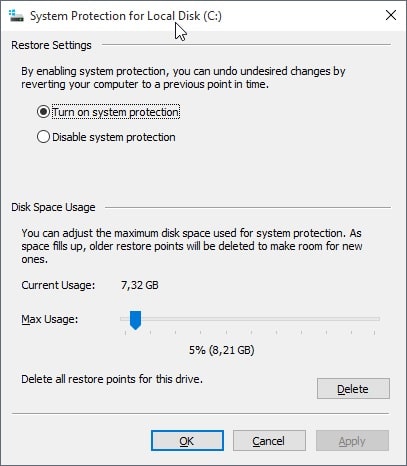
- If that is not the case, select the drive and click on the configure button afterwards.
- Switch to "turn on system protection" and select the maximum storage space that you want system restore to use on the device. A value between 5 to 10 Gigabyte is usually a good option.
- Click apply and then ok to complete the process.
- Repeat the process for other drives if necessary.
The system protection tab provides you with options to create a restore point, and to restore a data point that was created earlier.
This may be handy to know as you may sometimes need to restore points manually.
Creating System Restore points manually

The creation of new System Restore points is relatively simple. Windows 10 creates new System Restore points automatically as well, e.g. when updates get installed, but you may have the need to create them manually as well at times.
- Use Windows-Pause to open the System control panel applet.
- Select Advanced system settings from the menu on the left.
- Switch to the System Protection tab in the new window that opens.
- Select "Create" to create system restore points for all drives that have System Restore turned on.
Closing words
System Restore is not a catch-all solution on the other hand. While it works well usually when it comes to updates or software installations, it may not work at all if other changes are made to the system, for instance by malicious software or data corruption.
System Restore does not replace proper data backup. Check out our free drive backup guide if you need help finding a solution.
Now You: If you run Windows 10, was System Restore enabled or disabled?


System Restore is on after the big Win10 upgrade for me. I don’t know its status before that. 10 gig is reserved by default.
After multiple installs of Win 10 on a variety of devices and HDD sizes I now believe the threshold for System Restore being disabled by default is having an HDD of less than 256 GB in size.
Windows 8.1 on Surface and HP Stream/Mini devices have System Restore disabled by default due to their tiny SSD’s.
I have Windows 7 installed with Windows 10 in a separate partition. Windows 7 is on drive C and Windows 10 on drive F. The System Protection Dialog on both partitions has options for setting up Restore for both Windows 7 and Windows 10. The partitions seem to work independently. Changing the Restore setting in one does NOT change the other. Where should I set up Restore for Windows 10? Should I set it up on drive C with Windows 7? Or by itself on Windows 10? Or does it need to be set up on both? I am having a problem with the restore files being deleted on both partitions.
For Windows 10, on Windows 10 ; For Windows 7, on Windows 7.
Why would they disable this critical feature in the first place? Has somebody poisoned the water around Redmond?
In fact, System Restore is always disabled by default on Windows 10, since the earliest builds. Each update build, it was necessary to re-enable it. Apparently, it is the same after the upgrade.
Hi Martin just use the following script , Give a name like (open_sys_rest.vbs) and save as .vbs after that run it
——– script start ——–
‘Velociraptor
Set oShell = WScript.CreateObject(“WSCript.shell”)
oShell.run “SystemPropertiesProtection”
——– script End ——–
Happened to me also, System Restore was disabled after the upgrade.
Ironically, I actually needed it a bit later. I had Wise 365 which worked perfectly with 7 and 8.1, used it on 10 to get rid of registry keys and perform some tweaks, but it seems it broke Cortana and the new Start menu, because they wouldn’t pop out anymore when asked to.
The best advice, always make sure you go to every Control Panel option, before using 3rd party software.
Glad to know all of this is going on and not going on–the core apps install was great to know as well. It’s this type of Microsoft micromanagement that makes upgrading Windows such a time-consuming process and one that requires constant vigilance and tech reading by users.
Ghacks covers a lot of the “What Microsoft didn’t tell us information,” but there are plenty of other sites offering like information. I am supposing the “typical” consumer who upgraded will never know System Restore isn’t enabled until the one day when it’s really needed.
Okay, System Restore isn’t enabled. As I recall, it’s always been enabled on previous releases. Okay, bloatware comes from computer manufacturers; now users have to deal with all of the programs Microsoft “thinks” they want installed by default. It’s all so silly.