How to replace the laptop hard drive with a faster one

I was in desperate need of a new laptop, one that I could use for work when I was away from home. After reading lots of online reviews, I decided to get a Thinkpad E145.
The laptop was offered in different configurations, and I decided to pick the one that shipped only with FreeDOS installed. It cost me about €320 which I think is cheap for what it has to offer.
Anyway, the reviewers were impressed by the device's battery run time and even its performance, and the only complaint that most had was that the hard drive the device shipped with was slowing the system down considerable.
The 500 GB 5400rpm hard drive the laptop ships with was not going to cut it, and I decided to buy a fast Solid State Drive instead.
My choice was a 120 GB Samsung EVO 840 SSD for about €70. While it offers less space than the internal hard drive the laptop ships with, it eliminates the performance bottleneck.
In addition to that, it is also reducing the noise of the device as Solid State Drives do not emit noise.
I have received the laptop and the Solid State Drive today, and would like to provide you with an easy to follow guide that highlights how I replaced the old hard drive of the laptop with the new one.
Note: This should work on most laptops out there, not only on the E145. It is important that you select a drive that is compatible with the device, and that fits it as well. Usually, all you need to make sure of is that you pick a 2.5" drive also know as laptop hard drives.
Before you do, consult a representative of the manufacturer of the device to find out if doing so voids the warranty.
What you need
- The laptop, my choice the Thinkpad E145.
- The new hard drive, for instance the Samsung EVO 840 120 GB for about $90.
- Proper screwdrivers, for instance this PC Precision Screwdriver set for about $15.
What you do
I suggest you work on a table with proper lighting and space. The screws are tiny and lost easily.
Take the laptop and turn it on its back. You find three main screws on the opposite side of where the battery is inserted.
I have used an No.0 screwdriver to remove the three screws that hold the plate on the back in place. You do not need to apply force for that. Once they don't hold the plate anymore, you can carefully remove it by pulling it from the location of the screws up towards you.
The original hard drive is attached to the laptop with two additional screws. You can use the very same screwdriver to remove them as well.
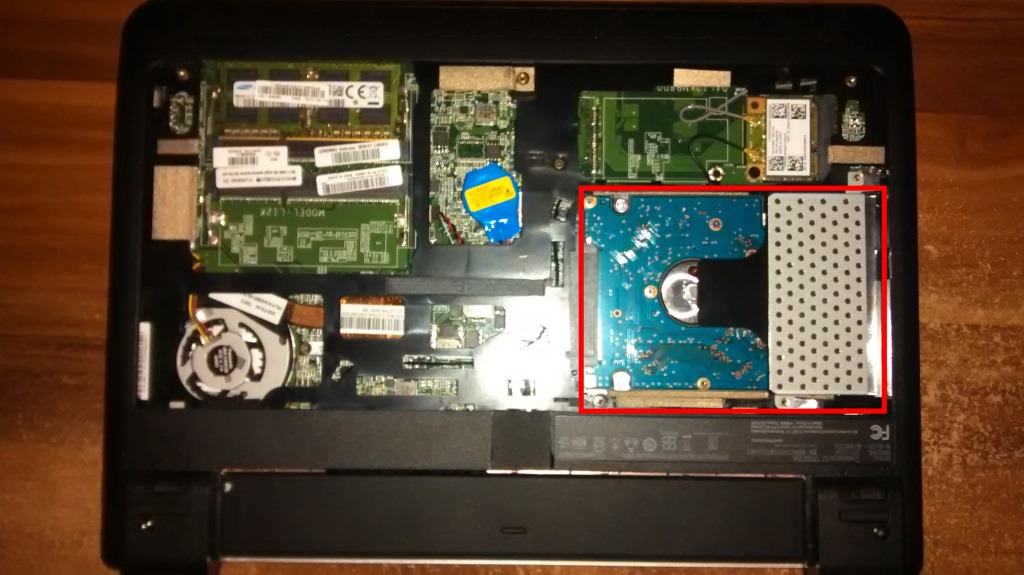
Once done, push the drive carefully to the right site so that it is no longer attached to the connector.
Remove it from the laptop, and replace it with the hard drive that you want to use instead.
Make sure the connectors of the drive face up, and push it gently into the direction of the connectors until it is firmly connected.

You can remove the cage from the old hard drive and add it to the new one, so that you can increase its stability with the help of the cage and the two screws.
Once done, put the back cover back on by sliding it in place at the bottom of the laptop and applying a bit of pressure.
Last step is to use the screwdriver one last time to close the back plate again and you are done.
What Next?
You do need to install an operating system on the drive obviously, which would be the next step. The laptop that I bought does not have an optical drive, which means that you will have to put the installation files on an USB flash drive or stick to install the operating system on it.
Advertisement


Martin, you say:
‘… In addition to that, it is also reducing the noise of the device as Solid State Drives do not emit noise. …’
I say:
In addition to this, it is also reducing the heat of the device as Solid State Drives do not emit (almost) heat.
I’m using all laptops at home with SSDs, Samsung 830 or Intel 520 (now ‘old’) with great joy!
Even my desktop ‘archive’ with 8x3TB HDDs boots from a small 40GB Intel SSD in less than 15 seconds…
Also it was a breeze cloning the original HDDs to the SSDs using Acronis True Home Image (could be Paragon Hard Disk Manager, etc.).
More, my old Dell Latitude D830 with 4GB RAM (and of course an SSD) feels like new! The same for the others.
Until they die I will buy no new machines!
You are right, no heat as well. Thanks for mentioning that.
Those tiny screws. I thought of an easy solution. Take a largish piece of paper and pierce it with each removed screw in the relative positions to where they were removed from the laptop.
I upgrade laptops at my job with SSD’s almost weekly and can attest to the speed difference. I eventually put one in my 1 yr old laptop and the speed boost is nothing but impressive!
My Wn 8.1 boot time went from about 15 seconds to 3 seconds. Programs launch almost immediately and overall much faster than before.
For those that still have Optical Drives, you can buy a converter that adapts your hard drive so you can plug it in and place it in your optical drive slot for secondary use. I haven’t done this, but might in the future.
Why not install both ?
I bought a Thinkpad E520 with 500GB 5400rpm hard drive. I added a 128GB mSATA SSD drive which hosts Windows OS (C) while the hard disk became drive D for data.
From the photos I’d say Martin would have to give up his internal wifi card to pull that off, even then I’m not sure it would fit. Looks like the long gap to the left of the wifi card has not actually got a second mini PCI-e socket, just room for one should they want to add it to some models of the laptop.
A word of warning. Some newer laptops can only accommodate low-profile 2.5″ drives (normally about 7mm tall rather than 9.5mm IIRC). If in doubt, check first.
i had a little dell netbook. to replace the hard drive i had to take the screws out from the back. insert a smaller pin into the same screw holes and pop the keyboard off from the front without destroying the paper thin ribbon wire running to the keyboard. with 8 gigs of ram and a 120gb ssd that was a kickass netbook until someone stole it