Ashampoo Snap 6 review

As a journalist, I take dozens of screenshots a day. Each article that I publish online has at least one screenshot that I take by myself. While Windows ships with options to take screenshots, either by using the print key which copies the screen contents to the clipboard, or by use of the Snipping tool which Microsoft integrated into Windows 7 and newer systems, it is nowhere near as good of a solution as using software specifically designed for the purpose.
Ashampoo Snap 6 is a screenshot taking software for Windows that leaves little to be desired. It does not only provide you with the means to take screenshots with a click, but also edit them in the built-in editor before you publish them using the software.
Installation
The installation is straightforward and should not be problematic. Note that the program will install the Ashampoo Toolbar on the system if you do not uncheck the option during installation. You can enter a license code on first start or use a trial version of the program first to see if it offers all the features you are looking for.
Ashampoo Snap 6
The program maps the print key automatically to a full screen screenshot of the system, which unfortunately cannot be remapped. I'd preferred to map it to take rectangular screenshots with it instead. A quick check of the options reveals that rectangular screenshots have been mapped to the F9 key and that the number of different tools are excellent. Next to full screen and rectangular screenshots you get options to create single window screenshots (Shift-F9), scrolling window screenshots (Ctrl-F9), free style region screenshots, fixed region shots, video captures and a couple of specialized options.
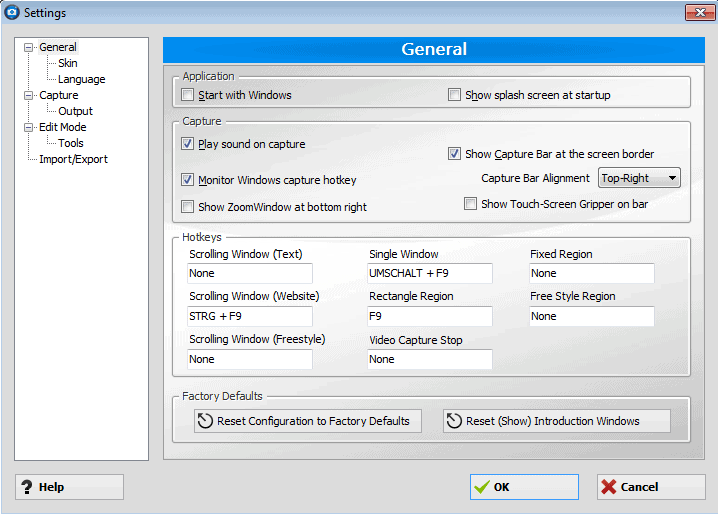
The program makes available two additional options to take screenshots. If you prefer not to use hotkeys, you can use the capture bar which it displays at the top right by default to take screenshots with a single click of the mouse, or by using the context menu of the program's system tray icon.
I prefer to use hotkeys as it is generally the fastest option, but if you feel more comfortable with the other options, you have them at your disposal. If you do not use the capture bar at all, I suggest you disable it in the options so that it does not irritate you at the top. You can also move it to another location if you feel more comfortable using it there.
Once you have taken a screenshot you are automatically taken to the image editor where you can edit it before saving it. The screenshot and editor window is displayed on top of the screen in full screen mode. The actual screenshot is highlighted on the screen and you can start using the editing tools available that Snap 6 displays on the left, top and right border of the screen.

The left and top menu provides you with editing tools. Here you can zoom in and out of the screenshot, resize and rotate it for instance. The editing tools leave little to be desired. You can blur or highlight contents, add text, arrows or icons, and apply effects to the screenshot. Some editing option display a selection menu next to it when you click on it that you can use to make a selection, while others display the options right in the editor. The selection option for instance displays options to pixelate, zoom or crop the selection right underneath the area you have selected on the screenshot.
The publishing bar is displayed on the right. Here you can save the screenshot locally, send it via email or upload it to Facebook or the Ashampoo server, print it out or copy it again to the clipboard.
Ashampoo Snap 6 can capture video besides static imagery. When you select the video capture option you are presented with a configuration menu. Here you select the area that you want to record. Options range from capturing the contents of a single window or the desktop to a fixed region or webcam. If you select fixed region, you need to select a specific format, e.g. 852x480 Youtube or 1600x900 PC from the available options. There is unfortunately no option to set a custom size here.
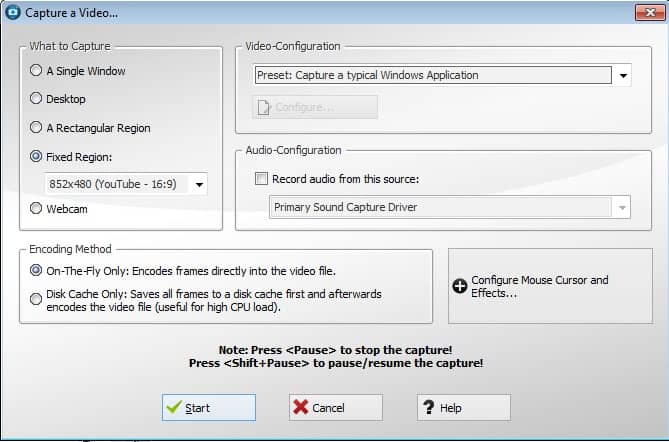
You get additional options to record an audio source and use one of the preset video configurations or create a custom one. If you select custom you are taken to a second configuration screen where you can change the frames per second and bitrate as well as the video and audio codec used in the capture.
A couple of mouse and cursor effects are also available. The program will highlight the mouse cursor by default and can also highlight left and right mouse clicks. The F10 key furthermore enables a zoom effect when you record videos that enables you to zoom in while recording the video. Finally, you also get to configure post process effects and video resizing options here.
Another interesting feature of Ashampoo Snap 6 is the watermarking feature. You can configure the program to automatically watermark images, or use the image editor to watermark only select screenshots manually.
Verdict
Ashampoo Snap 6 leaves little to be desired in terms of functionality. It provides you with all the screenshot taking options you would expect from a professional program. There are a couple of smaller things that I would change though, like an option to remap the print key to another capturing option or the ability to select custom fixed region sizes in the video recorder. All in all though it is everything that you could ever want in a screenshot taking tool.
Advertisement