How to Customize Default Line Spacing in Microsoft Word 2007, 2010

When you have made the move from older versions of Microsoft Office to Office 2007 or Office 2010, one of the first things that you notice in Word is the difference in default line spacing. By default there is more space between the lines.
You change it from 1.15 to 1.0 and there is very little difference. The other options are even more extreme. Sometimes you want to create a document with tighter line spacing than the default. This is true with Word 2010 as well.
This article will show how to customize the line spacing in Word 2007 and 2010, in which the default is 1.15. The 1.0 default spacing in Word 2003 is, for example, more compressed than it is in the new versions of Word and many users like this.
You may actually like the fact that the sentences don’t seem to be crammed together with the Word 2007/2010 default. Even so, this will give you the option of changing that if you need to.
Word 2007 and 2010 spacing

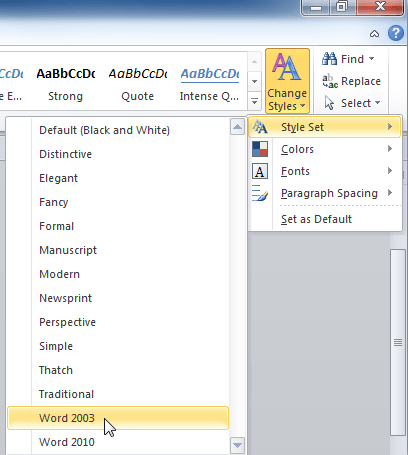
To change the line spacing for an entire document, go to the Styles section of the Home Ribbon and click Change Styles and select Style Set.

Hover the mouse cursor over each of the styles in the dropdown menu, the document will shift to that style and you can select the one you need. In the following screenshot, Word 2003 was selected and we can see how it changed the spacing.

And if you select the Manuscript style, you get a totally different spacing format.

This is certainly more versatile than simply choosing between 1.0, 1.15, 1.5, 2.0, 2.5 and 3.0. All you have to do is hover over any of the options and select the optimal format for your document.
If you want to select one of the style sets as a default every time you open a new document, go to Change Styles and select Set as Default.
This may seem obvious and simple, but it is surprising how many users are unaware of this useful option. It is easy to switch between defaults and even return to the original default setting. If you were pleased with the default setting in Word 2003, set that as the default. The same goes for any of the styles. You get the point.
It is also possible to change the line spacing in specific parts of a document. Simply highlight the portion of text in the document to change. Go to the Ribbon and in the Paragraph group, click the Line and Paragraph Spacing button.
Next, choose the spacing you want for that section of the document. This feature also has the live preview option to hover over the different spacing options and see how the section will look. By selecting Line Spacing Options, there are further tweaks to implement.
Word 2007 and 2010 offer a plethora of different formatting options. Use them to create any desired document format. All of the tweaks are in the Ribbon.


Hi:
I’ve tried to save MS 2003 as the default line spacing style several times but every time I open a new document I’m back to MS 2010 1.15 line spacing. Any thoughts?
thanks!
Nice tip. Thanks!