Record from your web cam in Linux with GUVCView

Recently I have had to do some video tutorials. I tried recording these tutorials with Ubuntu's default Cheese Webcam Booth, but unfortunately the combination of my Logitech Quickcam Pro 9000, Ubuntu 10.10, and Cheese didn't want to record video in any usable FPS. So I had to look elsewhere. My search turned me to GUVCView and I can't tell you how happy I have been with the results. Not only is this tool as easy to use as Cheese, it's far more flexible, and renders much better video. Let's take a look at installing and using this video recording tool.
What is it?
GUVCView is a GTK+ front-end for the capturing of video from devices supported by the UVC driver. GUVCView was based on the luvcview project created by the QuickCamTeam. With GUVCView you can capture video or images along with audio. You can also control the look of your captured images/videos with easy to use sliders and check boxes. There is no need to be a video or audio expert to get high-quality video with GUVCView.
Installation
Installation is simple. I will demonstrate in Ubuntu 10.10. To install this tool do the following:
- Open up the Ubuntu Software Center.
- Search for guvcview.
- Click the Install button associated with GUVCView.
- Type your sudo password.
- Accept any dependencies (if applicable).
Let the installation complete. Once the installation is finished, you will find GUVCView in the Applications > Sound & Video menu.
Usage
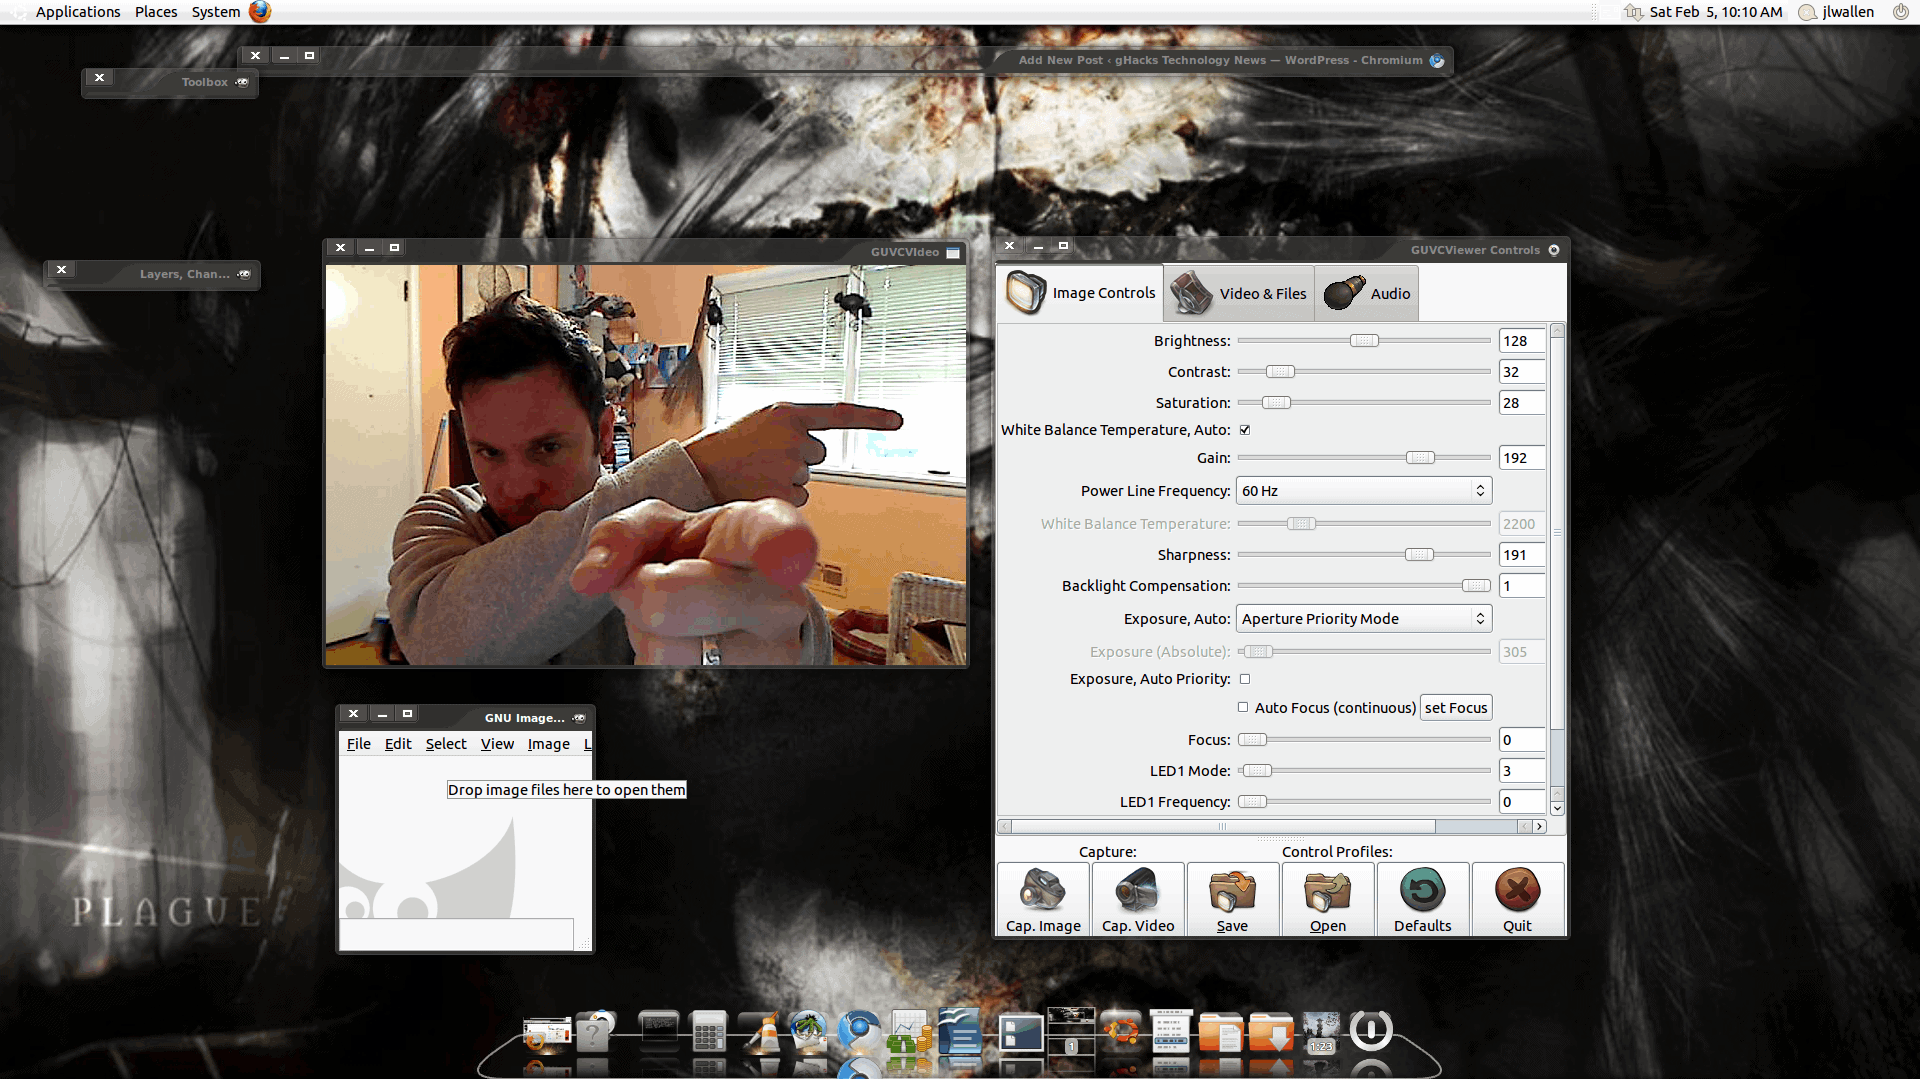
The basic usage of GUVCView is simple. When opened you will see two different windows. Figure 1 shows me pointing out the two different windows used by GUVCView. The left window is the preview window that will show a real-time viewer as you record your video (or take your picture). The right window is where you control the video and set up the options for the recording.
If you notice your camera is not auto-detected, you will want to go to the Video & Files tab and then see if your device is listed in the Device tab. If it is, but is not selected, go ahead and select it. If it is not listed, the camera might not be supported (or the drivers installed). Typically speaking, if your camera is supported in Cheese, it will be supported in GUVCView.
In this same tab you can select various options for your video recording. One very important option is the resolution. Remember, the higher the resolution the better the quality but the larger the file size.
Do the same for audio in the Audio tab. You might have to select a different Input device (depending upon the camera you have).
Once you have all of your options set up you are ready to record. To do this just make sure you are within the frame of the camera lense and hit the Cap. Video button in the control window. As soon as you click the Cap. Video button, you are recording. When you click the Cap. Video button it will change to Stop Video. To stop recording click th Stop Video button and the file will automatically be saved.
Final thoughts
GUVCView, from my perspective, is a much better means of recording video than Cheese. This especially applies if the video you are recording is to be used for something other than, say, Skype chatting.
Advertisement


What is dev default for sample rate?
Try installing :Linux Mint.
Hi, I am still stuck with nothing to use with Linux. Guvcview has great photo quality but when the photo works I get no sound. When the sound works, I get no video. I have been searching for weeks now for something that works to record videos. Webcamoid has terrible sound quality. Any ideas, anyone?
Did you
get a chance to check out
QtCAM? It’s opensource and is a powerful Linux camera application that you might
want to look at.
So thankful for this post since I (ubuntu 12.04) was having trouble with Cheese Webcam Booth due to an audio/video lag but it’s resolved with GUVCView :-)
@Porup the photos are saved to your Home folder. To get there go to places->Home Folder
@J.M. Porup
I don’t know if you modified the standard-setting, so you have to to go to “Video & Data” and set the Video-Codec to e.g. MJPEG or MPG4-AVC (H264) and the Video-Format to AVI or MKV.The field Video-File should contain the filename: e.g. capture.avi. That’s all
hi Marko
Thanks. I haven’t modified any of the standard settings. I can see the filename capture.avi. But how do I get to it once I’ve recorded it?
So I hit the Save button, and it offers to save this weird gpfl file…
any more ideas???
OK… so I Cap Video, I Stop Video…. then what??? I try to save the file, it gives me some weird extension “.gpfl”, I google this and there is *nothing* out there!
How do I find and playback the videos I record?
thanks!!!
jmp
I have been trying to do video editing on Linux for years, and while it was pretty decent just a few years ago, alot of video processing applications have broken over the years, and developers have not bothered to fix the bugs with newer Linux releases and package upgrades.
Cheese gives me choppy video, and while GVUCview is much better than cheese for video recording, it still comes out very choppy and with some tweaking is still unusable.
At this point I feel forced to use online video recording or duel boot with another operating system to get any decent video processing done.
Hey, thanks for your article. My Logitech C270 runs well under Opensuse 12.1 and GUVCView. At first i had to clone the GIT-Repo via:
1. git clone git://git.linuxtv.org/media_build.git
2. cd media_build/
3. ./build
4. make install
this is (maybe) necessary to get the module for your cam. I wrote “maybe” cause i didn’t tried it before the install.
Mine, using siduction (debian sid derivative), crashes (guvcview 2.0) when I click the capture button.
Used to work well earlier in aptosid.
Yes I get the same problem on ubuntu 11.10. when I click on Cap Video the application just closes.
Any idea how to fix this? My cam is detected and selected.
@dpt & @drifter – see bug here: https://bugs.launchpad.net/ubuntu/+source/guvcview/+bug/872026 and specifically comment #25 here: https://bugs.launchpad.net/ubuntu/+source/guvcview/+bug/872026/comments/25
Found after having the same issues. Looks like a bug in the app itself for earlier versions that has been corrected in 1.5.3.
@Jack Wallen – This is so much better than Cheese it’s not even funny.
Jack,
Thanks for saving my sanity today. I installed GUVCView and saw beautiful video on my screen and great image adjustment controls, but no way to start/stop recording. I must have searched for half an hour before I found your screenshot showing the blindingly obvious Capture Video button.
Turns out that on my little netbook, the default height of the text-and sliders part of the window filled my screen exactly, looking like it was intended to stop there, with the buttons completely invisible. After seeing your image, I was able to drag the divider between scrollable controls area and buttons up until I could use the buttons.
Now I see why nobody bothered to write instructions for start/stop recording…
Loren
man dont know when you published this but it was just in time for me apparently. yup works like a charm, so superior to cheese!
now i just need to get rid of the loud background buzz so i can get a clear audio track too!
great app thanks
This is great! For over a year my 9000 webcam has worked with Skype, but with too much exposure and slow jerky video. It was barely acceptable.
Installing guvcview, it was initially the same when using this program, but guvcview allows you to change the webcam parameters. Simply by hitting the “Set to Default” settings button, the picture became beautifully balanced and fluid in guvcview – and the settings were then used by Skype as well. So now it works as well as it ever did in Windows.
So guvcview is a great tool for tuning your webcam generally.
Thanks,
Darren