Use Top Shelf to keep track of what you are working on

As a writer one of the most important things for me is to keep organized. This may seem like a fairly simple task, but when you are doing everything from researching a topic to piecing together a much larger work, having fast access to all of the particular documents you are working on can make the difference between efficient work and a catastrophe.
There are many ways to keep yourself organized. I've seen writers keep spreadsheets, use tools like Basket or OneNote, scratch notes on pieces of paper, or you can take the Anne Rice approach and plaster your house with Post It Notes. I prefer a much simpler task that add a simple panel applet that allows me to add files to keep track of everything I am working on at the moment. This tool? Top Shelf. In this article I am going to introduce you to this tool, how to install it, and how it works.
What is it?
Top shelf is like a combination of the Recent Documents menu and the Favorites menu, only you get to quickly determine what it contains at any given time. It lives on your GNOME panel and allows you quick and easy access to a list of files and/or their containing folders you have added. I like to use this for one project (it works best for larger projects) at a time. As the project grows, so to will the file list grow. It doesn't matter if each file is contained in a different folder on your machine, you can add it. You can even add a shared folder from another computer if necessary (so long as you have access to that file). And, best of all, Top Shelf is very unobtrusive. You won't even notice it until you need it.
Installation
As you probably have grown to expect, the installation of Top Shelf is simple. But Top Shelf is currently only available in binary form for Ubuntu. For other distributions you will have to install from source. To install in Ubuntu follow these steps:
- Open up your Add/Remove Software tool.
- Search for "top shelf" (no quotes).
- Mark Top Shelf for installation.
- Click Apply to install.
That's it. Now, if you are using a different distribution you will need to follow these steps:
- Download the source from the main page.
- Open a terminal window.
- Change to the directory housing the download.
- Issue the command
tar xfzf topshelf-XXX.tar.gz(where XXX is the release number). - Change into the newly created directory with the command
cd topshelf-XXX(Where XXX is the release number). - Change to the root user.
- Issue the command
make install
That's it. You are now ready to add the Applet.
Adding the applet
This is as simple as adding any other applet. Right click your GNOME panel and select Add To Panel. In the new window scroll down until you see Top Shelf, select Top Shelf, and click Add. You will now see the Top Shelf Icon on your panel.
Using Top Shelf
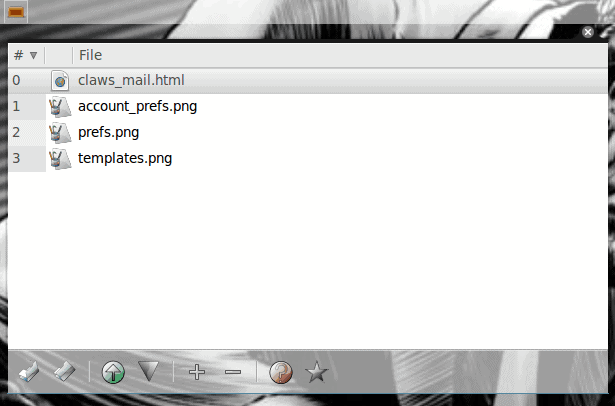
If you click the Top Shelf icon the Top Shelf window will appear (see Figure 1). In this new window you can add/remove files, open any of the currently listed files, open a files' containing folder, and change the order in which the files are listed. To open a file simply double click on the file you want to open. To open a containing folder right-click the file and select Open Folder.
Final thoughts
That is all there is to Top Shelf. As simple as this application is, you will be amazed at how much it will help you keep your current working project organized and give you quick access to those files.
Advertisement


