Install osTicket for a free (open source) help desk tool

The consulting firm I work for has tasked me with finding a good help desk system for us to use. I have spent quite a bit of time trying to find a solution that both has the features we need and isn't too costly. There are a LOT of help desk tools available. Some of them simply price themselves out of the middle-market. Others just don't have the necessary features. Still, some don't work. So this task has become quite the chore.
But during this process I thought I would share with you some of the tools I have tried. This one in particular is an open source trouble ticket tool called osTicket. osTicket has a fair amount of features - especially for a free system. It's not ideal, but it's far from the bottom of the barrel. The installation is fairly simple and straight-forward. And, it requires a database, so you know your tickets will scale better than your average ticket system using a flat file.
In this article I will show you how to get osTicket up and running.
Requirements
osTickets has few requirements:
- PHP >= 4.3
- MySQL >= 4.1
- php5-mysql
That's it. Of course you will have to be able to create a database for the tool. I prefer to use MySQL Workbench (read my article "Complete database administration with MySQL Workbench" for more information.)
Once you have all the requirements met, it's time to download the file and start the installation. The beginning steps are:
- Move the osticket-XXX.tar.gz (Where XXX is the release number.)
- Create a directory for osTicket to live (let's call it /var/www/support) with the command sudo mkdir /var/www/support.
- Unpack the osticket package with the command sudo tar xvzf osticket-XXX.tar.gz.
- Move the necessary files from the newly created /var/www/osticket-XXX/uploads into /var/www/support with the command mv /var/www/osticket-XXX/uploads/* /var/www/support.
- Change the name of the ost-config.sample.php file with the command mv /var/www/support/include/ost-config.sample.php /var/www/support/include/ost-config.php.
- Give the ost-config.php file write permissions with the command chmod 777 /var/www/support/include/ost-config.php.
- Finally, point your browser to http://ADDRESS_TO_SERVER/support/setup to start the installation process.

When you start up the web interface you will find a few simple configuration options. Fill those out and click the Install button. After this runs you will be instructed to remove write access to the ost-config.php file. Do this with the command sudo chmod ugo-w /var/www/support/include/ost-config.php. Now you can log into the admin panel with the username/password combination you created in the web setup.
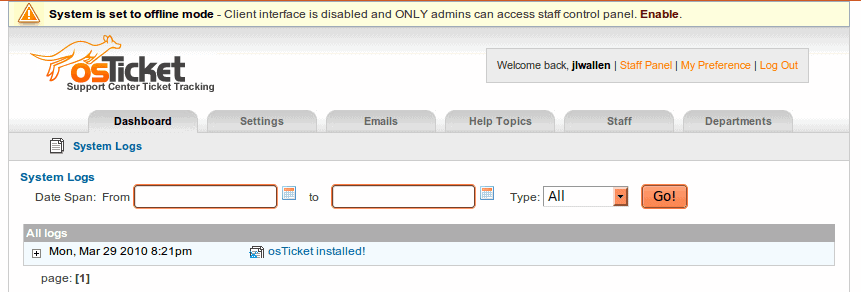
By default the system is set to off-line mode. This means the interface is only accessible to admins. You will see, at the top of the interface, a small link that allows you to Enable the interface for clients (see Figure 2). When you click that link you will open up the settings panel and, at the top of that page, you can mark your osTicket installation to be online. From this same page you can also configure the rest of your osTicket installation.
Final thoughts
Although osTicket doesn't have every feature needed for a consulting firm, it does offer more features than most of the free offerings. If you're looking for a help desk system, and your budget practically demands open source, you would be remiss to neglect osTicket.
Update: osTicket is no longer available, the website returns a 404 not found error.
Advertisement


Thank you very much for sharing
you are just great I’ve finally installed my osticket but now at the begging I’ve gave one URL for the Helpdesk URL: and now I’m trying to change it, do you know how I can change it cause I’ve went to the admin panel and is not saving me the new one do I have to unistall it? could you help me to do it?
I followed the steps verbatim, but when I get to step 7 I always receive Page Not Found in the browser (even when using the browser locally on the server). During the install of my CentOS server I disabled both the firewall and SELinux. I can verify that Apache and PHP is working as I setup two test files: index.html and index.php.
All other forums make the install sound so easy, so it has to be something I am overlooking :-)
I really want to get this working because when it is up and running it will replace our existing Microsoft CRM system which is horrid!!
have u tried otrs (http://otrs.org/)? it’s also open source and very powerful.
otrs is very powerful, but it is also very resource hungry (pegs processor whenever you access pages).